
User Manual

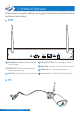

Reset button: Press reset button for 10 seconds to restore factory setting
and enter into matching-code mode.
Photosensitive: Used to measure light and control the turning on of infra-
red light.
5
HDD installation
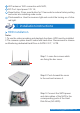
1.To use the video recording and playback functions, HDD must be installed.
2.The camera system doesn't come with hard drive. Recommend to choose
an Monitoring dedicated Hard Drive in SATA III 3.5", 1-2TB .
Step 1: Loose the screws which
are fixing the box cover.
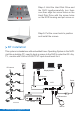
Step 3: Connect the SATA power
and data cables of the NVR to the
corresponding ports of the Hard
Disk Drive.(NO HDD).
Step 2: Push forward the cover
to the end and remove it.
Notes:
WiFi antenna: WiFi connection with NVR;
DC Port: Input power 12V 1A;
installation instructions
03
technicalreply@qacctv.com