ABRASIVES USER GUIDE 1-85-JOOLTOOL BUY SUPPLIES AT WWW.JOOLTOOL.
THANK YOU HI, I’M ANIE Thank you for purchasing the award-winning JOOLTOOL™ X System. I designed it with YOU in mind. In case you didn’t know, I began my career at a very young age as a jeweler, designer and gemologist for my father’s business. That’s me in the picture above, working at the bench when I was just 11 years old. Customers’ pieces had to be finished quickly and beautifully so I constantly created new tools to make work easier and more productive.
TABLE OF CONTENTS SAFETY KNOW YOUR JOOLTOOL QUICK START p.4 p.5 p.6 QUICK REFERENCE ABRASIVES, BACKPADS & CUSHIONS USE & MAINTENANCE p.7 p.8 p.9 DRAWER, HOOD & ATTACHMENTS p.10 p.11 p.12 p.13 PORTABLE & HORIZONTAL MODES TOOL REST - CHISEL SIDE TOOL REST - DRILL BIT SIDE SHARPENING BASICS p.14 LAPIDARY HARD STONES MINERAL WATCH CRYSTAL HARD GLASS p.15 p.16 p.17 p.18 p.18 p.18 LAPIDARY SOFT STONES POLYMER CLAY & RESIN - FLAT OR DETAILED PIECES POLYMER CLAY & RESIN - DOMED OR ROUND PIECES p.19 p.
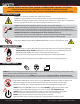
SAFETY PLEASE READ & UNDERSTAND THIS BEFORE OPERATING THE JOOLTOOL™ NOTICE: SAFETY INSTRUCTIONS CANNOT ADDRESS EVERY POSSIBLE SITUATION PLEASE USE THE INFORMATION CONTAINED IN THIS DOCUMENT AS GENERAL GUIDELINES. ALWAYS USE COMMON SENSE AND KEEP SAFETY A PRIORITY WHEN OPERATING YOUR JOOLTOOL SYSTEM. ELECTRICAL SAFETY ALWAYS use a properly grounded 110 / 240V electrical outlet. ALWAYS use approved electrical outlet adaptors when using the unit outside of the U.S.A.
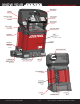
KNOW YOUR HOW TO REFER TO PARTS BY NAME BACKPAD SEE-THRU DISC HOOD (REMOVABLE) MAIN PLATE LOCKING KNOB OF TOOL REST FOR TOOL REST MAINPLATE (IF EQUIPPED) (IF EQUIPPED) RIGHT POST OF TOOL REST (IF EQUIPPED) LEFT POST LOCKING KNOBS OF TOOL REST (IF EQUIPPED) FOR TOOL REST POSTS SPINDLE SLOT (REMOVABLE) FOR SNAP HOOK IN HORIZONTAL MODE ALUMINIUM BODY ON/OFF SWITCH WITH SPEED CONTROL VACUUM PORT DRAWER & WATER TRAY EJECT BUTTON & BUILT-IN SNAP HOOK BASE DOCK (REMOVABLE) ALIGNMENT HO
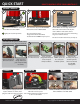
QUICK START HOW TO QUICKLY SETUP YOUR JOOLTOOL™ SECURE THE BASE 1 2 b 3 a a Press EJECT BUTTON to release the tool from the BASE/DOCK Slide machine away from ALIGNMENT PINS to detach from BASE/DOCK b Lightly tilt machine upwards To re-attach after Step 3: -Align and slide tool onto PINS. -Push down until HOOK snaps in place. Set the BASE close to edge of bench or table and secure with screws of your choice. Refer to 4 locations above.
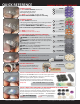
QUICK REFERENCE SUMMARY OF ITEMS AND THEIR USES GRINDING & FILING Use 3M™ PURPLE CERAMIC abrasives for: - Sprue removal from castings - Grinding & filing your piece Use HIGH speed for 80 Grit, 120 Grit, 220 Grit Use these with CUSHIONS to improve contouring. LAPPING & SANDING Use 3M™ TRIZACT abrasives for: - Flat lapping, Knife-edge finishing, Fine Sanding on Metals - Light beveling and scratch removal on Glass Finish with CERIUM OXIDE and FELT DISC on Glass (p.
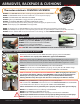
ABRASIVES, BACKPADS & CUSHIONS The motor rotation is COUNTER CLOCKWISE ALWAYS turn JOOLTOOL “OFF” before installing/changing BACKPADS or ACCESSORIES. NEVER install BACKPADS while the motor is “ON”. This can cause personal injury. ALWAYS install BACKPADS with ABRASIVE side DOWN. ALWAYS tighten your BACKPADS snuggly onto the spindle before use. ALWAYS use GENUINE JOOLTOOL™ BACKPADS & ORIGINAL spindle. This will guarantee that your discs will be perfectly centered and give you optimal results.
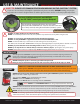
USE & MAINTENANCE ! PROPER OPERATION & CARE OF YOUR TOOL ANIE’S TIP: PLEASE USE COMMON SENSE WHEN WORKING ON THE JOOLTOOL™ SYSTEM If you are not sure how to accomplish a particular task, please consult us BEFORE starting your project. Stay within the Jooltool’s designed limits to achieve great results as well as a safe & enjoyable experience. For best visibility and control, work WITHIN the SEE-THRU™ area of your spinning Backpad.
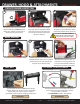
DRAWER, HOOD & ATTACHMENTS STORAGE DRAWER & WATER TRAY USEFUL FEATURES 1 2 3 Pull the tab under the speed control switch to slide the DRAWER out from under your Jooltool. Push to slide in. Great for storing small items! The drawer transforms into a handy water tray. Slide it completely off the tool, then mount it by inserting the 2 locator pins into the 2 holes at the top of the Jooltool. The drawer/water tray can hold water for quick access to lubrication when performing lapidary work. (p.
PORTABLE & HORIZONTAL MODES HOW TO SWITCH ! WARNING: NEVER USE THE JOOLTOOL WITH SEE-THRU BACKPADS IN HORIZONTAL OR PORTABLE MODES! THESE MODES ARE ONLY FOR USE WITH 3M RADIAL BRISTLE BRUSHES & PURPOSELY DESIGNED ACCESSORIES. ALWAYS DOCK THE TOOL VERTICALLY ON ITS BASE WHEN USING SEE-THRU BACKPADS! NEVER TRY TO SHARPEN WITH SEE-THRU DISCS WHILE IN HORIZONTAL OR PORTABLE MODES, THIS NULLIFIES THE SEE-THRU EFFECT AND CAN CAUSE YOU TO LOSE CONTROL OF THE WORKPIECE.
TOOL REST - CHISEL SIDE MULTIPLE FUNCTIONS SETUP & SHARPEN COMMON CHISELS LOCKING MODE ICON KNOB The Tool Rest has a rotating MAIN PLATE which has 2 sides/functions: -One side helps set bevel angles on square-edged Tools such as Chisels MAIN PLATE GUIDE(s) -The other side helps you sharpen Drill Bits to precise degrees. LEFT-HAND POST INSTALL THE TOOL REST 1 RIGHT-HAND POST (UN)LOCKING THE PLATE 2 UNLOCK S S LOCK Slide the Posts into the mounting holes as shown.
TOOL REST - DRILL BIT SIDE 1 2 ICON DISC ROTATIO N ABRASIVE Rotate the main PLATE to the DRILL BIT side (ICON). Set the desired angle by aligning indicators on LEFT-HAND post with the ANGLES indicator. The most common setting is 118 degrees Lock with LOCKING KNOB. 3 SHARPEN COMMON DRILL BITS RECOMMENDED DRILL BIT SIZES DRILL BIT ANGLE The resulting drill bit angle will be as set in STEP 1. Use coarse grade abrasives such as 3M Purple Ceramic to regrind damaged bits.
SHARPENING BASICS HOW TO SHARPEN , FREE-HAND STYLE ANIE’S TIP: Know what you want to accomplish and use the correct abrasive for the task. Using the right abrasives increases productivity, the quality of your work and the longevity of your abrasives. Always start off with a finer abrasive, you can use a coarser grade if you need more abrasive power. ! The motor rotation is COUNTER CLOCKWISE.
SHARPENING FOLLOW THESE STEPS TO SHARPEN 1 2 SETUP Apply CUSHIONS to BACKPADS. FELT does not need a cushion. 3 Apply abrasives onto BACKPADS (with the CUSHIONS applied). ! Prepare FELT DISC as shown in your USER’S GUIDE and VIDEO IMPORTANT: Stay within your see-thru area of the disc. Avoid pointing the cutting edge towards rotating disc NOTE: You can use the TOOL REST accessory to sharpen your edges to precise angles. (p.
POLISHING BASICS HOW TO USE YOUR SEE-THRU™ FELT DISC NEVER use felt with WATER. It can absorb it and disintegrate! NEVER force a sharp tip into the spinning FELT DISC. It will DAMAGE it. NEVER use outer perimeter of FELT DISC to polish, it may cause loss of control of workpiece. ALWAYS apply compound from UNDERNEATH of wheel, NOT from the EDGE or the TOP. ALWAYS store FELT and compound in a DRY location. It can absorb moisture and disintegrate.
JEWELRY POLISHING 1 2 ALL METALS* 3 Apply Scratch Eraser on BACKPAD Apply and Prepare FELT DISC HOW TO SHAPE & POLISH SETUP Apply Abrasives onto BACKPADS. ANIE’S TIPS: - Use these steps for jewelry, car parts, custom metal work, etc.. - Always let your abrasives do the work, use a gentle touch, do NOT use force! - Gently apply your piece to the spinning abrasive disc, making full contact.
LAPIDARY MINERAL CRYSTAL HARD GLASS 1 SETUP Apply CUSHIONS to BACKPADS. FLEX DIA. & FELT don’t need cushions. 2 3 Apply abrasives onto BACKPADS (with the CUSHIONS applied). ! SAFETY FIRST! Always wear eye and respiratory protection. Use Water Tray to apply water to the workpiece during every step. HARD-STONE LAPIDARY ADD-ON KIT: Item# K-1001 (Hard Stones: Mohs 7 +) ALSO WORKS ON SOFT STONES (as on p.
LAPIDARY SOFT STONES 1 HOW TO SHAPE & POLISH 2 SETUP Apply CUSHIONS to BACKPADS. FELT & BUFF don’t need cushions. 3 Apply abrasives onto BACKPADS (with the CUSHIONS applied). ! Use Water Tray to apply water to the workpiece during every step. SAFETY FIRST! Always wear eye and respiratory protection.
POLYMER CLAY & RESIN 1 2 SETUP Apply CUSHIONS to BACKPADS. FELT & BUFF don’t need cushions. FLAT PIECES Apply abrasives onto BACKPADS (with the CUSHIONS applied). 3 ! Prepare FELT DISC as shown in your USER’S GUIDE and VIDEO Avoid using the edge to prevent cutting grooves in the clay. STEP 1 SHAPE your clay Use 3M Microfinishing Film 15 Mic. (Orange/Translucent) Hold the piece FLAT against the spinning abrasive.
POLYMER CLAY & RESIN HOW TO SHAPE & POLISH DOMED OR ROUNDED PIECES NOTE: Abrasives shown are included in POLYMER CLAY UPGRADE KIT (Item# K-1005-5) and can be purchased at JOOLTOOL.COM 1 2 SETUP Apply FOAM CUSHIONS to BACKPADS. BUFF does not require a cushion! SAFETY FIRST! Always wear eye and respiratory protection. ! Apply ABRASIVES over FOAM CUSHIONS applied to BACKPADS. FOR DOMED OR ROUNDED PIECES ONLY! IMPORTANT: Do NOT use on pieces with sharp edges.
GLASS WATCH CRYSTAL 1 REMOVE SCRATCHES & POLISH GLASS* 2 SETUP Apply CUSHIONS to BACKPADS. FELT & BUFF don’t need cushions. Apply abrasives onto BACKPADS (with the CUSHIONS applied). FOR DOMED OR FLAT GLASS 3 ! Use Water Tray to apply water to the workpiece during every step. SAFETY FIRST! Always wear eye and respiratory protection. WATCH CRYSTAL POLISHING ADD-ON KIT: Item# K-1004 IMPORTANT: Stay within your see-thru area of the disc. Avoid using the edge to prevent cutting grooves in the glass.
ENAMEL / FUSED GLASS LAMP WORK 1 SETUP Apply CUSHIONS to BACKPADS. FELT & BUFF don’t need cushions. 2 HOW TO SHAPE & POLISH 3 Apply abrasives onto BACKPADS (with the CUSHIONS applied). ! Use Water Tray to apply water to the workpiece during every step. FOLLOW THESE STEPS TO TAKE ENAMEL FROM ROUGH TO A HIGH POLISH 1 STEP 1 VERY FAST GRINDING & SHAPING of your piece Use 3M Flex-Diamond (X COARSE ) abrasive for VERY AGGRESSIVE material removal.
QUICK-MOUNT FLEXSHAFT (some items below may be sold separately) ! FOR SAFETY: POWER “OFF” BEFORE INSTALLING FLEXSHAFT AND/OR ACCESSORIES INSTALL THE FLEXSHAFT 1 HOW TO SETUP AND USE INSTALL/CHANGE A HANDPIECE 2 1 2 a Slide the Flexshaft Connector Hub onto the Jooltool spindle. This is similar to installing Backpads onto the Spindle. Tighten the connector Hub firmly onto the JOOLTOOL spindle.
DRILLING HOW TO DRILL USING THE FLEXSHAFT AND HANDPIECES (some items below are sold separately) ! 1 ! FOR SAFETY: POWER “OFF” BEFORE INSTALLING FLEXSHAFT & ACCESSORIES INSTALL THE DIAMOND BURRS/DRILLING BITS (EXAMPLE SHOWS #30 HANDPIECE) 2 Insert the desired bit into the handpiece chuck/jaw. Note: Make sure the jaw is opened wide enough to fit the bit. Using the chuck key, tighten the jaw. Note: Check if the bit is centered by rotating the chuck by hand.
SILVERSMITHING & PEARL VISE USEFUL TIPS (some items below are sold separately) ! FOR SAFETY: POWER “OFF” BEFORE INSTALLING ACCESSORIES Deluxe Mini Buffing Wheel (Cotton): - Get Final High Polish with Jooltool Compound - Use Medium to Hard pressure for a High Polish Please use caution, common sense and keep safety a PRIORITY! Mini Felt Polishing Bobs: 3M Scotch-Brite EXL Wheels (Grey): - Use after Scotch-Brite EXL (Grey) wheel - Use with Jooltool Mini White Compound Bar - Medium to Hard pressure fo
BRUSHES HOW TO USE 3M™ SCOTCH-BRITE™ RADIAL BRISTLE BRUSHES DESCRIPTION Made from patented abrasive technology, these are the safest alternative to wire brushes and buffing wheels. They are flexible and conform to irregular surfaces and tight, complex areas. They work great on metal, wood and even some coatings for sanding, cleaning, brushing, finishing and polishing. Each grade has a specific color so you always know which one to use for your project.
TROUBLESHOOTING ! HOW TO SOLVE ISSUES YOU MAY ENCOUNTER SAFETY FIRST! Make sure JOOLTOOL power is “OFF” when performing inspection and adjustments. If you are unable to perform any of the solutions described below, contact an authorized JOOLTOOL service center SYMPTOM Jooltool will not start POSSIBLE CAUSES SOLUTIONS 1. JOOLTOOL not plugged in power outlet. 1. Plug JOOLTOOL in power outlet. 2. Fuse blown or circuit breaker tripped 2. Replace fuse or reset circuit breaker 3. Cord damaged 3.
TECHNICAL DIMENSIONS AND SPECIFICATIONS 9$&880 3257 ,QQHU 'LDPHWHU LQ PP P P LQ PP LQ PP LQ PP LQ 2XWHU 'LDPHWHU LQ PP (5*2120,& 7,/7 PP LQ ELECTRICAL SPECIFICATONS MOTOR Constant Voltage: 12.0 V Current: 5.0 A nominal (19 A max) Output: 45 W (110 W Max) Direction: CCW Speed: 0-5000 RPM Note: Actual speed may depend on current and load.
WARRANTY JOOLTOOL LIMITED WARRANTY Anie sets the highest design and quality standards on the products that bear her name. At JOOLTOOL by Anie™, they go through rigorous inspection to ensure that our tools give your years of reliable service.
TRAVEL TIPS HOW TO PREPARE YOUR JOOLTOOL™ FOR TRAVEL Anie designed the JOOLTOOL™ X to be as compact and light as possible. It is compatible with 110V to 240V power. This makes it a perfect companion at your favorite club meeting, trade show or wherever your projects take you. ANIE’S TIP: In certain cases, Anie’s ESSENTIALS BAG may be considered a personal item, similar to a large purse or backpack. Check with your airline or carrier for details and restrictions.
YOUR ABRASIVE GRADES, ORGANIZED 3M FLEXIBLE DIAMOND (COARSE) Use with CUSHIONS 3M MICROFINISHING DIAMOND Use with CUSHIONS 3M PREMIUM DIAMOND Use with CUSHIONS 3M CERIUM OXIDE 3M CERAMIC PURPLE Use with CUSHIONS 3M TRIZACT™ Use with CUSHIONS 3M MICROFINISHING FILM Finish level shown with JOOLTOOL Compound FELT and BUFF 3M SCOTCHBRITE™ WHEELS 3M RADIAL BRUSHES ABRASIVE FINISH SANDING 120 Grit 125 Mic Mic 74 Mic Toll Free: 1-85-JOOLTOOL 250 Mic PRE-POLISHING 6 Mic Mic Mic 20 Mic