Caboose Ultralight Instruction Manual 45X Series Patent No. 5,622,375 Joovy • 2919 Canton Street • Dallas, TX 75226 • (877) 456-5049 • Fax: (214) 761-1774 Email: customerservice@joovy.com • Web Site: www.joovy.
! WARNINGS ! Please read this instruction manual completely before using this stroller. Keep these instructions for future reference. • • • • Failure to follow these instructions could result in serious injury or death. Never leave child unattended. Avoid serious injury from falling or sliding out. Always use safety belts and ensure that all children are positioned according to these instructions. • Keep all small parts out of reach of children while assembling the stroller.
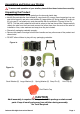
Assembling and Using your Stroller ! To ensure safe operation of your stroller, please follow these instructions carefully. Unpacking the Product • Carefully remove stroller and all parts from the box and plastic bag. • Identify the parts (stroller, front wheels (2), rear wheels (2), canopy, parent organizer, tray, car seat carrier support, rear axle, small washer (2), large washer (4), spring washer (2), snap pin (2), hub cap (2), red plastic cap, and documents) with the pictures in Figures 1a and 1b.
Unfolding the Stroller • Keep children away from stroller while unfolding. • Position the stroller with the handle bar closest to you. • Release the locking latch located on the right side by lifting the lever off of the extended rivet. See Figure 2. • Lift up slightly on the handle of the stroller. Then place one foot onto the rear platform and pull up and back on the handle until both side frame bars snap into their locking positions in the frame.
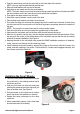
• Push the axle across and into the axle hole on the other side of the stroller. NOTE: you may need to guide the axle into this hole. • Slide one small washer over one end of the axle. • Next place a rear wheel over the the small washer. NOTE: The brake teeth on the wheel should be facing inward toward the red brake lever AND the arrow shapes on the tire tread should point toward the handlebar. • Then place one large washer over the axle. • Next slide a spring washer over the end of the axle.
Front Wheel Locks The front wheels can be either in swivel mode or locked mode. • To put the front wheels in their locked mode, first rotate each wheel set so that the wheels are pointed straight ahead. • Pull up on the lever to engage the small tab on the lever with the slot in the plastic frame sleeve. The lever can be either facing forward or rearward to lock the wheels. See Figure 6. • To unlock the wheels and put them into swivel mode, push down on the lever to disengage the tab from the slot.
Figure 7 Figure 8 Figure 9 Figure 10 ! WARNING Possible pinching hazard - Be careful when closing and opening the side hinges so as not to pinch your fingers. Attaching/Detaching the Front Tray • To attach the front tray, line up the female fittings on the tray with the male fittings on the front of the stroller and push inward until the fittings snap into place. See Figure 11. Pull outward on both sides of the tray to be sure both are snapped securely in place.
Rear Wheel Brakes • Before placing any child into the stroller or removing them from the stroller, be certain that the rear wheel brakes are engaged. • To engage the rear wheel brakes, push down on the brake lever located on each rear wheel. See Figure 13. The stroller may require slight forward or rearward movement in order to line up the teeth on the brake with each wheel brake cluster. • Check that the brakes are properly applied by attempting to push the stroller backward and forward.
Securing the Front Seated Child • Ensure that the two snaps on both armrest pads that hold the seat onto the frame are securely snapped together. • Ensure that both shoulder straps are attached to the waist strap buckles. See Figure 17. • Unlatch the waist/shoulder buckle by squeezing the latch releases on both sides of the buckle and removing the male ends of each buckle. • Carefully place the child in the stroller seat with the shoulder straps over their shoulders and chest.
Seatback Positioning The front seat has two positions. The fully upright position should only be used for a child that is at least 6 months old. • To place the seat in the upright position, push the bar on the rear of the seat toward the front of the stroller and rotate the seatback towards the front of the stroller until this bar is locked in its lowest position. See Figure 21.
Storage Basket Please note there is elastic on the basket sides for easy access, or, you can access the storage basket by sliding the rear bench seat forward or backward. The maximum weight that can be carried in the storage basket is 5 pounds. Excessive weight may result in a hazardous unstable condition. Using the Rear Bench Seat • Push the bench seat to its most rearward position. NOTE: that there are webbing straps attached to the bottom of the rear seat pad.
Using the Stroller as an Infant Car Seat Carrier • To use the stroller to carry an infant car seat carrier, you must replace the Front Tray with the Car Seat Carrier Support. • Remove the Front Tray by pressing in on the lock tabs and pulling the tray off the brackets. Store the tray in a convenient place for later use. • Line up the female fittings on the Car Seat Figure 25 Carrier Support to the male fittings on the front of the stroller and push inward until the fittings snap into place. See Figure 25.
! IMPORTANT NOTE When using your stroller as an infant car seat carrier, the following are the compatible infant car seat models that the Caboose Ultralight will accommodate: • Evenflo® Embrace™ • Baby Trend® Latch-Loc and Flex-Loc • Graco® Safe Seat™ • Britax® Companion™ • Graco® Snug Rider™ Series • Chicco® Key Fit Car Seat • Maxi Cosi Mico • Combi® Centre Series • Peg Perego® Primo Viaggio • Combi® Connection • Compass® Light and Portable Infant • Peg Perego® Primo Viaggio SIP Car Seat • Safety 1st® Desi
Folding the Stroller • Keep children away from stroller while folding. • Remove any infant carrier that has been installed on the stroller. Note that the stroller can still be folded with the car seat carrier support in place. • Position the stroller with the handle bar closest to you. • Place the canopy into its closed position and push it all the way forward toward the Figure 28 front of the stroller as far as it will go. • Make sure both rear wheel brakes are set to their locked positions.
Installing the Parent Organizer • Separate the hook & loop attachments in the open slot of the Organizer. • Orient the Organizer so that the cup holder is facing toward the front of the Caboose. See Figure 31. • Stretch the Organizer outward and slide it down over the handlebar until it just comes into contact with the red trigger releases. • Press the hook & loop attachments together to secure it in place. Figure 31 ! WARNING For use ONLY on the Joovy Caboose Stand-On Tandem Stroller.
SATISFACTION GUARANTEED We want you to be completely satisfied with your purchase of this product. Should you experience any difficulty in assembling or using this product, or if you have any questions, please contact our Customer Service Department at (877) 456-5049 between the hours of 8:30 am and 5:00 pm Central Time. Deluxe neoprene parent organizer 2 Cup holders Zippered pocket Three additional pockets No tools needed for installation Reversible two-sided seat pad.
Custom rain cover for both children Zippered button hole pass through for front seat Custom sun filter for both children’s comfort Zippered button hole pass through for front seat Protects from insects Caboose Ultralight Instruction Manual Page 16
Please log onto www.joovy.com to register your new Joovy product.
t! r Doll Rides in the B ack, or Sits in the Fron You Caboose Ultralight Instruction Manual Page 18
Joovy • 2919 Canton Street • Dallas, TX 75226 • (877) 456-5049 • Fax: (214) 761-1774 Email: customerservice@joovy.com • Web Site: www.joovy.com ©Joovy 2008 • Document Version 1.