
Operation Manual


14
Fuel Gas
Correct gas pressure is important; see the section about
gas pressure under Gas Installation, page 10. The gas
pressure before the valve and the gas pressure from the
valve to the main burner and pilot burner, are equally
important. These parameters may be the cause of various
performance problems.
If the gas pressure is too low, it can cause low pilot
flame, insufficient production of electricity at thermopile
and thermocouple, and poor flame pattern.
If the gas pressure is too high it can cause valve
damage if the pressure rises above 60 mbar. This is
usually the result of faulty installation or lack of a gas
regulator on the gas tank or cylinder. High gas pressure
may also cause an abnormally large pilot flame which can
overheat the thermopile and thermocouple, and further
cause a shutoff of the valve due to insufficient millivolt
production. Problems involving high flames and soot
indicate that the air volume is too small in relation to the
gas volume. It is wrong to correct the problem by adjusting
the air regulator, if the cause is that the gas pressure is
too high. Checking the gas pressure before the valve will
uncover faults in the gas supply at the valve or from the
tank/cylinder.
If the gas pressure to the valve is correct, the fault
must be found after the valve. A measurement performed
with a manometer will help you to swiftly uncover and
eliminate sources of errors. As mentioned above, blocked
or poor gas supply may lead to faulty combustion. Make
sure all gas tubes are dirt-free, as a small dust particle can
obstruct the pilot orifice. Components must remain free of
dirt during installation of the gas supply and connection to
the appliance, and when the valve is being replaced.
Troubleshooting
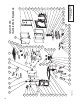
When No Spark is Generated
at the Pilot Head
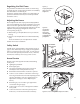
It is uncommon for the Piezo spark ignitor (fig 23-A) to fail,
unless it has mechanical damage. If the spark is not
conducted forward, it could be the result of a break in the
electrical circuit leading up to the pilot head. The spark is
small or weak if there is too much resistance from a bent
wire (E), or if corrosion appears at the electrode (G) or the
pilot head (H). This could result in insufficient heat to light
the gas. Inspect the pilot burner by looking for damage to
the individual parts. Check for damaged wires or wires
crushed between plate sections of the appliance and
check for loose connections.
Follow the trouble-shooting procedure below when no
spark is generated at the pilot head electrode:
1. Make sure the spark gap between electrode (G) and
pilot head (H) is smaller than or equal to 3.2 mm. If not:
check if the electrode is loose or damaged
2. Make sure the spark ignitor (A) is securely mounted
and the ground connection is in contact with the
bracket. If not: turn the spark igniter until the ground
connection is in contact with the bracket and tighten
the nut at the back of the spark igniter.
3. Make sure the insulated wire (E) is intact and without
cracks and properly connected between spark igniter
(A) and electrode (G). If not: properly fasten the insu-
lated wire to establish a connection between the spark
igniter and the electrode. Replace the electrode if the
wire is damaged or cracked.
4. Make sure the ceramic insulation (F) is intact and
without cracks If not: replace the electrode.
5. Make sure a spark is generated when you dismantle
the Piezo spark igniter and put the ground connector
against a metal piece, and the control knob (red mark)
on the spark igniter is finally pushed to the bottom (B).
If not: replace the Piezo spark ignitor.
Figure 23. Pilot ignition components.