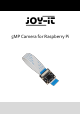
3 5MP Camera for Raspberry Pi Ausgabe 20.10.
3 5MP Camera for Raspberry Pi Index 1. Security- & Data protection information 2. Other informations 3. Connection 4. Installing the system 5. Installing the camera 6. Using the camera 6.1 Taking pictures 6.2 Taking videos 7. Support Ausgabe 20.10.
5MP Camera for Raspberry Pi Dear customer, thank you for purchasing our product. Please find our instructions below. 1. Security- & Data protection information Keep the instructions and notes! If the devices is passed on to third parties, these must be handed out. Use this device only for the specific area of application and according to the instructions. Always follow the instructions when setting up and using the camera.
3 2. 5MP Camera for Raspberry Pi Other informations Our information and take-back obligations according to the electronic law (ElektroG) Symbol on electrical and electronical quipment: This crossed-out dustbin means that electrical and electronic equipment does not belong in the household waste. You must hand out the used equipment at a collection point. Before handing out, old batteries and accumulators, which are not enclosed by the device, needs to be seperated from it.
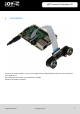
3 3. 5MP Camera for Raspberry Pi Connection Connect the camera module, as seen in the image, with the shipped ribbon cable to the CSI interface of your Raspberry Pi. Connecting the camera with its CSI interface is suitable. No other connection is needed. Ausgabe 20.10.
3 4. 5MP Camera for Raspberry Pi Installing the system You can skip this step if you are already using the latest Raspbian software on your Raspberry Pi. If not, please continue with the following instruction. Install the latest Raspbian-System-Image to your SD-Card. You can download the image here. You can transfer the image to your SD card with a suitable program (e.g. Etcher). After the transfer is complete, you can insert the SD card into your Raspberry Pi and boot the system. Ausgabe 20.10.
3 5. 5MP Camera for Raspberry Pi Installing the camera Open up a terminal window and start the Raspberry Pis configuration menu by entering the following command: sudo raspi-config In the now opened configuration menu, navigate to the Advanced Options menu. Choose the Camera option and activate it. Afterwards, you can exit the menu with the Finish option and reboot your Raspberry Pi. Ausgabe 20.10.
3 6. 5MP Camera for Raspberry Pi Using the camera 6.1 Taking photos To take pictures, you can use the following console command: raspistill –o image.jpg The image will be saved in the user directory (/home/pi) named image.jpg. 6.2 Taking videos You can take videos with the following command: Raspivid –o video.h264 –t 10000 The command „-t 1000“ defines how long the video is taken. In this case, the video is captured for 10 seconds. The video will be saved in the user directory (/home/pi) named video.
3 7. 5MP Camera for Raspberry Pi Support We also support you after your purchase. If there are any questions left or if you encounter any problems, please feel free to contact us by mail, phone or by our ticket-supportsystem on our website. Mail: service@joy-it.net Ticket-System: http://support.joy-it.net Phone: +49 (0)2845 98469 – 66 (11- 18 Uhr) Please visit our website for more informations: www.joy-it.net Ausgabe 20.10.