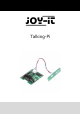
3 Talking-Pi Ausgabe 13.10.
3 Talking-Pi Index 1. Systeminstallation 2. Installation and activationg additional libraries 2.1 Overview 2.2 I2C 2.3 Servo-Motor Extension 2.4 wiringPi 2.5 433Utils 3. Connecting a speaker 4. Using the 433MHz radio modules 4.1 Connecting the modules 4.2 Usage 5. Servo/GPIO Connections 5.1 Servo-Usage 5.2 GPIO-Usage 6. Drivers 7. Button 8. Support Ausgabe 13.10.
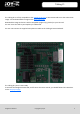
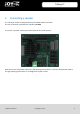
Talking-Pi Dear customer, thank you for purchasing our product. Please find our instructions below. 1. Systeminstallation There are only a few steps for the first installation. Please note that the Talking Pi set is only compatible to the Raspberry Pi 3. Older Raspberry Pis are not supported. First, plug the Talking-Pi extensionboard on to the GPIO-Header of your Raspberry Pi so that both boards are placed over each other. Ausgabe 13.10.
3 Talking-Pi The Talking-Pi set is fully compatible to the Google AIY Project so we recommend to use the Voice Kit SD image. You can download the image on the AIY project page. Download the image and write it with a compatible program (e.g. Etcher) to your SD-card. You can insert the card to your Raspberry Pi afterwards. You can now connect the supplied microphone-module to the Talking-Pi extensionboard. The Talking-Pi system is now ready.
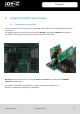
3 2. Talking-Pi Installation and activating additional libraries To be able to use all features of the Talking-Pi board you need to install and activate additional modules and libraries. Follow the next steps to activate all modules and be able to use all of the features. Please remember to restart your Raspberry Pi after you installed/activated the modules. 2.1 Overview Different modules are necessary for different features.
3 Talking-Pi 2.2 I2C The I2C functions are already installed. You just need to activate them. Open up a terminal window and enter the Raspberry configuration menu with the following command: sudo raspi-config Enter the Interfacing Options menu. And activate the I2C option by confirming the opening windows with Yes. Now leave the configuration menu and restart your Raspberry Pi. sudo reboot Ausgabe 13.10.
3 2.3 Talking-Pi Servo-Motor Extension A special library is needed to use the servo-module. This library is based on the Adafruit_PCA9685 Python-library but is specially adjusted to our board. We recommend to use our own, adjusted, libary. You can download the adjusted library here. Copy the extracted library to your Raspberry Pi and navigate with a terminal into this folder. Install the library with the following command; sudo python setup.py install 2.
3 2.5 Talking-Pi 433Utils To use the radio modules, another library is necessary. You can use the 433Utils library by ninjablocks. This library was published under the MIT license and allows you to easily use the radio modules. git clone https://github.com/ninjablocks/433Utils.git --recursive cd 433Utils/RPi_utils make all Ausgabe 13.10.
3 3. Talking-Pi Connecting a speaker The Talking-Pi module is equipped with a preinstalled speaker-connector. This one is suited for a speaker with a power of 3 Watt. To connect a speaker, loosen the marked scews of the screw terminal. Now connect the red speaker cable to the left opening (marked with a +) and the black speaker cable to the right opening (marked with a -) and tighten the upper screws. Ausgabe 13.10.
3 4. Talking-Pi Using the 433 MHz radio modules 4.1 Connecting the modules You can also connect sender and receivers of 433 MHz radio modules to the Talking-Pi board to control radio devices. Just plug the modules into the marked connections (433 TXD: 3-Pin Sender, 433 RXD: 4-Pin Receiver). The modules should (note the marked arrows) direct away from each other. Warning! Please note that you can not use the Driver1 and Driver2 connections and the 433MHz modules at the same time.
3 Talking-Pi 4.2 Usage To use the radio modules, navigate to the directory 433Utils/RPi_utils To use the receiver, enter the following command. As soon as the receiver receives a code it will be printed on the screen. sudo ./RFSniffer You can start the sender with the following command: You can change the number to any code you want. sudo ./codesend 1234 Ausgabe 13.10.
3 5. Talking-Pi Servo/GPIO Connections 5.1 Servo-Usage The marked connections can be used with up to 6 servo motors. You can switch with the jumper, placed next to the connections, between GPIO– and servo-operation. Just connect the centered and the right PIN with the jumper to activate the servo-mode. Please note that you need and additional power supply to use the servo motors. Therefore connect the coaxial power connector (5.5 / 2.1mm, 4.8 - 6V, 6A max.
3 Talking-Pi This example program will move the servo connected to channel 0. Of course you can adjust the example program to your needs. Therefore open the file with the following command: sudo nano simpletest.py You will find the to commands set_servo_pulse(0,start_position) and set_servo_pulse(0,end_position) at the very end of the file. The 0 defines the assigned channel number. Just change thenumber or enter new commands.
3 6. Talking-Pi Drivers The driver-connections are directly assigned to the Raspberry Pi‘s GPIO-connections. Next to the GPIO-Pin there are also pins for power supply and for reference connection. The drivers are assigned to the following GPIO-connections: Warning! Driver1 and Driver2 can not be simultaneously used with the 433MHz radio modules! Ausgabe 13.10.
3 7. Talking-Pi Button The Talking-Pi board has already a preinstalled button. But you can also connect another button (e.g. an Arcade-Button) to the preinstalled connection. The connection is assigned to the GPIO pin 23 and is free to use. The preinstalled button is connected in parallel to the connector so both buttons can be used for the same function. Ausgabe 13.10.
3 8. Talking-Pi Support We also support you after your purchase. If there are any questions left or if you encounter any problems please feel free to contact us by mail phone or by our ticket-supportsystem on our website. Mail: service@joy-it.net Ticket-System: http://support.joy-it.net Phone: +49 (0)2845 98469 – 66 (11- 18 Uhr) Please visit our website for more information: www.joy-it.net Ausgabe 13.10.