3 NodeMCU ESP32 Manual
NodeMCU ESP32 TABLE OF CONTENTS 1. Introduction 2. Overview 3. Module installation 4. Usage 7. Support 8. Other Informations Published: 26.09.
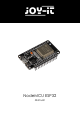
NodeMCU ESP32 1. INTRODUCTION Dear customer, thank you for choosing our product. In the following, we will show you what to observe during commissioning and use. Should you encounter any unexpected problems during use, please do not hesitate to contact us. 2. OVERVIEW The NodeMCU ESP32 module is a compact prototyping board and can be easily programmed via the Arduino IDE. It features 2.4 GHz dual-mode Wi-Fi and Bluetooth.
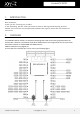
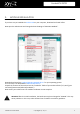
NodeMCU ESP32 3. MODULE INSTALLATION If you have not yet installed the Arduino IDE on your computer, download and install it first. Now open the Arduino IDE and change the board setting to "ESP32 Dev Module": Download and install the updated CP210x USB-UART driver for your operating system. The next step is to download the official ESP32 library. Unpack the contents of the archive into the "hardware" folder of your Arduino folder ("C:\Users\[your username]\Documents\Arduino\hardware").
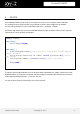
NodeMCU ESP32 4. USAGE Your NodeMCU ESP32 is now ready to use. Simply connect it to your computer with a USB cable. The installed library already provides many examples to allow a quick insight into the module. You can find the examples in your Arduino IDE under "File -> Examples -> ESP32". The fastest and easiest way to test your NodeMCU ESP32 is to get the device number. Either copy the code below or use the example "GetChipID": uint64_t chipid; void setup() { Serial.
NodeMCU ESP32 5. SUPPORT We also support you after your purchase. If there are any questions left or if you encounter any prob lems please feel free to contact us by mail, phone or via our ticket support system on our website. E-Mail: service@joy-it.net Ticket-System: http://support.joy-it.net Telefon: +49 (0)2845 98469 – 66 (11- 18 Uhr) Visit our website for more informations: www.joy-it.net 6.