
Owner's manual


8
English
7
English
1
English
2
English
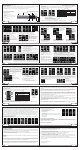
The display menu and operation method
eVic supreme configuration
Notice for Use
Thanks for choosing Joyetech products! Please read this manual carefully to ensure proper use. For additional information or
questions regarding the product or its use, please consult your local Joyetech retailer, or visit our website at www.joyetech.com.
Joyetech eVic supreme is the next generation of the Vapor Intelligent Cigarette product.
Upgraded Features
・
Maximum output wattage - 30W.
・
Maximum output voltage - 6V.
・
Support 0.5Ω~5Ω.
・
OLED display screen (adopts 0.96 -inch, 64 x 128 pixels),
with a 16 color grayscale display, which can show the
photos more clearly on the device.
・
More humanized menu design with new functions.
・
Stainless Steel Construction
・
Changeable atomizer connector.
A
:
Main menu
Operation:
Click the enter button 5 times within 1.5s to enter the main menu
,
use the direction key to select menu option
,
once you
have selected your option, use the enter button to access the submenu
Main menu display:
3
English
4
English
B
:
eVic supreme function operation
Power on
:
In the main menu, under power off mode, select“Power on”and click enter button. The screen will display the start-up animation.
①
When the eVic supreme detects a 2.2Ω atomizer:
②
The eVic supreme could NOT detect an atomizer
③
The eVic supreme detected a short while connected to an atomizer:
Power off
:
Under the “power on” mode,
Select “power off”and push the enter button
,
The screen will display the shut off animation.
④
Alarm set (In the alarm settings, a warning screen will show if the maximum time or puff values are reached. If both the time and puff are
not reached within the set duration, the time and puff value will reset and start counting at the beginning of next cycle.
Never exit to the main menu automatically after selecting this option Customize(Customized definition) Exit(Exit to the secondary menu)
5
English
6
English
①
Puff set Puff number set
②
Reset Puff (reset to the current puff number)
Total Puff (Total puff number)
Exit to the secondary menu
③
0000
(
Turn the direction key left to increase the puff,
rotate right to move the cursor, then click the enter button to confirm)
④
000000 show the total puffs
⑤
Exit return the main menu
System Select the standby time about system
00:30(Turn the direction key left to increase the
value, rotate right to move the cursor, then click
the enter button to confirm)
Calendar set the current time and date:
24Hour Select to display the time in 24-hour system
①
Show Time show the current time
②
Set Time
⑤
Set Data
⑥
Set Year
12Hour 12Hour Select to display the time in 12-hour system
③
Show Time Show the current time
④
Set Time
Temp Temp show the current temperature of this device:
℃
select “
℃
” to display the temperature
℉
select “
℉
” to display the temperature
Current display the current temperature on the device(please insert your atomizer)
Alarm select the alarm of temperature
25
℃
/77
℉
(it will show you the current temperature of the device when you attach the atomizer ,
and it will display “Please Insert Atomizer “ if you not attached the atomizer)
45
℃
/113
℉
(Turn the direction key left to increase the value, rotate right to move the cursor, then click
the enter button to confirm Minimum alarm of temperature is 40
℃
)
Menu function list
Power on
Menu screen
Function
Device
Reset
Password
Exit
Device information
Device reset
Password set
Exit the main menu
Menu screen
Function
Power on
Power off
Sleep
Vapor set
Configure
Display
Turn on the device
Turn off the device
Lock the system
Vapor set
Device set
Display set
Stealth
Hides the screen
during usage
(power saver)
② ③ ④
Vapor set
:
Select “Vapor set” and click the enter button to access the secondary menu, While in navigating the menu, the direction key is
to select the highlighted option, the enter button is to confirm your selection.
Switch device output mode selection
Mode Button mode selection
VV Variable Voltage mode
VW Variable Wattage mode
RVV Real-time Variable Voltage mode
RVW1 Real-time Variable Wattage mode1.
(set with MVR2.0)
Manual Manual button mode
Auto Auto button mode
(Note: Auto Mode will allow you to input a time duration
in which your eVic supreme will engage. Once you press
the “enter” button the eVic supreme will stay engaged for
the amount of time that you have specified)
3.3S(Turn the direction key left to increase
the setting time.Turn the direction key right
to switch the cursor and click the enter button
to confirm
The alarm
set of puff
number
the alarm set
of vapor time
The cycle set
of alarm time
024h (Turn the direction key left to increase the
setting time.Turn the direction key right to switch
the cursor and click the enter button to confirm.)
3200s (Turn the direction key left to increase the
setting time, rotate right to move the cursor, then
click the enter button to confirm)
0800 (Turn the direction key left to increase
the puff , rotate right to move the cursor, then
click the enter button to confirm)
Enter button
Front Cap
Atomizer connector
Direction Key“+”
Direction Key“-” Control head
Battery tube
Battery end cap
USB port
①
②
③
④
⑤
Configure
:
Select “Configure” and click enter button to the secondary menu. While navigating the menu, use the direction key to select
your option, Use the enter button to confirm your selection.
2600(Turn the direction key left to increase
the value, rotate right to move the cursor)
Scr Saver Select time to operate the screen saver
00:01 (Turn the direction key left to increase the value,
rotate right to move the cursor, then click the enter button
to confirm)
Screen select the showing time on display
00:01 (Turn the direction key left to increase the value,
rotate right to move the cursor, then click the enter button
to confirm)
①
②
③
④ ⑤ ⑥
Display: Select “Display” and click enter button to the secondary menu. During menu operations, the direction key is to select the menu,
the enter button is to confirm the menu.
10
English
9
English
12
English
11
English
14
English
13
English
Password: Select “Password” and click enter button to access the secondary menu. While navigating the menus, the direction key is to
select the menu, the enter button is to confirm the menu.
Device
:
Select “Device” and click enter button to access the secondary menu. While navigating the menu, the direction key is used to
highlight your option. Use the enter button is to confirm your selection.
Stealth: Select “Stealth” and click enter button to access the secondary menu. While navigating the menu, use the direction key to highlight
your option. Use the enter button is to confirm your selection.
Reset: Select “Reset” and click enter button to the secondary menu. While navigating the menus, use the direction key to highlight your option.
Use the enter button is to confirm your selection.
The Home Scr is for displaying the contents in the home screen
Home ScrL1: The setting on the left 1 of the home Scr
Home ScrL2: The setting on the left 2 of the home Scr
Home ScrR1: The setting on the right 1 of the home Scr
Home Scrr2: The setting on the right 2 of the home Scr
Home ScrB The setting on the bottom of the home Scr
Click the “Exit” to go back to secondary menu
Boot Logo The setting of the boot animation
OFF Turn off the boot animation
Def Logo the default System animation
User Logo Users can customize the animation,
(just import the animation through MVR2.0)
Scr Saver The setting of screen saver
OFF Turn off the screen saver
Def Logo The default System screen saver
User Logo Users can customize the saver,
(just import the screen saver through MVR2.0)
Def Logo:
The default logo
User Logo:
Users can customize the logo,
(just import the logo through MVR2.0)
①
②
③
④
Device ID
The ID number of the device
①
Display the current device ID
Version
The version of the MVR
②
Display the details of the
current software version
User Info
③
Display your information and you
can input the details through MVR2.0
Atomizer Ω: The information
of atomizer
④
Display the resistance of the atomizer
Exit : Return to
the main menu.
Stealth: The vapor time display set
OFF: Turn off the stealth mode of vapor time
ON: Turn on the stealth mode of vapor time
Normal: Return to the factory set
Factory: Return to the factory set and clear
the vapor data
Exit: Return to the main menu.
Password: Password set
Turn off the password mode
Turn on the password mode
Main function
Click “Power on” to turn on the device The screen will be black after animation,
then click “Enter” button and it will show as below,
A B
C D
E F
H
G
A
Project Function
B
C
D
E
F
H
G
Smile icon( The icon divides into three levels, if the icon
become lighter, this means your current puff count/time
is closer to the located alarm puff/time)
Battery Power Percentage
Display left 1 content
Display right 1 content
Display left 2 content
Display right 2 content
Display the current output mode
Display the content on the bottom
The main interface shortcuts
1, Under VV and VW mode, turn the "direction key" left to decrease the voltage or power, and turn the "direction key" right to increase
the voltage or power.
·
Battery Overload Protection Mode:
①
When the battery is unable to provide current output power, it will enter into the battery overload
protection mode. If this occurs, please do the following:
1 Lower the voltage or wattage
2 Use a higher resistance atomizer
3 Charge the battery
4 Replace the battery
·
Charging conditions
:
②
Plug the USB cable in the wall adapter to charge the eVic supreme
③
Use a high-power USB port on your computer to charge the eVic supreme
④
Fully charged
Lithium-ion battery instruction
In order to ensure the normal use of the product, we recommend using the original lithium-ion battery or high-rate lithium-ion battery with
high quality. The ordinary lithium-ion battery is not recommended.
PC software instruction
① ② ③ ④
① ② ③ ④ ⑤ ⑥ ⑦ ⑧ ⑨ ⑩
Precautions
1. Only have your eVic supreme repaired by Joyetech. Do not attempt to repair the unit by yourself as damage or personal injury may
occur.
2. Do not leave the eVic supreme in high temperatures or damp conditions, as this may damage the device. The appropriate operation
temperature is within 0
℃
to 45
℃
while charging and -10
℃
to 60
℃
while in use.
3. Do not attempt to combine the eVic supreme with parts from other brands of e-cigarettes. If it is damaged in this way, Joyetech will not
take responsibility and your warranty will be void.
Warranty terms
Please consult your Joyetech product warranty card. We are not responsible for any damage caused by user error. Our warranty is not
valid for products purchased from third party vendors.
Joyetech agrees to provide repair under warranty pursuant to the following terms and conditions:
This warranty provides repair free of charge for defective Joyetech brand merchandise. Warranty period is 90 days from date of purchase
by the end user.
2. This warranty may be void as a result of any of the following conditions:
* Customer does not provide warranty card and original receipt of purchase.
①
2,Under VV and VW mode, continuous rotation to the left or right "direction key" 3 times can realize continuous reduction or increase on
voltage or power, press "enter" button to stop that.
3,Continuously press the "enter key" three times to enter the home screen, and turn the "direction key" right to do the selection operation
on the display area(C,D,E,F,G,H). The selected area will flash, and then turn the "direction key" left to do the content switch, press
"enter" button to confirm.
When you connect atomizer normally, and then press enter button long, the atomizer will work. At the same time, when you normal vapor,
the screen will show the time of vapor.
①
When you loosen button, the screen will be blank after keeping 5s. But if you click enter button
and hold on during 5s, the atomizer will work and time again.
Atomizer Short alarm
:
②
If the connective atomizer has short circuit or output appears short circuit, and then you click enter button and
hold on, the battery will not output and appear alarm screen.
No Atomizer Find alarm
:③
If the connective atomizer has open circuit or the atomizer without connection, and then you can keep
pressing the enter button, the battery will not output and appear alarm screen.
Over 10s Protection
:④
In order to protect atomizer and battery, the battery will enter into working overtime protection when it keeps working over10s.
Power low Protection
:⑤
When the battery energy is below 5%, low voltage warning shows up during vaporing. When the battery energy
is 0%, the device will shut down automatically.
Password Protection
:⑥
To enable this feature, a four-digit password must be entered when the eVic supreme is powered on (the default
password 0000). The direction key is used for choosing the small keyboard digital, and "enter" key is the confirm key. If you forget the password,
please use the MVR 2.0 software to find or reset the password.(refer to MVR2.0 software instruction for more specific information)
Overheating Protection
:⑦
When the device’s temperature is over the temperature protection setting, the home screen will appear
flashing thermometer icon. Kindly suggest you’d better stop using the device at that time until the device’s temperature goes down. When
the device’s temperature is over the normal operation temperature range, it would appear the high temperature alarm interface⑧ and
shut off the output.
Max puff Alarm
:⑨
When your puff is over the maximum puff you set, the home screen will appear the“Max puff”alarm rather than the
vapor seconds.
Max time Alarm
:⑩
When your vapor time is over the maximum time you set, the home screen will appear the“Max time”alarm rather than
the vapor seconds.
* Merchandise failure or damage is caused due to improper use or unauthorized repair.
* Merchandise failure or damage as a result of excessive force such as dropping.
* Merchandise failure or damage as a result of usage outside of recommended operating conditions (see precautions in usage manual).
* Merchandise failure or damage caused by improper use of water or other liquid (see usage manual for operating instructions).
* Merchandise failure or damage due to usage with non-Joyetech components (charger, battery, and power cable).
3. This warranty does not cover personal items or consumable goods and attachments, including but not limited to: mouthpiece, cartridge,
atomizer head, lanyard, and leather sheath.
4. This warranty does not cover any non-Joyetech brand products. This warranty is only valid for eligible Joyetech brand products during
the warranty period of 90 days after date of purchase as indicated on proof of purchase.
Joyetech reserves the right of final decision in all warranty cases. Joyetech may interpret and revise the content of this warranty terms.
Joyetech (Shenzhen) Electronics Co., Ltd.
Email:info@joyetech.com
Shutdown