
Owner's Manual


17
18
15
16
Match your thermometer with a Smart Device
1. If this is your first time using it, bind first.Open "SETTING"
menu,choose“Bind and unbind device" and select the
appropriate model.
The date and time on your thermometer will automatically be
updated when it's connected with your phone.
2. Confirm that your thermometer is connected successfully.
When your thermometer is connected successfully to your smart
phone, the “ ” symbol stop flashing and keep showing.
Transfer your readings
1. As soon as your measurement is finished, open the app on
your smart phone to transfer the readings.
Note: On the matched smart phone, Bluetooth must be enabled.
2. You can view your temperature readings in the app.
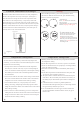
Illustration For Use
Care And Cleaning
1. The probe window must be kept clean, dry, and undamaged at all
times to ensure accurate readings. The accuracy of temperature
readings can be affected by damage to the probe window, or the
presence of dirt, fingerprints,dust and other soiling
compounds on the probe window. Degraded sensors can degrade
performance or cause other problems.
2. For cleaning:
1) Soak a clean soft cloth in drinking water,wring it out,and then
wipe the thermometer(including probe) no less than 3 times;
2) Visual or use magnifying glass to observe the thermometer have
no visible dirt and stains ,then use another clean soft cloth to
wipe the thermometer residue water;
3) Put the thermometer in the original packaging.
3.For disinfection:
1) Soak a clean soft cloth in drinking water,wring it out,and then
wipe the thermometer(including probe) no less than 3 times;
2) Visual or use magnifying glass to observe the thermometer have
no visible dirt and stains ,then use another clean soft cloth to
wipe the thermometer residue water;
3) Using a clean soft cloth dipped in 70% medical alcohol,wipe the
probe for 3 Times,each time 1 minute.
4) Using a clean cotton swab dipped in 70% medical alcohol,wipe
the sensor window 3 times;
5) Wait at least 10 minutes to let the alcohol volatilization and put it
in the original packaging.
4. Do not put the thermometer into water directly.
5. Store the thermometer in a dry location, free from dust and
contamination and away from direct sunlight.
6. Put the thermometer back to the original packaging after using.
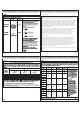
Memory Mode
Figure 5
3.
The user can press the Test Button to take new measurements.
In the memory mode, mark or mark will not change.
1. The Memory Mode can be accessed either in forehead mode or
object mode:
When the thermometer has been turned on and followed by
Figure 2/4 or finished testing, press and hold the Button
The letter M will appear in the corner of the display.
(See Figure 5)
Memory .
upper right
2. The thermometer will automatically memorize the last 30
temperature readings.
Each time the Button
is pressed, the screen displays past readings that correspond
with a number 1-30. The number 1 reflects the most recent
reading, while the number 30 reveals the oldest reading stored
in memory.(See Figure 6)
Each memory also records the
measurement mode icon. Memory
Battery Replacement
Figure 7
Figure 8
Figure 9
1.
continue to measure; replace battery when "
in the right corner as shown
in Figure 7.
2. as shown in Figure 8.
3. Remove battery and install 2 new AAA alkaline batteries
as shown in Figure 9.
4.
When flashes, it indicates that the power is low, but you can
" remains
displayed upper of LCD display
Turn battery cover clockwise
Turn battery cover on counterclockwise.