ASSEMBLY & OPERATING MANUAL J Perkins Distribution www.jpekins.
FUN WITH A CAPITAL ‘F’ Welcome, and congratulations on purchasing an F38 Hornet, an eye-catching, performance delta that has the ability to provide maximum excitement for minimal outlay and preparation time. Equipped with a powerful pre-fitted 1200KV brushless motor, 30A ESC and capable twin 9g servos, a few simple steps is all it takes to get this futuristic 3-channel PNP racer punching 3S-fuelled holes in the sky.
BOX CONTENTS Before you start the final assembly of your F38 please check that the following components are present and correct. 1x 2x 1x 2x 1x 1x 2x 1x Airframe with factory installed motor, ESC, and twin 9g servos. Vertical stabilizer fins. Nose landing gear assembly (leg and wheel). Servo pushrod with clevis. Spinner. 8 x 6” tuned propeller. Elevon control horns. Hook and loop strip. REQUIRED TO COMPLETE Foam safe glue. 3-channel 2.4GHz transmitter and receiver combo with elevon mixing.
2. Install the receiver Select a new model memory on your transmitter and set the appropriate delta / elevon mix. Connect the two servos and the ESC to the receiver as shown in the diagram or, if different, in accordance with the delta / elevon mix channel allocations dictated by your particular radio brand. Install the receiver behind the ESC. Please ensure you run your receiver antenna(s) clear of the ESC to limit any possible RF interference. 3.
. Attach the vertical fins You have two options when attaching the fins. Primarily designed to be fixed in an outwardfacing arrangement it is also possible to mount the fins facing inward. The effect of an inward stance is one of appearance and a slightly increased rate of roll. Note, however, that if you choose to angle the fins inward a modification is required to the base of each where it meets the control surface at the trailing edge.
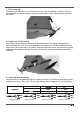
7. Fit the nose leg The nose leg is optional on your F38 however it can save the propeller on landing. The leg simply pushes into the landing gear support bearer located on the underside nose section of the model. 8. Install your 3S LiPo battery The position for the battery is shown in the illustration below. The space is designed for a Radient 2200mAh 3s 30C LiPo or an alternative of a similar size. Use the supplied hook and loop strap to secure the battery in position.
10. Check the Centre of Gravity (balance point) Use the image below to set the C of G. Do this by moving the battery forward or aft until the correct position has been found. Finally, mark the desired battery position on the inside of the battery bay in order to precisely locate the pack each time you fly. 11. Go flying For your first flight it's always best to get someone with experience to launch your F38, however do note the desired 15° launch angle in the illustration below.