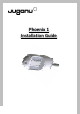
Phoenix 1 Installation Guide
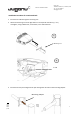
Phoenix 1 Installation Guide Juganu HQ 1 Yahadut Canada St., Or-Yehuda, Israel Tel.: + 972-3-5310031 sales@juganu.com Safety Instructions and Warnings DANGER - Risk of Shock - Disconnect Power before Installation FOLLOW THESE INSTRUCTIONS CAREFULLY TO AVOID DAMAGE TO FIXTURE AND PERSONAL INJURY - Installation must be performed by a certified licensed electrician in accordance with local law. - Make sure the AC power grid functions properly, otherwise the internal driver may be damaged.
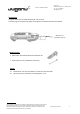
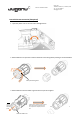
Juganu HQ 1 Yahadut Canada St., Or-Yehuda, Israel Tel.: + 972-3-5310031 sales@juganu.com Phoenix 1 Installation Guide Introduction This guide shows how to install the Phoenix1 unit on a pole. The mounting arm is supplied by Juganu and supports a 51-60 mm diameter pole adaptor. Mounting arm (supplied by Juganu) Required Tools Metric Allen Key Hexagon Wrench Screwdriver Set Metric Open-end or combination wrench key Notes The Phoenix1 unit can be installed on a vertical or horizontal pole.
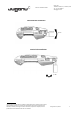
Phoenix 1 Installation Guide Juganu HQ 1 Yahadut Canada St., Or-Yehuda, Israel Tel.: + 972-3-5310031 sales@juganu.com Horizontal Pole Installation +/- 15° Vertical Pole Installation +/- 15° WWW.JUGANU.COM The Information provided herein is subject to change without prior notice by Juganu. Please verify all details with Juganu.
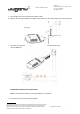
Phoenix 1 Installation Guide Juganu HQ 1 Yahadut Canada St., Or-Yehuda, Israel Tel.: + 972-3-5310031 sales@juganu.com Installation Procedure for a Horizontal Pole 1. Insert the AC cable through the mounting arm. 2. Attach the mounting arm to the light fixture in the required orientation (+/- 15°) and tighten, using 4 M8 screws, a flat washer, and a helical washer. 1 Mounting arm 2 4 x M8 3. Insert the AC wire protruding from the pole through the rear hole on the mounting adaptor.
Phoenix 1 Installation Guide Juganu HQ 1 Yahadut Canada St., Or-Yehuda, Israel Tel.: + 972-3-5310031 sales@juganu.com The adapter displayed is for illustration purposes only. You can use your own suitable adaptor. 4. Connect the mounting adapter by attaching the two (2) adapter parts to the pole and tighten, using four (4) M10 screws with M10 nuts, flat and helical washers. WWW.JUGANU.COM The Information provided herein is subject to change without prior notice by Juganu.
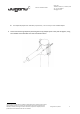
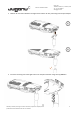
Juganu HQ 1 Yahadut Canada St., Or-Yehuda, Israel Tel.: + 972-3-5310031 sales@juganu.com Phoenix 1 Installation Guide 5. Put the Light Fixture on the personnel platform’s floor. 6. Make an AC connection between the Light Fixture and the AC wire protruding from the mounting arm. 7. Insert the mounting arm of the Light Fixture into the adaptor arm and fasten using three (3) M8 bolts. Installation Procedure for a Vertical Pole Note: In the vertical orientation, a mounting adaptor is not required. 1.
Phoenix 1 Installation Guide Juganu HQ 1 Yahadut Canada St., Or-Yehuda, Israel Tel.: + 972-3-5310031 sales@juganu.com 2. Make an AC connection between the Light Fixture and the AC wire protruding from the pole adaptor. 1 2 3. Insert the mounting arm of the Light Fixture into the pole and fasten using three (3) M8 bolts. WWW.JUGANU.COM The Information provided herein is subject to change without prior notice by Juganu. Please verify all details with Juganu.
Juganu HQ 1 Yahadut Canada St., Or-Yehuda, Israel Tel.: + 972-3-5310031 sales@juganu.com Phoenix 1 Installation Guide External Ethernet Connection (If Required) 1. Open the plastic cork on the rear side of the light fixture. 2. Disassemble the rear part of the external ethernet connection gland by rotating it counterclockwise. Rear part of the gland 3. Disassemble the internal rubber ring from the front part of the gland. WWW.JUGANU.
Phoenix 1 Installation Guide Juganu HQ 1 Yahadut Canada St., Or-Yehuda, Israel Tel.: + 972-3-5310031 sales@juganu.com WWW.JUGANU.COM The Information provided herein is subject to change without prior notice by Juganu. Please verify all details with Juganu. All values are typical values when measured under normal laboratory conditions, and Juganu makes no warranties, expressed or implied, that such performance will be obtained under end-use conditions. JL-IG_Phoenix1 | Rev.
Juganu HQ 1 Yahadut Canada St., Or-Yehuda, Israel Tel.: + 972-3-5310031 sales@juganu.com Phoenix 1 Installation Guide 4. Insert the ethernet cable plug through the rear part of the gland. * If the ethernet cable is inside the pole, first pull it out through the hole on the mounting arm, and then perform step 4. WWW.JUGANU.COM The Information provided herein is subject to change without prior notice by Juganu. Please verify all details with Juganu.
Juganu HQ 1 Yahadut Canada St., Or-Yehuda, Israel Tel.: + 972-3-5310031 sales@juganu.com Phoenix 1 Installation Guide 5. Insert the ethernet cable plug through the front part of the gland. 6. Assemble the rubber ring on the ethernet cable and insert it into the appropriate place on the front part of the gland. Rubber ring position WWW.JUGANU.COM The Information provided herein is subject to change without prior notice by Juganu. Please verify all details with Juganu.
Phoenix 1 Installation Guide Juganu HQ 1 Yahadut Canada St., Or-Yehuda, Israel Tel.: + 972-3-5310031 sales@juganu.com 7. Connect the RJ-45 plug to the connector on the light fixture. 8. Tighten the front part of the gland around the RJ-45 plug and connector. WWW.JUGANU.COM The Information provided herein is subject to change without prior notice by Juganu. Please verify all details with Juganu.
Juganu HQ 1 Yahadut Canada St., Or-Yehuda, Israel Tel.: + 972-3-5310031 sales@juganu.com Phoenix 1 Installation Guide 9. Tighten the rear part of the gland to the front part of the gland. Statement This device complies with Part 15 of the FCC Rules. Operation is subject to the following two conditions: (1) this device may not cause harmful interference, and (2) this device must accept any interference received, including interference that may cause undesired operation.