® COMPUTER SEWING MACHINE MACHINE A COUDRE ELECTRONIQUE MAQUINA DE COSER ELECTRONICA HZL-E70 INSTRUCTION MANUAL MANUEL D’INSTRUCTIONS MANUAL DE INSTRUCCIONES
FOR USA AND CANADA ONRY This appliance has a polarized plug (one blade wider than the other). To reduce the risk of electric shock, this plug is intended to fit in a polarized outlet only one way. If the plug does not fit fully in the outlet, reverse the plug. If it still dose not fit, contact a qualified electrician to install the proper outlet. Do not modify the plug in any way.
“IMPORTANT SAFETY INSTRUCTIONS” “When using an electrical appliance, basic safety precautions should always be followed, including the following:” “Read all instructions before using this sewing machine.” “DANGER_____To reduce the risk of electric shock:” 1. “An appliance should never be left unattended when plugged in. Always unplug this appliance from the electric outlet immediately after using and before cleaning.” 2. “Always unplug before relamping. Replace bulb with same type rated 15 Watts.
“NOTES DE SECURITE IMPORTANTES” “Lorsque vous utilisez un appareil électrique, des précautions élémentaires doivent toujours être suivies, comme celles-ci.” “Lisez attentivement ces instructions avant d’utiliser cette machine à coudre.” “DANGER_____Pour réduire le risque d’électrocution.” 1. “Un appareil ne doit jamais être laissé sans surveillance lorsqu’il est branché. Toujours débrancher cet appareil du secteur immédiatement après utilisation et avant de le nettoyer.” 2.
“NORMAS DE SEGURIDAD” Cuando utilice la máquina deberá observar todas las normas de seguridad, especialmente las que se detallan a continuación. Antes de utilizar la máquina, lea las instrucciones. PELIGRO____Para reducir el riesgo de descarga eléctrica. 1. Nunca deje desatendida la máquina cuando esté enchufada. Desconéctela de la red eléctrica cuando haya finalizado su trabajo. 2. Desenchufe la máquina siempre que deba realizar cualquier manipulación con ella.
CONTENTS / TABLE DES MATIERES / ÍNDICE CONTENTS Important safeguards ···························································· 1 Principal parts ······································································· 5,6 Accessories ··········································································· 6 Major functions ································································ 7-10 Winding the bobbin ··························································· 11,12 Placing bobbin in the case
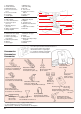
Principal Parts / Principaux éléments / PRINCIPALES PIEZAS 1. Spool pin 2. Bobbin thread guide 3. Thread tension dial 4. Thread spool cap 5. Bobbin winding regulator 6. Bobbin winder 7. Face cover 8. Speed controller 9. Reverse stitch button 10. Start/Stop button 11. Auxiliary bed 12. Drop feed lever 13. Automatic lock stitch button 14. Stitch selection panel 15. Handwheel 16. Light / Power switch 17. Power cord receptacle 18. Speed controller receptacle 19. Handle 20. Presser foot lever 1.
1. Thread Cutter 2. Needle threader 3. Buttonholing lever 4. Presser foot release lever 5. Presser foot shank 6. Feed dog 7. Needle plate 8. Bobbin case 9. Needle clamp 10. Needle 11. Presser foot 12. Hook cover release button 13. Hook cover 14. Bobbin 1. Coupe-fil 2. Enfile-aiguille 3. Levier de boutonnière 4. Releveur de pied presseur 5. Montage du pied presseur 6. Griffes d’entraînement 7. Plaque aiguille 8. Boîtier à canette 9. Montage du pied 10. Aiguille 11. Pied presseur 12.
Major Functions / Fonctions principales / FUNCIONES PRINCIPALES Type of Stitch patterns and operation (Operation/indication panel) Types de point et sélection (touches de sélection) Tipos de puntada y funciones (panel indicativo / operativo) Stitch length adjusting lever Curseur de réglage de la longueur du point Palanca de ajuste de la longitud de puntada Stitch length manual adjustment button Touche de réglage manuel de la longueur du point Botón de ajuste manual de la longitud de puntada Zigzag width a
This sewing machine has stitch patterns for stretchy fabric such as knitted fabric, jersey and so on. Cette machine possède des programmes spéciaux pour les matières extensibles comme les mailles, tricots, jerseys, etc. La máquina tiene tipos de puntada para diferentes tejidos como el punto, jersey, etc.
Major Functions / Fonctions principales / FUNCIONES PRINCIPALES Speed controller Push speed controller plug into lower receptacle at right end of machine. Mains power and light switch ON Interrupteurs de courant et de lumière Rhéostat Insérez la prise ’jack’ du rhéostat dans son logement à l’arrière de la machine. Interruptor de encendido y de luz OFF Pedal Conecte el cable del pedal en el enchufe que hay en la parte inferior derecha de la máquina.
Slower Lent Más lento Faster Rapide Más rápido Speed controller Thread tension dial You can adjust Maximum sewing speed. (a) To increase the needle thread tension. (b) To decrease the needle thread tension. (a) Curseur de vitesse Vous pouvez régler la vitesse maximale de couture avec ce curseur électronique. Bouton de tension du fil (b) Regulador de velocidad Se puede ajustar la velocidad máxima. (a) Pour augmenter la tension du fil d’aiguille. (b) Pour diminuer la tension.
Winding Bobbin / Bobinage de la canette / HACER CANILLA Winding a bobbin Enfilage pour le remplissage de canette Enhebrar para hacer canilla * When you turn on the power to the machine under the bobbin winding state, the machine will peep. *Lorsque vous allumez la machine en mode de remplissage de canette, eile émet un bip sonore. * Cuando encienda la máquina bajo el estado de hacer canilla, sonará un pitido.
Adjusting the bobbin thread guide Réglage du guide-fil de canette Ajuste del guía-hilo de la canilla In the case where the bobbin is unevenly wound with thread according to the type of thread, the bobbin thread guide has to be adjusted. Dans le cas où la canette serait mal remplie, selon le type de fil, il convient de régler le guide. En el caso de que la canilla esté mal bobinada, se deberá ajustar el guía-hilo de la canilla. Set the bobbin on the bobbin winder.
Threading The Machine / Enfilage de la machine / ENHEBRADO DE LA MÁQUINA CAUTION: Be sure to turn off the machine before threading. ATTENTION: Assurez-vous d’avoir éteint la machine avant l’enfilage. PRECAUCIÓN: Apague la máquina antes de enhebrar la máquina. [2] * Be sure to raise the presser foot before threading the machine head. * Le pied presseur doit toujours être relevé pour enfiler la machine. * Asegúrese de subir el prensatelas antes de enhebrar la máquina.
Automatic Needle Threader Enfilage automatique de l’aiguille Enhebrado automático del aguja * Check to be sure that the needle is in its highest position. * Contrôlez que l’aiguille est bien en position la plus haute. * Asegúrese de que la aguja esté en su punto más alto. Lower the presser foot. Lower the needle threader. Raise the needle. Then, lower the needle threader and thread (A). 1 Abaissez le pied presseur. Abaissez l’enfile-aiguille. Relevez l’aiguille. Puis, decendez l’enfileur et le fil (A).
Changing The Presser Foot Changement du pied presseur CAMBIO DEL PRENSATELAS Attaching The Needle Pose de l’aiguille COLOCACIÓN DE LA AGUJA CAUTION: Make sure to disconnect the plug from the wall outlet before changing the presser foot. CAUTION: Make sure to disconnect plug from wall outlet before inserting needle. ATTENTION: Assurez-vous d’avoir débranché la machine avant de changer le pied. ATTENTION: Assurez-vous d’avoir débranché Vis serreaiguille.
Needle to be purchased Aiguilles à utiliser Agujas When purchasing spare needles, specify HAx1 (130/705H) for household sewing machine or HAx1SP (needle for knits). Lorsque vous rachetez des aiguilles, spécifiez le type 130/705H (standard) pour machine à coudre ou HAx1SP (pour jerseys).
How To Adjust Thread Tension Comment régler la tension du fil AJUSTE DE LAS TENSIONES DEL HILO * Adjust the thread tension as described below when special type of fabric is used or the thread tension has changed from the adequate setting. * Les réglages de tension ci-dessous sont utiles lorsque l’on coud une matière spéciale ou que les réglages initiaux ont été changés.
Fabric, Thread And Needle Table Fabric Thread Needles HA x 1 (130/705H) Light-weight Medium-weight Lawn Silk # 80~100 (No.9) Georgette Synthetic thread/ Fine thread # 90, 100 No.11 Tricot Synthetic # 60~100 Knitting needle No.11 Wool and synthetic fiber cloth Silk Synthetic # 80 # 60~100 No.11 General cotton and synthetic cloth Cotton Synthetic # 50~80 # 50~60 No.11~14 Silk Synthetic # 50 # 50~60 Denim Cotton Synthetic # 30~50 # 30~50 No.
Tabla de Tejidos, Hilo y Agujas Tejido Hilo Agujas HA x 1 (130/705H) Fino Medio Lino Hilo de algodón # 80~100 (No.9) Crespón Hilo sintético / Hilo fino # 90, 100 No.11 Malla tricot Sintético # 60~100 Agujas para punto No.11 Lana y fibra sintética Seda Sintético # 80 # 60~100 No.11 Algodón y fibra sintética Algodón Sintético # 50~80 # 50~60 No.11~14 Seda Sintético # 50 # 50~60 Tejano Algodón Sintético # 30~50 # 30~50 No.
Stitch pattern Programme Tipo de puntada Automatic (mm) Automatique (mm) Automático (mm) Manual (mm) Manuel (mm) Manual (mm) 2.4 0~4 3.0 2.6 1.2 2.0 1.8 1.0 2.0 2.4 2.0 1.2 0.4 1.8 1.2 0.4 0.2 - - 0~4 ~2.6 ~4.0 ~4.0 ~2.6 ~4.0 ~2.0 0.4 0.5 0.6 0.2 ~ 1.0 1.4 1.0 ~1.8 Stitch pattern Programme Tipo de puntada Automatic (mm) Automatique (mm) Automático (mm) Manual (mm) Manuel (mm) Manual (mm) 2.0 0.7 2.6 0.8 1.6 0.2 1.2 0.4 ~2.4 ~1.0 ~2.6 ~4.0 -- 2.6 -- 1.2 ~ 2.6 0.5 0.0 ~ 1.
Straight Stitch / Point droit / PESPUNTE RECTO The straight stitch is the basic stitch. Le point droit est le point de base. El pespunte recto es el tipo de puntada más básica. CAUTION: Turn off the machine before changing the presser foot. ATTENTION: Eteignez la machine avant changer le pied presseur. Atención: Apague la máquina antes de cambiar el prensatelas. 1 Standard presser foot (A) Pied standard (A) Prensatelas estándar (A) Make sure that the presser foot is correct.
8 Lift the presser foot and take out the fabric. Wait until the needle totally stops. Push the reverse stitch button to raise the needle and then raise the presser foot lever. Relevez le pied et retirez le tissu. Attendez que l’aiguille soit bien arrêtée. Appuyez sur la touche couture arrière pour remonter l’aiguille puis relevez le pied. Levante el prensatelas y saque el tejido. Espere hasta que la aguja esté totalmente parada.
Automatic lock stitch Points d’arrêt programmables Puntada de seguridad automática Example: Straight stitch [1] Exemple: Point droit Ejemplo: Pespunte recto 1 Fabric Tissu Tejido [2] Select first stitch pattern to be sewn. Press button. The machine produces three times lock stitches and automatically starts sewing from the starting position. To prevent stitches from coming apart: Select a pattern to be sewn, then press button.
Lock stitch (Reverse stitch) Couture arrière Puntada de seguridad (Puntada inversa) Use this function to produce lock stitches of more than three stitches. Beginning of sewing heavy-weight fabric Démarrer la couture sur des matières épaisses Inicio de costura en tejidos gruesos Utilisez cette fonction pour faire plus de trois points en couture arrière.
Zigzag Stitch / Point zig zag / PUNTADA ZIG ZAG CAUTION: Make sure to turn off the machine before changing the presser foot. ATTENTION: Assurez-vous d’éteindre la machine avant de changer le pied presseur. PRECAUCIÓN: Asegúrese de apagar la máquina antes de cambiar el prensatelas. 1 Standard presser foot (A) Pied standard (A) Prensatelas estándar (A) Make sure that the presser foot is correct. Vérifiez d’avoir le bon pied presseur. Asegúrese de que el prensatelas es el correcto.
How To Adjust Stitch Width (manually) Comment régler la largeur des points (manuellement) Modo de ajustar la anchura de puntada (manualmente) Stitch width manual override indicator lamp Témoin de correction manuelle de largeur des points Lámpara indicadora de solapamiento manual de anchura de puntada Manual button Adjusting lever Touche manuelle Curseur de réglage Palanca de ajuste Botón manual * To adjust the stitch width, press the manual button (the lamp will light up) and move the adjusting lever to le
Overcasting Surfilarge SOBREHILADO Reinforcing stretch (elastic) stitch Point triple élastique PUNTADA DE REFUERZO ELÁSTICA This stitch style is used to prevent the cut edge of fabric from fraying. The reinforcing stretch stitch helps reinforce seams when used for sewing of elastic fabric or the force-exerted part of fabric that is likely to fray. Ce point est utilisé pour éviter que les bords ne s’effilochent par frottement. Este tipo de costura se utiliza para evitar que el tejido se deshilache.
Automatic buttonholes Boutonnières automatiques en 1 temps OJALES AUTOMÁTICOS Select a pattern according to type of fabric and size of button to be used. CAUTION: Make sure to turn off the machine be- Sélectionner une configuration en fonction du type de tissu et de la taille des boutons à utiliser. ATTENTION: Vérifiez d’éteindre la machine avant de Seleccione el tipo de costura adecuado al tipo de tejido y al tamaño del botón que se vaya a utilizar.
3 Sliding part Partie glissière Pieza corredera After placing a button on the buttonhole foot, press the sliding part to determine the buttonhole length. Après avoir placé un bouton sur le pied, refermez la glissière pour déterminer la longueur de la boutonnière. Tras haber colocado un botón en el prensatelas, ajuste la pieza corredera para determinar la longitud del ojal. Lower the buttonhole foot once to place a button on it. Lower the buttonhole foot at the marked position.
9 Sewing sequence Cycle de couture Secuencia de costura 1 2 3 4 5 6 The machine will automatically stop sewing after producing back tack stitches. The machine will stop with its needle up. La machine s’arrête automatiquement après avoir effectué les points d’arrêt. Elle stoppe l’aiguille en haut. La máquina parará automáticamente de coser tras hacer las atacados finales. La máquina parará con la aguja arriba. After the completion of sewing, trim the threads.
Bartacking / Couture d’arrêt / Presillado Bartacking is used to reinforce part of seam that is likely to ravel. La couture d’arrêt permet de renforcer une partie de la couture susceptible de s’effilocher. CAUTION: Make sure to turn off the machine El presellado se usa para reforzar la parte de la costura que es susceptible de destejerse. ATTENTION: Assurez-vous d’éteindre la machine before changing the presser foot. avant de changer le pied presseur.
Darning stitch / Point de reprise / Punto para zurcido CAUTION: Make sure to turn off the machine before changing the presser foot. ATTENTION: Assurez-vous d’éteindre la machine avant de changer le pied presseur. PRECAUCIÓN: Asegúrese de apagar la máquina antes de cambiar el prensatelas.
Quilting stitch / Point de courtepointe Puntada acolchada Patch Work / Patchwork PATCHWORK The works of quilting and patch work can be finished as though they were hand-sewn by using inconspicuous bobbin thread. CAUTION: Make sure to turn off the machine be- Les travaux de courtepointe et de patchwork peuvent avoir une finition “cousu main” en utilisant un fil de canette discret.
Inserting Zippers / Fermetures à glissière / COLOCACIÓN DE CREMALLERAS Zippers are set in two different ways such as by inserting in side seam of the garment and by centering in opening. Les fermetures à gllissière sont placées de deux façons différents : recouverte sur le côté du vêtement ou centrée à l’ouverture. Existen dos formas de colocar las cremalleras: la que queda cosida como recubierta por el tejido y otra que queda centrada.
lapped insertion / Fermetures recouvertes / Inserción recubierta Open the seam allowance. 1 Zipper opening size 3mm Fabric (wrong side) Tissu (dessous) Tejido (revés) Teeth Mesure Dents d’ouverture de Dientes la fermeture Slider Tamaño de la Glisseur apertura de la Carro cremallera Neatly open the seam allowance. Adjust the back seam allowance so that it projects 3 mm from the seam. Press with an iron to make a crease. Fit the crease at the edge of teeth.
Centered Insertion / Fermetures centrées / CoIocación centrada 1 Seamline Couture Línea de la costura Teeth Dents Dientes Fabric (wrong side) Tissu (dessous) Tejido (del revés) Slider Glisseur Carro Baste Bâti Hilván Zipper (wrong side) Fermeture (dessous) Cremallera (del revés) Fabric (wrong side) Tissu (dessous) Tejido (del revés) Baste zipper and garment body. Open the seam allowance. Fitting the teeth of zipper at the end of the seam line, perform basting.
Blindstitch / Point invisible / PUNTADA INVISIBLE Blindstitching provides a durable way to finish a hem and is presented as an instantly selectable pattern as a convenience. It needs practice, so a test sewing is suggested. CAUTION: Make sure to turn off the machine L’ourlet invisible procure une finition durable pour les ourlets et est facilité par son programme instantanément sélectionné. Il nécessite un peu de pratique, aussi faîtes quelques essais auparavant. before changing the presser foot.
Quilting attachment Ensemble pour quilting Mecanismo para acolchar Pattern to be used Programme Tipo de costura a utilizar How to adjust the guide of the blindstitch presser foot Comment régler le guide du pied ourlet invisible Ajuste de la guía del prensatelas de puntada invisible.
Optional parts / Accessoires optionnels / PIEZAS OPCIONALES Invisible zipper foot Pied fermeture invisible Prensatelas de puntada invisible Pattern to be used Programme requis Tipo de costura a utilizar Since a seam does not appear on the right side of fabric, opening can be finished with fabric edges neatly butted. A fin qu’aucune couture apparaisse sur le devant du tissu, l’ouverture doit être finie avec les bords du tissu rentrés à l’intérieur.
Undo the basting stitch seam to the bottom of opening as shown in the sketch given in step 1. Then, open the zipper. 3 Depuis le point de bâti du fond de l’ouverture, suivez les étapes. 1. puis, ouvrez la fermeture. Quite el hilván de abajo a arriba tal y como explica el punto 1. A continuación, abra al cremallera.
Manual buttonhole foot Pied boutonnière manuelle Prensatelas de ojales manual Pattern to be used Programme Tipo de costura a utilizar Use this foot for buttonholing heavy-weight placket or collar band. Utilisez ce pied pour des boutonnières sur des issus épais et spongieux. Utilice este prensatelas para hacer los ojales en los rellenos de cuellos o puños. CAUTION: Make sure to turn off the machine before changing the presser foot.
Rolled hemming foot Pied ourlet roulé Prensatelas de dobladillo de caracolillo Pattern to be used Programme Tipo de costura a utilizar Fabric edge is hemmed while rolling it under. Used for finishing bottom of shirts and blouses and edges of frills and handkerchiefs. Le bord du tissu est ainsi roulé en dessous. Permet de finir les bas de robes chemisiers et les bord des mouchoirs légers.
Even feed foot Pied double entraînement Prensatelas para alimentar el tejido de forma uniforme Pattern to be used Programme Tipo de costura a utilizar This even feed foot is generally used for fabrics (such as knits, jersey, vinyl cloth, artificial leather and leather) that are difficult to be fed by sewing machine. It ensures smooth feed of fabric while preventing fabric slippage to achieve neatly finished seams.
Teflon-coated presser foot Semelle téflon Prensatelas de teflón CAUTION: Make sure to turn off the machine before changing the presser foot. ATTENTION: Veillez à éteindre la machine avant de changer le pied presseur. PRECAUCIÓN: Asegúrese de apagar la máquina antes de cambiar el prensatelas. Teflon coating provides smooth surface. Teflon presser foot is suitable for hard-to-feed fabrics (jersey, vinyl cloth or leather).
Replacing lamp (How To Remove Face Cover) Comment remplacer l’ampoule CAMBIO DE LA BOMBILLA (CÓMO QUITAR LA TAPA FRONTAL) Maintenance (cleaning) Nettoyage de la machine MANTENIMIENTO (LIMPIEZA) CAUTION: Be sure to disconnect the plug from wall out- let before cleaning and lubricating machine. CAUTION: ATTENTION: Assurez vous débrancher la prise du Be sure to disconnect the plug from the wall outlet before replacing light bulb. Contact the dealer in your area for the correct light bulb replacement.
Performance Checklist If sewing difficulties occur, make sure the instructions are correctly followed. If a problem still exists, the reminders below may help solve it. Problem Cause (Reason) Action to be taken Page * Machine runs idle. * Stitch length is set at left position of manual mode. * Drop feed is engaged. * Return bobbin winder to the left. * Set stitch length at auto mode or right position of manual mode. * Disengage drop feed. 11,12 19,20 * Needle is bent.
Problèmes éventuels et remèdes simples Si vous recontrez des difficultés,vérifiez d’abord que vous avez bien suivi les instructions. L’expérience démontre que la plupart des problèmes sont dus à des détails d’utilisation. Sinon, essayez de résoudre vorte problème à l’aide du tableau ci-dessous. En cas de persistance, ramenez la machine auprès de votre vendeur spécialisé. Probléme Cause A faire Page * La machine tourne dans le vide. * La longueur du point est réglée en position gauche du mode manuel.
TABLA DE PROBLEMAS Si tiene problemas con el funcionamiento de la máquina compruebe que ha seguido las instrucciones detalladas en este manual. Si tiene algún problema, consulte esta tabla para intentar solucionarlo. PROBLEMA CAUSA (RAZÓN) SOLUCIÓN PAG. * La máquina no funciona bien * La longitud de la puntada está establecida en la posición izquierda del modo manual. * Bajar la perilla de transporte. * Gira el bobinador a la izquierda.
® JUKI CORPORATION 8-2-1, KOKURYO-CHO, CHOFU-SHI, TOKYO 182-8655, JAPAN PHONE : 03(3480)5034 FAX : 03(3480)5037 http : //www.juki.co.jp E-mail : hsm@juki.co.jp Copyright © 2003 JUKI CORPORATION. All rights reserved throughout the world.