® 2-Needle, 2/3/4-Thread Overlock Sewing Machine Macchina Tagliacuci, 2 Aghi, 2/3/4 Fili Surjeteuse-Raseuse 2 Aiguilles, 2/3/4 Fils Überwendlich-Nähmaschine Mit 2 Nadeln, 2/3/4 Fäden MO-644D/654DE Instruction Manual Manuale di istruzioni Manuel d’instructions Bedienungsanleitung MO-644D IMPORTANT: Read all safety regulations carefully and understand them before using your sewing machine. Retain this instruction manual for future reference.
“IMPORTANT SAFETY INSTRUCTIONS” When using an electrical appliance, basic safety precautions should always be followed, including the following: Read all instructions before using this overlock sewing machine. “DANGER_____To reduce the risk of electric shock:” 1. The appliance should never be left unattended when plugged in. 2. Always unplug this appliance from the electric outlet immediately after using and before cleaning. 3. Always unplug before re-lamping.
“NORMAS DE SEGURIDAD IMPORTANTES” Cuando se usa un aparato eléctrico deben respetarse las siguientes normas de seguridad: “PELIGRO_____para reducir el riesgo de electrochoque:” 1. No dejar nunca la máquina de punto cadeneta y cobertura sin vigilancia si ella está enchufada. 2. Después de coser y antes de los trabajos de mantenimiento, la máquina debe desconectarse quitando el enchufe de la red eléctrica. 3. Antes de cambiar la bombilla, desenchufar la máquina.
“PRESCRIPTIONS DE SECURITE IMPORTANTES” L’emploi d’un appareil électrique exige d’observer les mesures de sécurité suivantes: “DANGER_____Pour la protection contre tout choc électrique:” 1. Ne pas laisser la surjeteuse sans surveillance tant qu’elle est raccordée au réseau. 2. Après usage et avant un nettoyage, séparer toujours la machine du réseau. 3. Retirer la fiche du réseau pour changer une ampoule. Employer des ampoules pour modèle: 15W (110/115V), 10W(230/240V).
“ISTRUZIONI IMPORTANTI RIGUARDO LA SICUREZZA” Usando una apparecchiatura elettrica bisogna osservare le seguenti prescrizioni di sicurezza di base: “PERICOLO_____Per ridurre il rischio di scosse elettriche:” 1. Non lasciare mai la macchina tagliacuce incustodita, finchè è collegata alla corrente elettrica. 2. Al termine del lavoro e prima di pulirla, staccare sempre la spina dalla presa di corrente. 3. Prima della sostituzione della lampadina staccare la spina dalla presa di corrente.
Contents / Indice / Sommaire / Indice • Overlocking width selection knob .................. 10 Sewing in tape ............................................... 24 IMPORTANT SAFETY INSTRUCTIONS Details of the machine ............................... 1,2 • Presser foot pressure adjusting screw ............. 10 Differential feed ......................................... 25 • Accessories ..................................................... 2 • Changing the needles .................................. 11 Gathering .
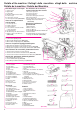
Details of the machine / Detalles de la máquina Piéces principales de la machine / Dettagli della macchina 1. Looper cover 2. Looper cover opening handle 3. Chip guard cover 4. Cloth plate 5. Throat plate 6. Presser foot 7. Lower looper thread tension dial 8. Upper looper thread tension dial 9. Right-hand needle thread tension dial 10. Left-hand needle thread tension dial 11. Thread take-up cover 12. Thread guide plate 13. Presser foot adjusting screw 14. Lamp (located inside) 15. Power/light switch 16.
Details of the machine / Dettagli della macchina ettagli della Détails de la machine / Details der Maschine View with looper cover open Vue intérieure de la machine, 1. Upper looper couvercle du boucleur ouvert 2. Upper knife 3. Lower knife 4. Overlock width selection knob 5. Lower looper 6. Lower knife setscrew 7. Lower looper threader (MO-654DE) Vista con il coperchio dell crochet aperto 1. Crochet superiore 2. Coltello superiore 3. Coltello inferiore 4.
Assembling thread stand / Ensamble del soporte del hilo Mise en place du support de guide-fil / Posizionamento dell'asta guidafilo Raise the support rod fully Turn the thread stand until it engages the positioning stopper (A) with a click. Levante completamente la varilla de soporte Gire el estante del hilo hasta que se enganche en el retentor (A) de posicionamiento con un clic. Soulever la tige jusqu’en butée Tourner le support de guide-fil jusqu’ à ce que la butée de position (A) s’encliquète.
Assembling thread stand / Ensamble del soporte del hilo Mise en place du support de guide-fil / Posizionamento dell'asta guidafilo For overlock spools Para carretes de sobreorillado Pour bobines de surjetage-rasage (overlock) Spoline per surfilatrice For large spools For spools of large inside diameter, position the anti-vibration come upside down. Para carretes grandes Para carretes de diámetro interior grande, posicione al revés el amortiguador de vibraciones.
Preparing machine / Preparación de la máquina Installation de la machine / Preparazione della macchina Attaching the foot controller 2 1 1. Plug foot controller into machine socket. 2. Plug foot controller into power supply socket. 3. Lay your foot on the foot controller. Step on the foot controller strongly (deeply), and the sewing speed increases. Step on the foot controller lightly (shallowly), and the sewing speed decreases. Modo de colocar el controlador de pie 1.
Operation and function / Operación y función Opération et fonction / Messa in servizio della macchina Handwheel (Pulley) The handwheel turns toward you. * Upon completion of threading, at sewing start or sewing end, be sure to turn the handwheel toward you. Volante de mano (Polea) El volante de mano gira en dirección hacia usted. * Al terminar el enhebrado, al principio o al fin de la costura, asegúrese de girar el volante de mano hacia usted.
Operation and function / Operación y función Opération et fonction / Messa in servizio della macchina Presser foot lifter (To raise the presser foot by the presser foot lifter) A For regular sewing operation (sewing a medium-weight material), raise the presser foot to position (A) illustrated in the figure. B When you sew a heavy-weight material, raise the presser foot to position (B) illustrated in the figure, to provide more space between presser foot and throat plate.
Operation and function / Operación y función Opération et fonction / Messa in servizio della macchina Raising the upper knife Be sure to turn the power switch OFF. 1. Turn the handwheel until the upper knife is fully raised. Open the looper cover. 2. Press the part indicated as (A) in the figure toward the right until it will go no further. 3. Keep pressing (A) and turn the knob on the right side in the direction of the arrow. 4. Turn the knob until the knife reaches position (B).
Operation and function / essa in ser i io della macchina Opération et fonction / Betrieb und Funktion titch length ad sting no to ad ust the stitch length Stitch length is adjustable within the range from 1 to 4. To adjust the stitch length, turn the stitch length adjusting knob and move the knob upwards or downwards. • For normal overlocking stitches set the stitch length adjusting knob at 2 to 3. Manopola di regolazione della lunghezza del punto La lunghezza del punto regola ile da a mm.
Operation and function / Operación y función Opération et fonction / Messa in servizio della macchina Overlocking width selection knob (for overlocking or roll hemming) * Turn the handweel until the needles are fully raised. • For overlocking Push the overlocking width selection knob back so that it aligns with the rear red marking on the throat plate. • For roll hemming 1. Pull the overlocking width selection knob forward so that it aligns with the front red marking on the throat plate. 2.
Operation and function / Operación y función Opération et fonction / Messa in servizio della macchina Changing the needles A Be sure to turn the power switch OFF. • Applying the needle attaching hole (A) of the cleaning brush will help replace the needle ease. 1. Turn the handwheel until the needle are fully raised. 2. Before Changing the needles, lower or remove the presser foot. 3. Using the small screwdriver, loosen the needle setscrews and remove the needles. 4.
Threading / Enhebrado Enfilage / Infilatura Thread the machine carefully and in the correct sequence. This is important for marking beautiful seams. Preparation 1. Retractable support rod with thread guide must be fully raised. 2. Open the looper cover and cloth plate. 3. Turn the handwheel toward you until the needles are fully raised. 4. Raise the upper knife. Threading sequence Colored threading illustrations affixed clearly show the threading sequence.
Threading (1) / Enhebrado (1) Enfilage (1) / Infilatura (1) 1. Upper looper thread (Blue) Place the spool on the spool holder pin right under blue marking on the retractable support rod thread guide. (1) Bring thread up from the rear of the retractable support rod thread guide with blue marking. (2,3) Pass the thread through the thread guide plate. (4) Bring the thread on to the thread guide. (5) Lay the thread between the thread tension dial discs. (6,7,8,9,10,11) Thread the thread guides.
Threading (2) / Enhebrado (2) Enfilage (2) / Infilatura (2) 2. Lower looper thread (Red) 1 2 Place the spool on the spool holder pin right under red marking on the retractable support rod thread guide. (1,2) Bring thread up from the rear of the retractable support rod thread guide to the front of it. (3,4) Pass the thread through the thread guide plate. (5) Bring the thread on to the thread guide. (6) Thread the thread tension dial. (7,8,9,10,11) Thread the thread guides.
Threading (2) / nfilatura (2) Enfilage (2) / Einfädeln (2) MO-644D MO-644D only: Solo per MO-644D: Seulement MO-644D: Nur MO-644D: (13) Using the looper threader, pass the threader from the right through to the left of the sewing machine. Turn the handwheel toward you until the lower looper is in the left-most position. Insert the thread into the slit on the lower looper. (14) Using the looper threader, pull the thread through to the right side again.
MO-644D MO-654DE
Threading (3) / Enhebrado (3) Enfilage (3) / Infilatura (3) 3. Right-hand needle thread (Green) Place the spool on the spool holder pin right under the green marking on the retractable support rod thread guide. (1,2) Bring thread up from the rear of the retractable support rod thread guide with the green markings to the front of it. (3,4) Pass the thread through the thread guide plate. (5) Thread the thread tension dial. (6,7) Thread the thread guide.
Threading (4) / Enhebrado (4) Enfilage (4) / Infilatura (4) 4. Left-hand needle thread (Yellow) Place the spool on the spool holder pin right under the yellow marking on the retractable support rod thread guide. (1) Bring thread up from the spool to the thread guide and take it through the yellow thread guide. (2,3) Thread the thread guide. (4) Thread the thread tension dial. (5) Thread the thread guide. (6) Lay the thread in the notch on the thread take-up lever. (7,8,9) Thread the thread guides.
3-thread overlocking / Sobreorillado de 3 hilos Overlock à 3 fils / Overlock (sopraggitto) a 3 fili 4 mm wide 3-thread Overlocking (Right-hand needle) (Blue, red and green) * Remove the left-hand needle. Thread in the following order. (1) Upper looper thread (Blue) (2) Lower looper thread (Red) (3) Right-hand needle thread (Green) * If the machine is already threaded with the left-hand needle thread, cut off and remove the thread.
2/3-thread converter / Convertidor de 2/3 hilos Convertisseur 2/3 fils / Convertitore per 2/3 fili How to use the 2/3 thread converter 2-thread flatlock Costura plana de 2 hilos Couture plate à 2 fils Cucitura piatta a 2 fili * This attachment enable the 1-needle type machine to perform overedging or decorative-stitching for 1-ply fabric. It enables the 2-needle type machine to perform 3-thread super stretch stitching.
Trial sewing / Cosido de prueba Couture d’essai / Prova di cucitura After threading, make a trial sewing Be sure to use a double layer of fabric in order to check whether the seam and thread tension are adequate. 1. Set the lower/upper looper, left-hand/right-hand needle thread tension dial “4”. 2. Make sure that the upper knife is lowered (in the cutting position). 3. Raise the presser foot. 4. Place the fabric under the presser foot. 5. Lower the presser foot and sew. 6.
Thread tension dial / Disco de tensión del hilo Bouton de réglage de la tension du fil / Manopola di regolazione della tensione del filo Adjusting the thread tension Imperfect stitch formation can be corrected by adjusting the set value (1 to 9) on the thread tension dial.
Adjusting the thread tension / Mode de ajustar la tensión del hilo Réglage de la tension du fil / Regolazione della tensione del filo A Adjusting the thread tension B Turn the thread tension dial in the direction of the arrow, and make a trial sewing.
Roll hemming / Dobladillado de rollo Roulottage / Orlo arrotolato Roll hemmer A The roll hemmer is built-in to the sewing machine. The fabric edge is automatically rolled and oversewn. The result is a very fine and narrow edge finishing. Preparation for roll hemming 1. Remove the left-hand needle and thread the machine as for 3-thread overlocking. 2. Set the lower knife adjusting knob at “1 - 2”. 3.
Standard thread tension list for roll hemming (rolled hem, narrow overlock sitich) Thread tension slightly differs depending on the types of the fabric and thread. Use the woolly nylon thread or thinner thread for roll hemming to attain the beautiful finish. Use the thin spun thread thinner than #80. Woolly nylon thread can be used only for the upper looper.
Sewing in tape / Cosido en cinta Pose de bande de renfort / Applicazione di un nastro Sewing in tape The standard presser foot is equipped with a tape guide. When sewing shoulders or side seams of stretchy fabrics as a knitted fabric, a tape works effectively to prevent undesirable stretch of the fabric. 1. Turn the handwheel toward you until the needles are fully raised. 2. Raise the presser foot, place the tape in the groove on the presser foot, and lower the presser foot. 3.
* Differential feed (MO-654DE) / * Transporte diferencial (MO-654DE) * Mécanisme d’avance à différentiel (MO-654DE) / * Trasporto differenziale (MO-654DE) * Differential feed MO-654DE Gathering and stretching of the fabric can be adjusted by adjusting the differential feed adjusting knob (differentiate the feeding amount of front feed dog (A) or rear feed dog (B)). After adjusted, be sure to sew on trial.
* Gathering (MO-654DE,644D) / * Fruncidos (MO-654DE,644D) * Fronces (MO-654DE,644D) / * Arricciatura (MO-654DE,644D) * Gathering 1. A single layer of light-weight fabric can be gathered. 2. Set the stitch length adjusting knob at max. “4”. 3. Set the differential feed adjusting knob at “1.5 - 2”. For examples: Sleeve heads, lower edges, yokes, lace edging or frills * When sewing without differential feed, set the differential feed adjusting knob at “N”. * Fruncidos 1.
Thread breakage during sewing / Rotura del hilo durante el cosido Fil cassé en cours de travail / Rottura del filo durante la cucitura Thread breakage during sewing 1. Turn the workpiece at a right angle direction and stop sewing immediately. The remove the workpiece. 2. Rethread * If the lower looper thread is broken, cut the both needle threads off at the needle. Then remove the threads. Thread the lower looper and then the needles.
Securing seams / Modo de asegurar las costuras Renforcement des fins de couture / Come assicurare la cucitura Securing seams 1. Sew about 3 to 4 cm of the thread chain at the beginning of seams. 2. Sew 2 to 3 stitches on the fabric. 3. Lower the needle and raise the presser foot. 4. Atretch the thread chain and lay it between the presser foot and the fabric from the left. 5. Lower the presser foot and sew over the thread chain.
Maintenance / Mantenimiento Entretien / Manutenzione WARNING Please refer to the safety instructions. Changing the upper knife The upper knife (moving knife) is made from special hardened material. Replace the upper knife only when the knife blade tip is damaged. For a replacement, contact your local dealer. Changing the lower knife Main switch off “O”. Disconnect machine from electricity supply. Turn handwheel towards you until needles are fully raised.
Maintenance / Mantenimiento Entretien / Manutenzione Replacing the bulb Be sure to turn the power switch OFF. Unscrew the bulb and replace it with a new one. The power consumption of the bulb is 10W (230V,240V), 15W (120V). The bulbs are available from your local dealer. Modo de cambiar la lámpara Asgúrese de desconectar la alimentación. Extraiga la lámpara vieja y cámbiela por otra nueva. El valor nominal de la lámpara debe ser 10W (230V,240V), 15W (120V).
Before you call for help: Trouble and corrective measures The followingproblems should not be regarded as the machine trouble. Check the following table before you call for help from us. Trouble Cause (reason) Corrective measures Page Fabric does not feed • Presser foot pressure is too low. Increase the presser foot pressure by turning the presser foot pressure adjusting screw to the right. 10 Needles break • Needles are bent, or the needle point is blunt. • Needles are incorrectly attached.
Dépistage des pannes et remèdas: avant d’appeler le mécanecien Les problèmes ci-dessous ne sont pas de défaut mécanique, vérifier le tableau ci-après avant appeler le mécanicien. Défaut Cause Remède Page L’étoffe n’est pas entraînée • La pression du pied presseur est insuffisante. Tourner la vis de réglage de pression du pied presseur vers la droite pour augmenter la pression. 10 Les aiguilles cassent • Aiguilles tordues ou la pointe abîmée. • Aiguilles mal montées. • Etffe trop fortement étirée.
Specifications / Especificaciones Caractérsteques techniques / Dati tecnici Caractérsteques techniques Specifications Item Item Specifications Specifications Number of threads 4 threads, 3 threads, 2 threads Nombre de fils 4 fils, 3 fils, 2 fils Needles Right-hand needle 130/705H Left-hand needle 130/705H (JLx2) Aiguilles aiguille droite 130/705H aiguille gauche 130/705H (JLx2) Overlocking width Left-hand needle: 6 mm Right-hand needle: 4 mm (for roll hemming: 2 mm) Largeur de point (overlock
Optional Accessories / Accesorios opcionales Accessoires spéciaux / Accessori opzionali · · · · Blind stitch presser foot Pie prensatelas de puntada ciega Pied presseur à points perdus Piedino per punto invisibile · Gathering presser foot · Pie prensatelas de funcidos · Pied presseur à froncer · Piedino per arricciatura A9810 634 0A0A A9860 655 0A0B · Elasticator · Elasticador · Elastiques · Piedino elasticatore · · · · A9815 655 0A0A A9865 655 0A0A · Cording presser foot · Pie prensatelas de acord