
assembly instructions


ASSEMBLY:
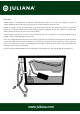
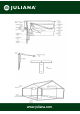
JULIANA VANLET is preassembled at the factory. The mixing tank is placed on a shelf or attached to the wall using the bracket (15) at
least 150 cm above floor level. The higher the tank is suspended above the floor, the greater the pressure will be.
The fitting can be attached to a wall or a greenhouse bar. Then lay out the feed hoses (10) and fit the drip pins (11). Now connect
the system to an ordinary water cock with a lightproof pressure hose and connect the measuring glass which has a ½” thread. An
8mm lightproof pressure hose can be purchased complete with a ½” screw connection as an accessory.
A Y-connection pipe (9), with two legs pointing upwards, is fitted to the end of the siphon hose. One is inserted into the venting
hose (13) and secured in the holder on top of the mixing tank.
The feed hose (10) with Y-branch pipes and drip pins can now be laid out. Up to 150 drip pins can be attached. They should be
distributed between three circuits with a hose direct from the tank. If only a small number of drip pins are used, the pins should
always be distributed between at least two circuits. At the end of each circuit, feed a hose up above the tank water level to vent the
entire circuit (13b). This applies to watering both outdoors and in greenhouses. Branch to the outdoors (14).
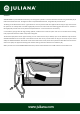
When you have test-run the JULIANA VANLET with water, lift the lid off and add 2 litres of 22 % fertilizer to the fertilizer tank.