® PRODUCT MODEL JTR6 Round 6' Diameter Trampoline Users Manual ASSEMBLY, SAFETY, CARE AND MAINTENANCE, USE, AND INSTRUCTIONAL MATERIALS ENCLOSED. WARNING: USING THIS TRAMPOLINE EXPOSES YOU TO THE RISK OF SERIOUS INJURY, INCLUDING PERMANENT PARALYSIS OR EVEN DEATH FROM LANDING ON THE BACK, NECK OR HEAD. THIS RISK EXISTS EVEN IF YOU LAND ON THE TRAMPOLINE MAT (BED). READ THIS MANUAL AND ALL MATERIALS FURNISHED WITH THE TRAMPOLINE THOROUGHLY BEFORE ASSEMBLING OR ALLOWING ANY PERSON TO USE THE TRAMPOLINE.
WARNING All Jumpking trampolines come equipped with important information regarding proper assembly, usage and safety procedures. This information must be read by all supervisors and trampoline users before allowing any person to jump on a trampoline. Jumpking, Inc. Limited Trampoline Warranty Jumpking, Inc. (Jumpking) warrants its trampoline products to be free from defects in material and workmanship under normal use and service conditions.
BEFORE YOU BEGIN Thank you for selecting a Jumpking Trampoline. The Jumpking Trampoline is designed and crafted to provide you and your family with many years of fun and fitness. For your benefit and safety, read this manual carefully before using this trampoline. If you have additional questions, please call our Customer Service Department, toll-free, at 1-800-322-2211, Monday through Friday, 8 a.m. until 5 p.m. Central Time (excluding holidays).
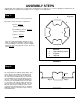
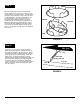
Top view ASSEMBLY STEPS Read through all assembly steps carefully before beginning the assembly process. Refer to drawings for clarification. No additional tools are required for assembly. The use of gloves is recommended. Step 1: Top view Lay out all frame sections in a circle (See Fig. 1). 3 4 The frame sections consist of 3 components: 1 Top rail - 4 pieces (part no. JTR6TR) Top rail with leg sockets - 4 pieces 2 (part no. JTR6TRS) Leg base - 4 pieces (part no.
FRAME ASSEMBLED Step 3: After the metal frame has been assembled it must be turned over so the base of the legs is in contact with the assembly surface. Stand outside the frame circle and lift one edge of the top rail to a vertical position. The frame is now like a coin on edge with the legs facing away from you. Rotate the frame until the legs face you and slowly lower the assembly to the ground or floor.
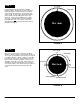
Step 5: 12 o'clock Top rail Lay the jumping mat (bed) (part no. JTR6B) inside the frame. Springs are used to support the mat (bed) and are connected between “V” rings on the mat (bed) and holes in the top frame rail. There are 48 “V” rings on the mat (bed) that have to line up with corresponding holes on the top frame rail. These are not numbered. To make sure they eventually all line up, pick an arbitrary point and call it zero or 12 o’clock.
Step 7: To install the rest of the springs, follow the above procedures in the following steps: a. Attach springs every 6 holes/”V” rings (springs now at 6, 18, 30, 42). b. Attach springs every 3 holes/”V” rings (springs now at 3, 9, 15, 21, 27, 33, 39, 45). c. You now have a two spring gap between the installed springs. Install one spring in each gap in a circular sequential fashion. Now install the remaining springs.
CARE AND MAINTENANCE Your trampoline is manufactured using quality materials and is finely-crafted to provide you and your family with many years of enjoyment and exercise. Proper maintenance and care will help to prolong the life of the trampoline and reduce the possibility of injury. The following guidelines should always be observed. 1. Inspect the trampoline before each use, and replace any worn, defective or missing parts.
TRAMPOLINE SAFETY SAFETY PRECAUTIONS 1. When used indoors or outdoors, ensure adequate horizontal and vertical (overhead) clearance from electric power wiring, tree limbs, ceilings, furniture, and other possible hazards. 2. The trampoline must be placed on a level surface before use. Place on carpet when used indoors. Place on grass when used outdoors. 3. The trampoline must always be used in a well-lighted area.
OWNER’S ROLE IN PREVENTING ACCIDENTS The supervisor or owner must teach the fundamentals, supervise the users, and enforce the rules. Strict supervision and enforcement of the rules will help minimize the likelihood of accidents or injuries. The supervisor must be in direct charge of any activity on the trampoline. Nearly every activity has rules or regulations which govern play or exercise. The rules set forth in this manual may not, by themselves, make such an activity safe.
BASIC JUMPING TECHNIQUE FUNDAMENTAL BOUNCE 1. Start from standing position with head erect and eyes on mat. 2. Swing arms forward and up in a circular motion. 3. Bring feet together and point toes downward while in the air. 4. Keep feet about 15 inches apart when landing on mat.
Exploded Drawing and Part List for Model JTR6, Round 6' Diameter Trampoline. 2 1 1 3 3 5 4 6 Replacement Parts Part Number Needed Quantity Description Drawing Reference Number JTR6B JTR6PW JTR6S JTR6TRS JTR6TR JTR6L ( 1) ( 1) (48) ( 4) ( 4) ( 4) 5'-6''dia.
ORDERING REPLACEMENT PARTS Replacement parts can be ordered by calling our Customer Service Department, toll-free, at 1-800-322-2211, Monday through Friday, 8 a.m. until 5 p.m. Central Time (excluding holidays). When ordering parts, please be prepared to give the following information: 1. The NAME and MODEL NUMBER OF THE PRODUCT (Jumpking trampoline). 2. The PART NUMBER (from page 12) . 3. The DESCRIPTION of the part (from page 12). 4. Quantity needed. 5. How to ship.
ORDER FORM Name:____________________________________________________________________________________________________ Street : _____________________________________________________________________________________________ City: ___________________________________ Home Phone #: ( ) State: __________________ Business Phone # Zip: _____________ ( ) Ship To: (if different from above) Name: ______________________________________________________________________________________________ Street: ________________
NOTES: Page 15
(Optional) 2nd Day UPS Charge TOTAL ENCLOSED _____________ $ _____________ You may order by phone with a credit card by dialing 1-800-322-2211; ask for Retail Sales Office. Jumpking, Inc. 901 W. Miller Road Garland, Texas 75041 800-322-2211 Page 20 As a manufacturer, we are committed to providing you complete customer satisfaction. If you have questions about this product, or find there are missing or damaged parts, we guarantee you complete satisfaction through direct assistance from our factory.