
Quick Start Guide
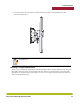
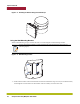
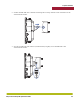
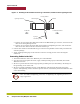


Table Of Contents
- MP-632
- Package Checklist
- Installing and Connecting an MP
- Installation Requirements and Recommendations
- Installing an MP-632
- Mounting the Unit
- Connecting External Antennas
- Multiple External Antenna Support
- Ethernet
- Connecting Cables to the Unit
- Connecting the Power Injector
- Aligning Antennas for Bridge or Mesh Links
- RSSI Meter Functionality
- Federal Communications Commission Interference Statement (United States)
- Canadian Department of Communications Industry Canada Notice (Canada)

Campus Connectivity MP Quick Start Guide
12
Trapeze Networks
Figure 1–1. Attaching the Bracket Using Steel Band Straps
Using the Wall-Mounting Bracket
Perform the following steps to mount the unit to a wall using the wall-mounting bracket.
Figure 1–2. Wall-Mounting Bracket
1. Position the bracket on the intended wall location and drill four large screws (not included in kit)
in through the circular holes on the bracket until it is firmly secured to the wall.
Note:
Always attach the bracket to a wall with the flat side flush against the wall (see
following figure)