
Network Router User Manual
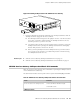
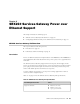
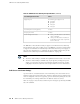

Table 15: 3G ExpressCard Physical Specifications (continued)
ValueSpecification
■
3.3V (primary source)
■
1.5V (secondary source)
Voltage supply
Related Topics SRX210 Services Gateway 3G ExpressCard Basic CLI Commands on page 33■
■ Installing the 3G ExpressCard in the SRX210 Services Gateway ExpressCard Slot
on page 32
■ SRX210 Services Gateway Front Panel and Back Panel Views (Low Memory, High
Memory and PoE Version) on page 10
Installing the 3G ExpressCard in the SRX210 Services Gateway ExpressCard Slot
TIP: Placing the SRX210 Services Gateway on a flat, level surface, with the Juniper
Networks logo facing up, will make it easier to align and insert the 3G ExpressCard
in the ExpressCard slot.
CAUTION: The SRX210 Services Gateway does not support hot insertion and removal
of the 3G ExpressCard.
To install the 3G ExpressCard in the ExpressCard slot on the SRX210 Services
Gateway:
1. Align the 3G ExpressCard as follows:
■ Ensure that the 3G ExpressCard is parallel with the surface on which the
SRX210 Services Gateway is placed.
■ Ensure that the center of the 3G ExpressCard is aligned with the center of
the ExpressCard slot on the SRX210 Services Gateway.
2. Study Figure 14 on page 33, which shows installation of the 3G ExpressCard on
the SRX210 Services Gateway.
32 ■ Installing the 3G ExpressCard in the SRX210 Services Gateway ExpressCard Slot
SRX210 Services Gateway Hardware Guide