
Datasheet


Replace an AC Power Supply
M40 Internet Router Hardware Guide
138
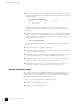
Figure 53: Remove an AC Power Supply
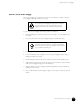
Install an AC Power Supply
To install an AC power supply, follow this procedure:
1. Verify that the switch on the power supply faceplate is in the
OFF (O) position.
2. Locate the power cord shipped with the router, which should be appropriate for your
geographical location (see “AC Power Cord Specifications” on page 45).
3. Attach an ESD strap to your bare wrist and connect the strap to one of the ESD points on
the chassis.
4. Grasp the handle on the power supply faceplate with one hand and place the other hand
under the unit to support it.
5. With a finger of the hand that is grasping the handle, lift and hold up the safety interlock
lever, which is just below the appliance inlet.
6. While holding the safety interlock lever up, slide the power supply into the chassis until
it contacts the backplane.
7. Still holding the safety interlock lever up, turn the extractor/inserter clockwise until the
power supply engages with the connectors on the backplane.
8. Push the safety interlock lever down.
9. Using a Phillips screwdriver, tighten (but do not overtighten) the thumbscrew at each
upper corner of the power supply faceplate.
1018
Safety
interlock lever
Captive screw
Extractor/inserter