
Datasheet

Maintain and Replace the Power Supplies
Disconnect and Connect DC Power
149
8. If not immediately attaching replacement cables, replace the protective shield over the
terminal studs and tighten the screws that secure it to the box.
9. Verify that the removed cables are not touching or blocking access to any router
components.
10. Repeats Steps 4 through 9 for the other power supply.
Connect DC Power to the Router
Connect DC power to the router by attaching power cables from external DC power sources
to the terminal studs on the power supplies. Power and grounding cables are not supplied
with the router. For information about the required cable type, see “DC Power and Grounding
Cable Specifications” on page 46.
To connect DC power to the router, follow this procedure:
1. Ensure that the voltage across the leads of the DC power source cables that you are
connecting is 0 V and that there is no chance that the cable leads might become active
during installation.
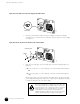
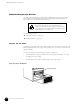
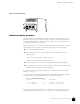
2. Verify that the power supplies are fully inserted in the chassis, that the thumbscrews and
extractor/inserters on their faceplates are tightened, and that the power switches on
both faceplates are in the
OFF (0) position. See Figure 64.
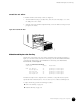
3. Attach the grounding cable to a proper earth ground, if it is not already.
4. Slide the grounding cable lug onto the grounding studs at the lower right corner of the
power supply faceplate. Secure the lug, first with locking washers, then with nuts. Using
a 7/16-in. nut driver or wrench, tighten the nuts.
The router must be connected to two separate external DC
power sources, one for each set of terminal studs on the
circuit breaker box.
There is no standard color coding for DC power cables. The
color coding used by the external DC power source at your
site determines the color coding for the leads on the power
cables that attach to the circuit breaker box. You must
ensure that the connections at the circuit breaker box
maintain the proper polarity. The power source DC cables
might be labeled
(+) and (–) to indicate their polarity.
Do not substitute a metric nut driver or wrench. A tool that
does not fit the nuts exactly can damage them. If a 7/16-in.
tool is not available, use pliers or an adjustable wrench.