
Datasheet


CHAPTER 10
Connecting the M7i Router to External
Devices
After installing the router into the rack as described in “Installing the M7i Router Into the
Rack” on page 49, complete the installation by performing the procedures described in
the following topics:
•
Tools and Parts Required for M7i Router Connections on page 55
•
Connecting the M7i Router to Management and Alarm Devices on page 55
•
Inserting an SFP into the 1-Port Gigabit Ethernet FIC on page 57
•
Connecting FIC and PIC Cables to the M7i Router on page 58
Tools and Parts Required for M7i Router Connections
To connect the router to management devices and PICs and to power on the router, you
need the following tools and parts:
•
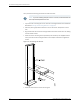
Electrostatic discharge (ESD) grounding wrist strap
Related
Documentation
M7i Router Power Requirements on page 167•
• M7i Router Site Preparation Checklist on page 37
Connecting the M7i Router to Management and Alarm Devices
After you have installed the router into the rack, connect the router to one or more external
devices for management and service operations.
To connect external devices, perform the procedures described in the following topics:
•
Connecting the M7i Router to a Network for Out-of-Band Management on page 56
•
Connecting the M7i Router to a Management Console or Auxiliary Device on page 56
55Copyright © 2012, Juniper Networks, Inc.