
User manual


14
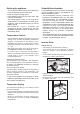
Refrigerator compartment
Control panel
1 2 3 4 5 6 7 8 9
1 Pilot light (green)
2 ON/OFF switch
3 Temperature setting buttons (for warmer
temperatures)
4 Temperature display
5 Temperature setting buttons (for colder
temperatures)
6 Super Frost indicator light (yellow)
¥ Super Frost for rapid freezing in the freezer
compartment
7 Push button for Super Frost
8 SchnellkŸhlen indicator light (yellow)
¥ SchnellkŸhlen for intensive fridge cooling
9 Push button for SchnellkŸhlen
Safety Instructions / Disposal . . . . . . . . . . . . . . . . . . . . . . . . . . . . . . . . . . . . . . . . . . . . . . . . . . . . . . . . . . . . .14
Use and Control Before Use / Refrigerator compartment - Control panel . . . . . . . . . . . . . . . . . . . . . . . . . . . .14
Starting the appliance / Temperature control / Temperature display / Supercool function / Internal parts . . .15
Hints . . . . . . . . . . . . . . . . . . . . . . . . . . . . . . . . . . . . . . . . . . . . . . . . . . . . . . . . . . . . . . . . . . . . . . . . . . . . . . . .16
Freezer compartment - Temperature control / Superfrost function / Interior accessories . . . . . . . . . . . . . . . .16
Freezer compartment - Hints . . . . . . . . . . . . . . . . . . . . . . . . . . . . . . . . . . . . . . . . . . . . . . . . . . . . . . . . . . . . .17
0¡C compartment / 0¡C compartment - Interior accessories . . . . . . . . . . . . . . . . . . . . . . . . . . . . . . . . . . . . .17
Hints . . . . . . . . . . . . . . . . . . . . . . . . . . . . . . . . . . . . . . . . . . . . . . . . . . . . . . . . . . . . . . . . . . . . . . . . . . . . . . . .18
Maintenance Defrosting / Cleaning / Changing the light bulb . . . . . . . . . . . . . . . . . . . . . . . . . . . . . . . . . . . . .20
Something not Working / Customer Service and Spare Parts . . . . . . . . . . . . . . . . . . . . . . . . . . . . . . . . . .21
Technical Specifications . . . . . . . . . . . . . . . . . . . . . . . . . . . . . . . . . . . . . . . . . . . . . . . . . . . . . . . . . . . . . . . . .22
Installation
Positioning / Electrical connection . . . . . . . . . . . . . . . . . . . . . . . . . . . . . . . . . . . . . . . . . . . . . . . .22
Building-in . . . . . . . . . . . . . . . . . . . . . . . . . . . . . . . . . . . . . . . . . . . . . . . . . . . . . . . . . . . . . . . . . . . . . . . . . . . .23
Contents
Use and Control
Before Use
Wait two hours before connecting the
appliance to allow the oil to flow back in the
compressor.
¥ Before using the appliance for the first time, wash
the interior and all internal accessories with
lukewarm water and some neutral soap so as to
remove the typical smell of a brand-new product,
then dry thoroughly.
Do not use detergents or abrasive
powders, as these will damage the finish.
¥ Remove safety elements used for transportation.