FINAL JN-71D-EU English 09/06/2004 09:08 Page A JMW 9161 Microwave oven with grill Operating Instructions
FINAL JN-71D-EU English 09/06/2004 09:08 Page B
FINAL JN-71D-EU English 09/06/2004 09:08 Page 1 CONTENTS Important safety instructions . . . . . . . . . . . . . . . . . . . . . . . . . . . . . . . . . . . . . . . . . . .2 - 4 Oven & accessories . . . . . . . . . . . . . . . . . . . . . . . . . . . . . . . . . . . . . . . . . . . . . . . . . . .5 Control panel . . . . . . . . . . . . . . . . . . . . . . . . . . . . . . . . . . . . . . . . . . . . . . . . . . . . . . .6 Before operation . . . . . . . . . . . . . . . . . . . . . . . . . . . . . . . . .
FINAL JN-71D-EU English 09/06/2004 09:08 Page 2 IMPORTANT SAFETY INSTRUCTIONS IMPORTANT SAFETY INSTRUCTIONS: READ CAREFULLY AND KEEP FOR FUTURE REFERENCE To avoid the danger of fire Do not store food or any other items inside the oven. Check the settings after you start the oven to ensure the oven is operating as desired. See the corresponding hints in this operation manual. To avoid the possibility of injury The microwave oven should not be left unattended during operation.
FINAL JN-71D-EU English 09/06/2004 09:08 Page 3 IMPORTANT SAFETY INSTRUCTIONS To avoid the possibility of electric shock Under no circumstances should you remove the outer cabinet. Never spill or insert any objects into the door lock openings or ventilation openings. In the event of a spill, turn off and unplug the oven immediately and call an authorised JUNO-ELECTROLUX service agent. Do not immerse the power supply cord or plug in water or any other liquid.
FINAL JN-71D-EU English 09/06/2004 09:08 Page 4 IMPORTANT SAFETY INSTRUCTIONS To avoid misuse by children Only use the turntable and the turntable support designed for this oven. Do not operate the oven without the turntable. To prevent the turntable from breaking: (a) Before cleaning the turntable with water, leave the turntable to cool. (b) Do not put hot foods or hot utensils on a cold turntable. (c) Do not put cold foods or cold utensils on a hot turntable.
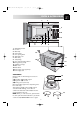
FINAL JN-71D-EU English 09/06/2004 09:08 Page 5 OVEN & ACCESSORIES 1 2 3 4 5 9 8 7 6 10 1 Grill heating element 2 Front trim 3 Oven lamp 4 Control panel 5 Door opening button 6 Waveguide cover 7 Oven cavity 8 Seal packing 9 Door seals and sealing surfaces 10 Fixing points (4 points) 11 Ventilation openings 12 Outer cover 13 Rear cabinet 14 Power supply cord support clips 15 Power supply cord 15 11 14 12 13 ACCESSORIES: Check to make sure the following accessories are provided: (16) Turntable
FINAL JN-71D-EU English 09/06/2004 09:08 Page 6 CONTROL PANEL 1 Digital Display 2 Indicators The appropriate indicator will flash or light up, just above each symbol according to the instruction. When an indicator is flashing, press the appropriate button (having the same symbol) or carry out the necessary operation. 1 2 Stir Turn over Weight/power level 3 Grill Microwave 4 5 Cooking in progress 3 TIMER/WEIGHT/POWER knob 4 AUTO COOK button Press to select one of the 2 automatic programmes.
FINAL JN-71D-EU English 09/06/2004 09:08 Page 7 BEFORE OPERATION Using the STOP button Use the STOP button to: 1. Erase a mistake during programming. 2. Stop the oven temporarily during cooking. 3. Cancel a programme during cooking, touch twice. Plug in the oven. 1. The oven display will flash: 2. Press the STOP button, the display will show: x1 3. To set the clock, see below. 4. Heat the oven without food. (See page 17 note 2).
FINAL JN-71D-EU English 09/06/2004 09:08 Page 8 WHAT ARE MICROWAVES? Like radio and television waves, microwaves are electromagnetic waves. Microwaves are produced by a magnetron inside the microwave oven, and these vibrate the molecules of water present in the food. The friction this causes produces heat, which ensures that the food is defrosted, heated or cooked through. The secret of the reduced cooking times is the fact that the microwaves penetrate the food from every direction.
FINAL JN-71D-EU English 09/06/2004 09:08 Page 9 SUITABLE COOKWARE MICROWAVE CLING FILM METAL This, or heat-resistant film, is very suitable for covering or wrapping. Please follow the manufacturer's recommendations. Generally speaking, metal should not be used, since microwaves do not pass through metal and therefore cannot reach the food.
FINAL JN-71D-EU English 09/06/2004 09:08 Page 10 TIPS & ADVICE BEFORE YOU START... COOKING TIMES To make it as easy as possible to use the microwave oven we have put together a few hints and tips for you. Only switch on the oven when the food is already inside. All the times given in this book are guidelines, which can be varied according to the initial temperature, weight and condition of the food (water or fat content etc.).
FINAL JN-71D-EU English 09/06/2004 09:08 Page 11 TIPS & ADVICE USING A FOOD THERMOMETER TO DETERMINE COOKING TIME BLANCHING VEGETABLES Before freezing vegetables, they should be blanched. This preserves the quality and flavour at their best. Method: wash and chop the vegetables. Put 250g of vegetables in a dish with 275 ml water and cover. Heat for 3-5 minutes. After blanching, immerse immediately in cold water to prevent further cooking and then allow to drain.
FINAL JN-71D-EU English 09/06/2004 09:08 Page 12 TIPS & ADVICE COVERING ARRANGEMENT OF FOOD Covering the food retains the moisture within it and shortens the cooking time. Use a lid, microwave cling film or a cover. Foods which are to be crispy, e.g. roasts or chickens, should not be covered. As a general rule, whatever would be covered in a conventional oven should also be covered in a microwave oven. Whatever would be uncovered in a conventional oven can also be left uncovered in a microwave oven.
FINAL JN-71D-EU English 09/06/2004 09:08 Page 13 HEATING ● Ready-prepared meals in aluminium containers ● The times are for food at a room temperature of should be removed from the aluminium container and heated on a plate or in a dish. Food should be covered with microwave cling film, a plate or cover (obtainable from stores), so that the surface does not dry out. Drinks need not be covered. Remove the lids from firmly closed containers.
FINAL JN-71D-EU English 09/06/2004 09:08 Page 14 COOKING FRESH VEGETABLES ● When buying vegetables try to ensure that, as ● Vegetables are usually cooked in a dish with a far as possible, they are of similar size. This is particularly important when you want to cook the vegetables whole (e.g. boiled potatoes). ● Wash the vegetables before preparing them, clean them and only then weigh the required quantity for the recipe and chop them up.
FINAL JN-71D-EU English 09/06/2004 09:08 Page 15 MICROWAVE POWER LEVELS Your oven has 5 power levels. To choose the power level for cooking, follow the advice given in the recipe section. Generally the following recommendations apply: 450 W for dense foods which require a long cooking time when cooked conventionally, eg. beef dishes, it is advisable to use this power setting to ensure the meat will be tender. 900 W used for fast cooking or reheating e.g.
FINAL JN-71D-EU English 09/06/2004 09:08 Page 16 MICROWAVE COOKING Your oven can be programmed for up to 90 minutes. (90.00) The input unit of cooking (defrosting) time varies from 10 seconds to five minutes. It depends on the total length of the cooking (defrosting) time as shown on the table.
FINAL JN-71D-EU English 09/06/2004 09:08 Page 17 GRILL & DUAL GRILL COOKING This microwave oven has two GRILL cooking modes: 1. Grill only. 2. Dual Grill (Grill with microwave). 1. GRILL ONLY COOKING This mode can be used to Grill/Brown food. Example : To make toast for 4 minutes. 1. Enter the desired cooking time by rotating the TIMER/WEIGHT/ POWER knob. 2. Choose the desired cooking mode by pressing the COOKING MODE button twice. (Grill only). 3. Press the START/+30 button once to begin cooking.
FINAL JN-71D-EU English 09/06/2004 09:08 Page 18 OTHER CONVENIENT FUNCTIONS 1. MULTIPLE SEQUENCE COOKING A sequence of 3 stages (maximum) can be programmed using combinations of MICROWAVE, GRILL or DUAL GRILL. Example: To cook : 2 minutes and 30 seconds on 630 W power 5 minutes Grill only (Stage 1) (Stage 2) STAGE 1 1. Enter the desired cooking time by rotating TIMER/ WEIGHT/POWER knob clockwise. 3. Choose the desired power by rotating the TIMER/ WEIGHT/POWER knob clockwise. 2.
FINAL JN-71D-EU English 09/06/2004 09:08 Page 19 OTHER CONVENIENT FUNCTIONS 2. ADD 30 SECONDS FUNCTION The START/+30 button allows you to operate the two following functions: a. Direct start You can directly start cooking on 900 W microwave power level for 30 seconds by pressing the START/+30 button. NOTE: To avoid the misuse by children the START/+30 button can be used only within 3 minutes after the preceding operation, i.e., closing the door, pressing the STOP button or cooking completion. b.
FINAL JN-71D-EU English 09/06/2004 09:08 Page 20 AUTO COOK & DEFROST OPERATION AUTO COOK and AUTO DEFROST automatically work out the correct cooking mode and cooking time. You can choose from 2 AUTO COOK, 6 AUTO COOK plus GRILL and 4 AUTO DEFROST menus. What you need to know when using this automatic function: For example: 1a. AUTO COOK: The AUTO COOK button has two menus. Press the AUTO COOK button once, the display will appear as shown. 1a. 1b.
FINAL JN-71D-EU English 09/06/2004 09:08 Page 21 AUTO COOK & DEFROST OPERATION Example 1 for AUTO COOK plus GRILL 1: To cook Gratinated Fish Fillet 1,5 kg using Auto Cook plus Grill 1 (A1-1). 1. Select the menu required by pressing the AUTO COOK PLUS GRILL 1 button once. 2. Enter the weight by rotating the TIMER/WEIGHT/ POWER knob. 3. Press the START/+30 button once. x1 x1 Check the display. Example 2 for AUTO DEFROST: To defrost Steak 0,2 kg using Auto Defrost (Ad-1). 1.
FINAL JN-71D-EU English 09/06/2004 09:08 Page 22 AUTO COOK & DEFROST CHARTS BUTTON AUTO COOK WEIGHT (Increasing Unit) / UTENSILS AC-1 Cook Chicken Pan with Vegetables 0,5 - 1,5 kg* (500 g) • See recipe for Chicken Pan with Vegetables (initial temp Chicken 5° C) on page 25. Gratin dish with microwave cling film * Total weight of all ingredients. AC-2 Cook Mince and Onion 0,5 - 1,5 kg* (500 g) • See recipe for Mince and Onion on page (initial temp Mince 5° C) 25.
FINAL JN-71D-EU English 09/06/2004 09:08 Page 23 AUTO COOK & DEFROST CHARTS BUTTON x1 x2 AUTO COOK plus GRILL 2 WEIGHT (Increasing Unit) / UTENSILS A2-1 Cook French Fried Potatoes Thick type (recommended for conventional ovens) 0,20 - 0,40 kg (50 g) (initial temp -18° C) Flan dish High rack • Remove the frozen french fried potatoes from the package and place them on a flan dish. • Place the dish on the high rack in the oven. • When the audible signals sound, turn over.
FINAL JN-71D-EU English 09/06/2004 09:08 Page 24 AUTO COOK & DEFROST CHARTS BUTTON WEIGHT (Increasing AUTO Unit) / UTENSILS DEFROST NO. Ad-1 Defrost Steak and Chops 0,2 - 1,0 kg (100 g) (initial temp -18° C) (See note below) • Place the food on a plate in the centre of the turntable. • When the oven stops and the audible signals sound, turn the food over, rearrange and separate. Shield thin parts and warm spots with aluminium foil.
FINAL JN-71D-EU English 09/06/2004 09:08 Page 25 RECIPES FOR AUTO COOK MENUS CHICKEN PAN WITH VEGETABLES (AC-1) Spicy chicken fricassee Ingredients Preparation 1. Mix the rice and saffron and place in the greased dish. long grain rice (parboiled) 2. Mix the onions, red pepper, leek and chicken. sachet saffron Season and place on the rice. onion (sliced) 3. Put butter on the top. red pepper (in strips) 4.
FINAL JN-71D-EU English 09/06/2004 09:08 Page 26 RECIPES FOR AUTO COOK MENUS GRATINATED FISH FILLET (A1-1) Fish esterhazy Ingredients 0,5 kg 1,0 kg 1,5 kg 230 g 100 g 20 g 40 g 10 g 450 g 200 g 40 g 100 g 10 g 680 g 300 g 60 g 140 g 20 g 1 tbsp 11/2 tbsp 2 tbsp 50 g 100 g 150 g 50 g 100 g 150 g GRATIN (A1-2) Spinach gratin Ingredients 0,5 kg 1,0 kg 150 g 15 g 300 g 30 g 150 g 35 g 50 g 1 40 g 300 g 75 g 100 g 2 75 g Preparation 1.
FINAL JN-71D-EU English 09/06/2004 09:09 Page 27 COOKING CHARTS TABLE : HEATING FOOD AND DRINK Quantity Setting Food/Drink -g- Coffee, Milk, Water, 1 cup 1 cup 1 cup 6 cups 1 dish One-plate meal (Veg, Meat + side dishes) Stew Soup, clear Cream soup Vegetables Side dishes 1 Meat, 1 slice Fish fillet Sausages, 2 pieces Cake, 1 slice Baby food, 1 jar 1 Melting Margarine or Butter Melting chocolate Dissolving 6 sheets of gelatine Cake glaze for 1/4 l liquid 1 Time Power -min- -Level- 150 150 150
FINAL JN-71D-EU English 09/06/2004 09:09 Page 28 COOKING CHARTS TABLE : COOKING, GRILLING, BROWNING Meat, Fish and Poultry Roasts (Pork, Veal, Lamb) Weight Setting -g- 500 1000 1500 Roast beef (medium) 1000 1500 Cooked mince 1000 Chicken 1200 Chicken legs 200 Trout 250 Power -Level- Time 5-8 6-8 (*) 5-8 4-5 16-18 5-7 (*) 14-16 4-6 26-28 5-6 (*) 26-28 4-5 5-8 8-10 (*) 3-5 12-15 12-15 (*) 4-6 20-23 6-9 9-11 5-7 (*) 9-11 3-5 6-7 (*) 4-6 7-9 (*) 90 W 4-5 90 W 450 450 450 450 450 450 450 4
FINAL JN-71D-EU English 09/06/2004 09:09 Page 29 COOKING CHARTS TABLE : COOKING OF FROZEN SNACKS Frozen Snacks Weight Setting Power Time Method Place in a shallow gratin dish and put on the high rack. After approx. 5-6 Min. of grill time turn over. (Thin potato chips need a shorter grill time). Place on the low rack.
FINAL JN-71D-EU English 09/06/2004 09:09 Page 30 RECIPES ADAPTING RECIPES FOR THE MICROWAVE OVEN FOR COMBINED OPERATION In general the same rules apply as for microwave operation. The following additional tips should be borne in mind: If you would like to adapt your favourite recipes for the microwave, you should take note of the following: Shorten cooking times by a third to a half. Follow the example of the recipes in this book.
FINAL JN-71D-EU English 09/06/2004 09:09 Page 31 SOUPS & STARTERS France 1. Place the butter cut up into pieces in the bowl. Add the sliced onion, the meat stock and the seasoning. Cover and microwave.. 9-11 min. 900 W 2. Toast the slices of bread, cut them into cubes and divide them among the soup bowls. Pour the soup over the toast cubes and sprinkle on the cheese. 3. Place the bowls on the turntable, use the top grill and brown the cheese topping. 6-7 min. ONION SOUP Total cooking time: approx.
FINAL JN-71D-EU English 09/06/2004 09:09 Page 32 SOUPS & STARTERS 1. Remove the stalks from the mushrooms and chop the stalks into small pieces. 2. Spread the butter on the bottom of the dish. Add the onions, the diced bacon and the mushroom stalks. Season with pepper and rosemary, cover and cook. 3-5 min. 900 W Leave to cool. 3. Heat 100 ml of the wine and cream in the other dish with its lid on. 1-3 min. 900 W 4. Mix the remaining wine with the flour, stir into the hot liquid and cook with the lid on.
FINAL JN-71D-EU English 09/06/2004 09:09 Page 33 MEAT, FISH & POULTRY 1. Cut the aubergines in half lengthways. Scoop out the flesh with a teaspoon to leave a shell about 1 cm thick. Sprinkle the aubergines with salt and dice the scooped-out flesh. 2. Remove the skin from two of the tomatoes and chop them up, having first cut out the stalks. 3. Grease the bottom of the bowl with the olive oil. Add the onions. Cover and cook. approx. 2 min. 900 W 4.
FINAL JN-71D-EU English 09/06/2004 09:09 Page 34 MEAT, FISH & POULTRY 1. Knead the minced meat, onion cubes, egg and breadcrumbs into a dough and season with salt and pepper. Place the meat loaf in the dish. 2. Mix the meat stock with the tomato puree. 3. Arrange the potatoes and carrots around the meat loaf together with the liquid. Cover and microwave. Turn once during cooking. 20-23 min. 900 W Give the contents of the dish a final adjustment and leave to stand for about 5 minutes.
FINAL JN-71D-EU English 09/06/2004 09:09 Page 35 MEAT, FISH & POULTRY Switzerland 1. Slice the meat into finger-thick strips. 2. Smear the butter evenly around the dish. Add the onion and the meat to the dish, cover and cook. Stir once during cooking. 6-9 min. 900 W 3. Add the white wine, the gravy powder and the cream, stir, cover and continue to cook. Stir once during cooking. 3-5 min. 900 W 4. Taste the stew, stir again and allow to stand for 5 minutes. Serve with parsley garnish.
FINAL JN-71D-EU English 09/06/2004 09:09 Page 36 MEAT, FISH & POULTRY 1. Wash the fish and pat dry. Remove any bones. 2. Slice the lemon and the tomatoes finely. 3. Grease the gratin dish with butter. Place the fish in it and drizzle with vegetable oil. 4. Sprinkle the fish with parsley, lay the slices of tomato on top and season. Lay the slices of lemon on top of the tomato and pour the white wine over this. 5. Dot the lemon with butter, cover and cook. 11-13 min.
FINAL JN-71D-EU English 09/06/2004 09:09 Page 37 MEAT, FISH & POULTRY 1. Wash the fish, pat dry and sprinkle with lemon juice. Leave to stand for 15 minutes, pat dry again and rub with salt. 2. Smear the butter on the bottom of the dish. Add the diced onion, cover with the lid and steam. 1-2 min. 900 W 3. Sprinkle the flour over the onions and stir. Add the white wine and mix. 4. Grease the gratin dish and place the fish in it. Pour the sauce over the fish and sprinkle with cheese.
FINAL JN-71D-EU English 09/06/2004 09:09 Page 38 VEGETABLES, NOODLES, RICE & PASTA 1. Cut the bread rolls into small cubes and soak in the milk. 2. Divide the fat on the bottom of the bowl and add the chopped onion. Cover and cook. 1-2 min. 900 W 3. Add the onion to the bread cubes. Beat the eggs, add them and mix well to form a workable paste. If necessary add a little milk. 4.
FINAL JN-71D-EU English 09/06/2004 09:09 Page 39 VEGETABLES, NOODLES, RICE & PASTA 1. Place the water and the salt into the bowl, cover and bring to the boil. 9-11 min. 900 W 2. Add the pasta, bring to the boil again, and then simmer. 1. 1-2 min. 900 W 2. 6-9 min. 270 W 3. Meanwhile rub the garlic cloves over the soufflé dish. Chop the basil leaves. Keep some aside for garnishing. 4. Drain the pasta well. Stir in the crème fraîche and sprinkle the basil over the pasta. 5.
FINAL JN-71D-EU English 09/06/2004 09:09 Page 40 VEGETABLES, NOODLES, RICE & PASTA 1. Cut the bacon into cubes. Spread the butter over the base of the bowl. Place the onions and bacon cubes, cover, and braise. 2-3 min. 900 W 2. Add the rice, fill with the meat stock, bring to the boil, and then simmer. 1. 3-5 min. 900 W and then 2. 15-17 min. 270 W Allow the rice to stand for about 3-5 minutes after cooking. 3. Mix the cheese with the saffron and season to taste.
FINAL JN-71D-EU English 09/06/2004 09:09 Page 41 DRINKS, DESSERTS & CAKES 1. Put the milk, sugar and almonds into the bowl, cover and heat. 3-5 min. 900 W 2. Add the semolina and stir. Cover and microwave. Stir once during cooking. 10-12 min. 270 W 3. Mix the egg yolk with the water in a cup and fold into the hot semolina. Beat the egg white until stiff and lightly fold it in. Transfer the pudding to small bowls. 4.
FINAL JN-71D-EU English 09/06/2004 09:09 Page 42 DRINKS, DESSERTS & CAKES 1. Put the rice and the liquid in the bowl. Slit open the vanilla pod and add it to the rice with the salt and sugar. Cover and microwave. Stir once during cooking. 1. 3-5 min. 900 W 2. 24-26 min. 270 W Leave the rice to stand for 5 minutes after cooking. 2. Cut the strawberries in half and mix with sugar and the orange liqueur. 3. Remove the vanilla pod from the rice and cool the rice by stirring it in a bain-marie.
FINAL JN-71D-EU English 09/06/2004 09:09 Page 43 DRINKS, DESSERTS & CAKES 1. Reserve some of the fruit for decoration. Puree the rest of the berries with the wine. Put into the bowl and cook cover. 5-7 min. 900 W Add sugar and lemon juice. 2. Leave gelatine in cold water for 10 minutes to soften. Remove and squeeze out water. Stir gelatine into the hot fruit until it dissolves. Put the jelly into the fridge to set. 3. To make the vanilla sauce, put the milk in a bowl.
FINAL JN-71D-EU English 09/06/2004 09:09 Page 44 DRINKS, DESSERTS & CAKES 1. Beat the butter until smooth and slowly add the sugar. Gradually add the eggs and then whisk into the mixture. Mix flour, baking powder and cocoa then put into mixture. Add the milk and mix everything well. 2. Grease baking tin, pour in the mixture and cook. 8-10 min. 630 W Check with a knife whether the dough is ready. 3. Leave the cake to cool in the baking tin for 10 minutes, then remove it. Leave it to cool down completely.
FINAL JN-71D-EU English 09/06/2004 09:09 Page 45 CARE & CLEANING Oven Interior 1. For cleaning, wipe any spatters or spills with a soft damp cloth or sponge after each use while the oven is still warm. For heavier spills, use mild soap and wipe several times with a damp cloth until all residues are removed. 2. Make sure that mild soap or water do not penetrate the small vents in the walls which may cause damage to the oven. 3. Do not use spray type cleaners on the oven interior. 4.
FINAL JN-71D-EU English 09/06/2004 09:09 Page 46 WHAT TO DO IF... SYMPTOM POSSIBLE SYMPTOMS/REMEDIES ... the microwave appliance is not working properly? Check that - the fuses in the fuse box are working, - there has not been a power outage. - If the fuses continue to blow, please contact a qualified electrician. ... the microwave mode is not working? Check that - the door is properly closed, - the door seals and their surfaces are clean, - the START-button has been pressed. ...
FINAL JN-71D-EU English 09/06/2004 09:09 Page 47 SERVICE & SPARE PARTS If you wish to purchase spare parts or require an engineer, contact your local authorised service agent. The telephone number can be obtained from the operator.
FINAL JN-71D-EU English 09/06/2004 09:09 Page 48 SPECIFICATIONS AC Line Voltage Distribution line fuse/circuit breaker AC Power required: Microwave Grill Dual Grill Output power: Microwave Grill Microwave Frequency: Outside Dimensions: Cavity Dimensions Oven Capacity Turntable Weight Oven lamp : : : : : : : : : : : : : : 230 V, 50 Hz, single phase Minimum 16 A 1.37 kW 1.00 kW 2.
FINAL JN-71D-EU English 09/06/2004 09:09 Page 49 INSTALLATION INSTALLING THE APPLIANCE 3. Fit the appliance into the kitchen cupboard slowly, and without force, until the front frame of the oven seals against the front opening of the cupboard. 4. Ensure the appliance is stable and not leaning. 5 mm Ensure that a 5mm gap is kept between the cupboard door above and the top of the frame (see diagram). 5. Fix the oven in position with the screws provided.
FINAL JN-71D-EU English 09/06/2004 09:09 Page 50 INSTALLATION CONNECTING THE APPLIANCE TO THE POWER SUPPLY • The electrical outlet should be readily accessible so that the unit can be unplugged easily in an emergency. (A) • The socket should not be positioned behind the cupboard. • The best position is above the cupboard, see (A). When not connecting the power supply cord to position (A) it should be removed from the support clip (see diagram, item 14, on page 5) and routed under the oven.
FINAL JN-71D-EU English 09/06/2004 09:09 Page 51
FINAL JN-71D-EU English 09/06/2004 09:09 Page 52
FINAL JN-71D-EU English 09/06/2004 09:09 Page 53
FINAL JN-71D-EU English 09/06/2004 09:09 Page 54 From the Electrolux Group. The World’s No.1 choice. The Electrolux group is the world’s largest producer of powered appliances for the kitchen, cleaning and outdoor use. More than 55 million Electrolux Group products (such as refrigerators, cookers, washing machines, vacuum cleaners, chain saws and lawn mowers) are sold each year to a value of approx. USD 14 billion in more than 150 countries around the world.