JRU 44602 GEBRAUCHSANWEISUNG OPERATING INSTRUCTION
Hinweise zur Benutzung der Gebrauchsanweisung Die folgenden Symbole erleichtern das Lesen der Gebrauchanweisung: Sicherheitshinweise bezüglich der Benutzung des Gerätes Ratschläge für den korrekten Gebrauch und die optimale Ausnutzung des Gerätes. Informationen zum Umweltschutz Sicherheitshinweise Bevor Sie Ihr neues Kältegerät in Betrieb nehmen, lesen Sie bitte diese Gebrauchsanweisung aufmerksam durch. Diese sind Sicherheitshinweise.
Inhalt Sicherheitshinweise . . . . . . . . . . . . . . . . . . . . . . . . . . . . . . . . . . . . . . . . . . . . . . . . . . . . . . . . . . . . . . . . . . . . . .2 Entsorgung . . . . . . . . . . . . . . . . . . . . . . . . . . . . . . . . . . . . . . . . . . . . . . . . . . . . . . . . . . . . . . . . . . . . . . . . . . . . .3 Gebrauch Vor Inbetriebnahme / Kühlabteil - Inbetriebnhame / Temperaturregelung . . . . . . . . . . . . . . . . . . . . .3 Kühlabteilausstattung / Tipps . . . . . . . . . . . . .
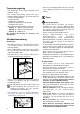
Temperaturregelung • Der Drehknopf für die Temperaturwahl ist im Kühlraum rechts. • Die richtige Einstellung erhält man, unter Berücksichtigung folgender, die Innentemperatur beeinflussender Faktoren: • Raumtemperatur • Häufigkeit des Türöffnens • Menge der eingelagerten Lebensmittel, • Aufstellung des Gerätes. • Die Temperatur wird automatisch geregelt.
Gefrierabteil Temperaturregelung • Der Thermostatknopf regelt das Kühl- und Gefrierabteil. • Für das Einfrieren von Lebensmitteln ist es nicht nötig die Einstellung des Thermostatknopfes von der üblichen Normalstellung zu ändern. • Wünscht man aber ein rasches Einfrieren, dann muß der Thermostatknopf auf die höchste Stellung gedreht werden. Dabei aber darauf achten, dass im Kühlfach die Temperatur nicht unter Null sinkt. In diesem Falle den Thermostatknopf auf eine niedrigere Markierung drehen.
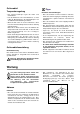
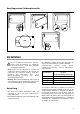
Gefrierraum • Die Reifschicht mit dem Plastikschaber abkratzen. • Wenn im Gefrierabteil die Eisschicht stärker als ca. 5 mm ist, tauen Sie Ihr Gerät ab. Um ein vollständiges Abtauen durchzuführen, geht man wie folgt vor: • Tiefkühlgut herausnehmen, in mehrere Lagen Zeitungspapier einpacken und abgedeckt an einem kühlen Ort lagern. • Thermostatknopf auf «O» einstellen oder Stecker aus der Steckdose herausziehen; • Tür offen lassen. 1. Nehmen Sie die Küchenmöbelsockelblende (1) ab; 2.
Wenn etwas nicht funktioniert Falls das Gerät Störungen aufweisen sollte, bevor Sie den Kundendienst verständigen, überprüfen Sie zuerst folgendes: Störung Abhilfe Im Gerät wird es nicht kalt genug Der Drehknopf auf kältere Temperatur drehen. Die Lebensmittel müssen so eingelagert werden, dass die Kälte um sie frei zirkulieren kann. Tür richtig schließen. Die Umgebungstemperatur ist zu warm. Gerät kühlt zu stark. Der Drehknopf auf wärmere Temperatur drehen.
Technische Angabe Maßen Höhe 815 mm Breite 596 mm Tiefe 540 mm Die technischen Angaben sind auf dem Typschild genannt, das auf der rechten inneren Seite der Anlage liegt. Im Falle einer Stromunterbrechung während der Lagerung von Tiefkühlkost bzw. von eingefrorenen Lebensmitteln soll die Tür des Gefrierfaches nicht geöffnet werden. Die Tiefkühlkost verdirbt nicht, wenn es sich um eine kurze Unterbrechung handelt (12 Std.) und das Gerät voll ist.
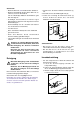
Anschlagwechsel Verdampferfachtür 180° Installation Vor der Installation sicherstellen, dass das Gerät nicht beschädigt ist. Mögliche Transportschäden sind dem Händler unverzüglich mitzuteilen. • Während das Gerät in Betrieb ist, werden der Verflüssiger und der Kompressor, die sich auf der Rückseite des Gerätes befinden, heiß. Aus Gründen der Sicherheit muss eine Mindestbelüftung gesichert sein. Siehe Aufstellungsanweisungen.
Elektrischer Anschluss Vorbereitung des Lüftungsgitters Bevor Sie den Stecker in die Steckdose einstecken, überprüfen Sie bitte, dass die auf dem Typschild des Gerätes angegebene Spannung sowie Frequenz mit dem Anschlusswert des Hauses übereinstimmen. Eine Abweichung von ±6% von der Nominalspannung ist zulässig. Für die Anpassung des Gerätes an andere Spannungen muss ein Spartransformator angemessener Leistung vorgeschaltet werden. Nehmen Sie das Gitter aus der unteren Verpackungsschale.
Einbau unter eine Arbeitsplatte Nischenmaße Die Maße der Nische müssen den angegebenen Werten entsprechen. 596 60 0 555x ma 5 min50 . + - 600 3 DO013 1xB 2xC + max. 890 mm Das Gerät ist mit regulierbaren Füssen ausgestattet, um es der gewünschten Höhe (max 870 mm) anzupassen; diese befinden sich an den vier unteren Ecken des Gerätes. 1xA 1xK 2xG 18xI 2xL 2xF 2xD 1 1 1. Mitgelieferte Montageteile B 4 4. Fugenabdeckprofil (B) am Gerät ankleben, wie in der Abbildung gezeigt.
a I b C click click 5 5. Gerät festschrauben c 8 6. Möbeltür montieren.
A 1 2 45° 3 11 14 7. Abdeckung (A) anbringen.
Montage der Sockelblende • • • DO008c 25 a = 100 b = 170 A = 820 B = 890 • Achtung Um die Funktionalität des Gerätes nicht zu beeinträchtigen ist es notwendig das Original-Lüftungsgitter zu benutzen. Bei einer lichten Einbauhöhe von A =820 mm muss die Sockelblendenhöhe a=100 mm betragen. Bei einer lichten Einbauhöhe von B =890 mm muss die Sockelblendenhöhe b=170 mm betragen. .Für Zwischen- Einbauhöhen ( > 820 mm,< 890 mm) muss die Sockelblende beschnitten werden.
Instructions for the use of the instructions booklet Notes which are important for your safety or for the proper functioning of the appliance Supplementary information regarding operation and practical applications of the appliance. Tips and notes concerning economical and environmentally sound use of the appliance Safety Instructions This information has been provided in the interests of your safety. Please read it before installing or using the appliance.
At the end of the Appliance Life • When disposing of your appliance use an authorised disposal site. The symbol on the product or on its packaging indicates that this product may not be treated as household waste. Instead it shall be handed over to the applicable collection point for the recycling of electrical and electronic equipment.
Temperature Control • The thermostat control situated inside the fridge compartment regulates the temperature of the appliance. • It allows you to adjust the temperature inside the refrigerator according to use and external conditions. • Setting „1“ = hightest temperature, warmest setting • Setting „6“ = lowest temperature, coldest setting. • Setting „0“ = Off A medium setting is generally the most suitable. Internal Parts Storage shelves • The shelves can be removed for cleaning.
Freezer compartment Temperature Control • To freeze fresh foods it is not necessary to change the setting of the thermostat knob. • For a quicker freezing operation, turn the thermostat knob to the coldest setting; but remember that, in this condition, the refrigerator compartment temperature might drop below 0°C. If this occurs reset thermostat knob to a warmer setting.
Freezer compartment • Remove the frost with a plastic scraper. • Whenever the thickness of the frost exceeds 5 mm complete defrosting should be carried out. Prooceed as follows: • Remove any stored food, wrap it in several layers of newspaper and put it in a cool place. • Pull out the plug from the wall socket or turn the thermostat knob to the «O» setting. • Leave the door open. The structure of the appliance permits cleaning of the rear zone close to the wall, using a vacuum cleaner. 1.
Something not Working Problems may be due to causes which can easily be solved before calling the Technical Service. Please follow these instructions: SYMPTOM SOLUTION Door does not close Weight surpasses the storage limit of the door shelf so spread weight more evenly or take some products out. The appliance is not properly installed. Please look in the “Building-in” section. It is too warm inside the refrigerator Set a lower temperature.
If there is a power failure when food is in the freezer, do not open the door of the freezer compartment. The frozen food will not be affected if the power cut is of short duration (up to 12 hours) and the freezer compartment is full, otherwise, it is recommended that the food should be used within a short time (a temperature increase of the frozen food shortens its safe storage period). Door reversal 6 6 4 1 7 8 5 6 2 3 1 2 6 10 13 Warning! If the ambient temperature is cold (i.e.
Inner door reversal 180° Installation Take utmost care when handling your appliance so as not to cause any damages to the cooling unit with consequent possible fluid leakages. • During normal operation, the condenser and compressor at the back of the appliance heat up considerably. Always ensure that there is adequate ventilation as a failure to do this will result in component failure and possible food loss. See installation instructions.
Electrical connection Grid preparation Before plugging in, ensure that the voltage and frequency shown on the serial number plate correspond to your domestic power supply. Voltage can vary by ±6% of the rated voltage. For operation with different voltages, a suitably sized auto-transformer must be used. Left door opening: Important The appliance must be earthed. The power supply cable plug is provided with a contact for this purpose. If the domestic power supply socket is not earthed.
1xB 2xC 596 1xA 1xK 2xG 555x ma 18xI 2xL + - 2xF - 2xD 3 1 1. Installation kit 2. Two cabinet securing brackets (D) are supplied with the installation pack. They need to be assembled onto the cabinet prior to cabinet being pushed into the Kitchen aperture. 2 Left hand bracket 3. Push the appliance into place. The plug socket necessary for connection of the appliance to the electricity supply should be positioned, so that the plug is not placed in the recess.
a I b C click click 5 5. Screw appliance into place and retain the cabinet with screws (I) through the securing brackets into the worktop or adjacent woodwork as necessary. c 8 6.
A 1 2 45° 3 11 14 7. Refit the covering strip (A).
Fitting the plinth Important For the efficient operation of the appliance, it is important that the original ventilation grid is used. •If the opening height dimension is A=820 mm, the plinth height must be a=100 mm. If the opening height dimension is B=890 mm, the plinth height must be b=170 mm. • For intermediate heights cut the plinth to a requested height, but pay attention that it does not cover or exceeds the ventilation grid.
www.electrolux.com www.electrolux.co.at www.electrolux.