
Installation Sheet


INSTALLATION INSTRUCTIONS
PRO-SERIES HALOGEN, PRO-SERIES XENON UNDERCABINET LIGHT
Juno Series Low Voltage ULH Halogen or UPX Xenon Luminaires
FIXTURE DIMMING
Fixtures may be used with quality household dimmers or a dimmer
system designed for non-inductive loads. For best dimming
performance, use dimmer systems specifically designed for low
voltage electronic transformers.
MOUNTING FIXTURE
1. Place fixture in desired position.
2. Drive fixture MOUNTING SCREWS securely. Mounting screws are
suitable for cabinet bottoms 3/8” or thicker. Use shorter screws for
cabinet bottoms thinner than 3/8”.
3. In some installations it may be desired to drill a pilot hole for the
screws. Place the fixture in the desired position and drive
MOUNTING SCREWS a small amount to impart a small reference
point for drilling.
4. Make sure that all unused electrical ports on the ends of the fixture
are safely protected with ELECTRICAL PORT COVERS
(two provided with each fixture).
5. Re-energize electrical circuit at service panel.
6. Fixture has a three-position switch: HIGH/OFF/LOW.
JOINING MULTIPLE FIXTURES
1. WARNING: IN MULTIPLE FIXTURE INSTALLATIONS DO NOT
ELECTRIFY FIXTURE GROUP UNTIL ALL ELECTRICAL
CONNECTIONS HAVE BEEN SECURELY MOUNTED.
ELECTRICAL PORT COVERS MUST BE INSTALLED IN ALL
OPEN PORTS AT THE COMPLETION OF INSTALLATION.
2. Fixtures can be joined together using FIXTURE JOINER
(one provided with each fixture) or with JUMPER CORD accessory
(Cat. No. JC3, sold separately).
3. WARNING: THE TOTAL NUMBER OF FIXTURES THAT CAN BE
JOINED TOGETHER AND POWERED FROM ONE ELECTRICAL
FEED PORT IS GOVERNED BY THE NUMBER OF 20W LIGHT
BULBS PER ELECTRICAL FEED POINT (600W MAXIMUM).
4. First mount fixture that receives incoming electrical supply.
With a small screwdriver remove ELECTRICAL PORT COVERS
as needed. When using FIXTURE JOINER to add fixtures make
sure JOINER is fully seated in both fixtures. Fixtures should fit fully
and squarely end-to-end when mounting is complete.
5. When using JUMPER CORD accessory, make sure plugs on both
ends are fully inserted into ports on both fixtures. There should be
some slack in the JUMPER CORD so that the electrical connections
are not stressed in any way. Use cord clips (provided), as desired,
to keep cord safely snug to mounting surface.
6. WARNING: DO NOT USE JUMPER CORD AS A MEANS TO
TURN FIXTURES ON AND OFF.
LIGHT BULB REPLACEMENT AND LENS CLEANING
1. Before opening fixture make sure it has fully cooled down.
2. Turn off electrical power at service panel.
3. Lower lens by pushing LENS RETENTION BAR towards rear of
fixture. Lens will swing downward.
4. Replacement light bulbs: Use only 12V, 20W Halogen lamps for
Pro-Halogen Series. Use only 12V, 20W bi-pin Xenon lamps for
Pro-Xenon Series. WARNING: USE OF HIGHER WATTAGE
BULBS CAN CAUSE OVERHEATING, DAMAGE TO FIXTURE
AND SURFACE TO WHICH IT IS MOUNTED.
5. Do not handle Halogen bulbs with bare fingers. Use packaging
provided with bulb or a clean cloth to hold bulb for insertion
into socket. If bulb is touched, clean with rubbing alcohol.
6. Re-seat lens by pushing upward while simultaneously pushing
LENS RETENTION BAR rearwards.
7. Lens can be fully removed for bulb replacement or cleaning by
performing Step 3, above. Then while lens is in straight down
position, grasp right side lens end cap and push rearward
about 1/4˝. Pull down and remove lens.
8. Clean lens only with warm water and a mild detergent solution.
Do not use abrasive powders or petroleum solvents to clean lens.
Dry lens completely before re-inserting into fixture.
9. Replace lens by first inserting pin into hole in left side of fixture.
Push right pin up into slot on right side of fixture and pull lens
forward about 1/4˝ until it stops. Swing lens back and up into fixture
while simultaneously pushing LENS RETENTION BAR rearward.
(Note: replacement lens available from factory.)
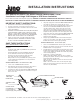
FIXTURE JOINER
JUMPER CORD AVAILABLE IN
8", 17" AND 26" LENGTHS.
BLACK OR WHITE FINISH.
(order separately)
PUSH LENS RETENTION
BAR REARWARD TO RELEASE
ELECTRICAL
PORT COVERS MUST BE INSTALLED
IN
ALL OPEN PORTS AT COMPLETION OF INSTALLATION
Product Services Phone (888) 387-2212
1300 South Wolf Road • Des Plaines, IL 60018 • Phone 800-323-5068 • www.junolightinggroup.com
FIXTURE JOINER
JUMPER CORD AVAILABLE IN
8", 17" AND 26" LENGTHS.
BLACK OR WHITE FINISH.
(order separately)
PUSH LENS RETENTION
BAR REARWARD TO RELEASE
ELECTRICAL PORT COVERS MUST BE INSTALLED
IN ALL OPEN PORTS AT COMPLETION OF INSTALLATION
© 2016 Acuity Brands Lighting, Inc. Printed in China P5025 Rev 6/16 pg 2 of 2