PL Instrukcja obsługi Piekarnik pa‐ rowy JB097C5
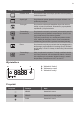
SPIS TREŚCI Informacje dotyczące bezpieczeństwa Wskazówki dotyczące bezpieczeństwa Opis urządzenia Przed pierwszym użyciem Codzienna eksploatacja Funkcje zegara 2 4 7 7 8 11 Korzystanie z akcesoriów Dodatkowe funkcje Wskazówki i porady Konserwacja i czyszczenie Rozwiązywanie problemów Instalacja Efektywność energetyczna 12 16 16 30 34 35 37 Producent zastrzega sobie możliwość wprowadzenia zmian bez wcześniejszego powiadomienia.
• • Dzieciom nie wolno zajmować się czyszczeniem ani konserwacją urządzenia bez odpowiedniego nadzoru. Dzieciom w wieku do 3 lat nie wolno zbliżać się do urządzenia podczas jego pracy. Ogólne zasady bezpieczeństwa • • • • • • • • • Instalacji urządzenia i wymiany jego przewodu zasilającego może dokonać wyłącznie osoba o odpowiednich kwalifikacjach. OSTRZEŻENIE: Urządzenie oraz jego nieosłonięte elementy nagrzewają się podczas pracy do wysokiej temperatury.
WSKAZÓWKI DOTYCZĄCE BEZPIECZEŃSTWA Instalacja OSTRZEŻENIE! Urządzenie może zainstalować wyłącznie wykwalifikowana osoba. • Usunąć wszystkie elementy opakowania. • Nie instalować ani nie używać uszkodzonego urządzenia. • Należy postępować zgodnie z instrukcją instalacji dołączoną do urządzenia. • Zachować ostrożność podczas przenoszenia urządzenia, ponieważ jest ono ciężkie. Należy zawsze stosować rękawice ochronne i mieć na stopach pełne obuwie. • Nigdy nie ciągnąć urządzenia za uchwyt.
Obsługa OSTRZEŻENIE! Niebezpieczeństwo odniesienia obrażeń ciała, oparzenia, porażenia prądem lub wybuchu. • Urządzenie jest przeznaczone wyłącznie do użytku domowego. • Nie zmieniać parametrów technicznych urządzenia. • Należy upewnić się, że otwory wentylacyjne są drożne. • Nie pozostawiać włączonego urządzenia bez nadzoru. • Wyłączać urządzenie po każdym użyciu. • Podczas pracy urządzenia należy zachować ostrożność przy otwieraniu jego drzwi. Może dojść do uwolnienia gorącego powietrza.
Konserwacja i czyszczenie OSTRZEŻENIE! Występuje zagrożenie odniesieniem obrażeń, pożarem lub uszkodzeniem urządzenia. • Przed przystąpieniem do konserwacji należy wyłączyć urządzenie i wyjąć wtyczkę przewodu zasilającego z gniazda elektrycznego. • Upewnić się, że urządzenie ostygło. Występuje zagrożenie pęknięciem szyb w drzwiach urządzenia. • Jeśli szyba pęknie, należy ją niezwłocznie wymienić. Należy skontaktować się z autoryzowanym centrum serwisowym.
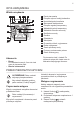
OPIS URZĄDZENIA Widok urządzenia 1 2 3 4 5 6 7 8 9 16 5 15 4 10 3 11 2 1 14 13 12 1 2 3 4 5 6 7 8 9 10 11 12 13 14 15 16 Akcesoria Panel sterowania Pokrętło wyboru funkcji piekarnika Kontrolka/symbol zasilania Sterowanie elektroniczne Pokrętło regulacji temperatury Wskaźnik/symbol temperatury Wskaźnik zbiornika na wodę Szuflada na wodę Grzałka Oświetlenie Wentylator Prowadnice blach, wyjmowane Rurka odpływowa Zawór spustowy wody Poziomy umieszczenia potraw Otwór wlotowy pary Do pieczenia c
4. Pozostawić włączone urządzenie na 15 minut. 5. Ustawić funkcję i ustawić maksymalną temperaturę. 6. Pozostawić włączone urządzenie na 15 minut. Akcesoria mogą rozgrzać się mocniej niż zwykle. Z urządzenia może wydobywać się nieprzyjemny zapach i dym. Jest to normalne zjawisko. Należy zapewnić wystarczający dopływ świeżego powietrza do pomieszczenia. CODZIENNA EKSPLOATACJA OSTRZEŻENIE! Patrz rozdział dotyczący bezpieczeństwa.
Funkcja piekarnika Zastosowanie Grzałka dolna Do pieczenia ciast na kruchym spodzie oraz do pastery‐ zowania żywności. Szybki grill Do grillowania potraw płaskich w dużych ilościach i do opiekania pieczywa. Turbo grill Do pieczenia większych kawałków mięsa lub drobiu z kością na jednym poziomie. Również do przyrządzania zapiekanek i przyrumieniania. Termoobieg / Rozmrażanie Do pieczenia na trzech poziomach jednocześnie oraz do suszenia żywności.
Pieczenie parowe 1. Włączyć funkcję . 2. Nacisnąć pokrywę szuflady na wodę, aby ją otworzyć. Napełniać szufladę na wodę, aż zaświeci się wskaźnik pełnego zbiornika. Maksymalna pojemność zbiornika wynosi 900 ml. Taka ilość wody wystarcza na ok. 55-60 minut pieczenia. Należy używać wyłącznie wody. Nie używać wody filtrowanej (demineralizowanej) ani destylowanej. Nie używać innych cieczy. Nie wlewać do szuflady na wodę łatwopalnych cieczy ani cieczy zawierających alkohol (grappy, whisky, koniaku itp.). 3.
Gdy na wyświetlaczu widoczny jest wskaźnik , w zbiorniku nadal może znajdować się pewna ilość wody. Należy zaczekać, aż woda przestanie wypływać z zaworu spustowego. 5. Po usunięciu wody wyjąć złączkę z zaworu. Nie używać raz wykorzystanej wody do ponownego napełnienia zbiornika. FUNKCJE ZEGARA Tabela funkcji zegara Funkcja zegara Zastosowanie BIEŻĄCA GO‐ DZINA Ustawianie, zmienianie lub sprawdzanie aktualnego czasu. CZAS Ustawianie czasu pracy urządzenia.
4. Gdy upłynie czas pieczenia, będzie migać i zostanie wyemitowany sygnał dźwiękowy. Nacisnąć dowolny przycisk, aby wyłączyć sygnał dźwiękowy. 5. Obrócić pokrętło wyboru funkcji piekarnika i pokrętło regulacji temperatury w położenie wyłączenia. 6. Urządzenie wyłączy się automatycznie. Ustawianie CZASU OPÓŹNIENIA 1. Ustawić funkcję piekarnika i temperaturę piekarnika. 2. Naciskać , aż zacznie migać. 3. Nacisnąć lub , aby ustawić funkcję CZAS. 4. Nacisnąć . 5. Nacisnąć lub , aby ustawić funkcję KONIEC.
oraz stalowego rusztu do umieszczenia na dnie naczynia. Szklana miska (A) Ruszt wraz z głęboką blachą: Wsunąć głęboką blachę między prowadnice blachy, a ruszt między prowadnice powyżej; upewnić się, że nóżki są skierowane w dół. Pokrywka (B) Niewielkie występy na górze mają na celu zapewnienie większego bezpieczeństwa. Występy służą także jako zabezpieczenie przed wypadnięciem. Wysoka krawędź wokół rusztu zapobiega zsuwaniu się naczyń z rusztu.
Rurka dyszy (C) • Nie wlewać zimnej cieczy do gorącego naczynia do pieczenia. Dysza do bezpośredniego pieczenia parowego (D) • Nie stawiać naczynia do pieczenia na rozgrzanej powierzchni gotowania. Stalowy ruszt (E) • Nie używać do czyszczenia naczynia ściernych środków czyszczących, szorstkich myjek ani proszków do czyszczenia. • Nie stawiać gorącego naczynia do pieczenia na zimnych / mokrych powierzchniach.
Pieczenie parowe w naczyniu do potraw dietetycznych Umieścić potrawę na stalowym ruszcie w naczyniu do pieczenia i przykryć je pokrywką. 1. Umieścić rurkę dyszy w specjalnym otworze w pokrywce naczynia do potraw dietetycznych. C UWAGA! Nie przykrywać naczynia pokrywką. OSTRZEŻENIE! Zachować ostrożność, używając dyszy podczas pracy piekarnika. Aby dotknąć dyszy, gdy piekarnik jest gorący, należy założyć rękawice kuchenne. Jeśli nie używa się funkcji pieczenia parowego, należy wyjąć dyszę z piekarnika.
Więcej informacji na temat pieczenia parowego znajduje się w tabelach pieczenia dla funkcji pieczenia parowego w rozdziale „Wskazówki i porady”. DODATKOWE FUNKCJE Wentylator chłodzący Podczas pracy urządzenia wentylator chłodzący włącza się automatycznie, aby utrzymać powierzchnie urządzenia w niskiej temperaturze. Po wyłączeniu urządzenia wentylator chłodzący może nadal działać do czasu schłodzenia urządzenia. spowodować niebezpieczne przegrzanie urządzenia.
spowodować uszkodzenie emaliowanej powłoki. Pieczenie ciast • Drzwi piekarnika nie należy otwierać przed upływem co najmniej 3/4 ustawionego czasu pieczenia. • Jeśli wykorzystywane są dwie blachy do pieczenia jednocześnie należy pozostawić jeden pusty poziom między nimi. Pieczenie mięsa i ryb • Do pieczenia bardzo tłustych potraw należy używać głębokiej blachy, aby nie dopuścić do trwałego zabrudzenia piekarnika.
Produkt Górna/dolna grzałka Termoobieg Czas (min) Uwagi Tempera‐ tura (°C) Poziom piekarni‐ ka Tempe‐ ratura (°C) Poziom piekarni‐ ka Strudel 175 3 150 2 60 - 80 Na blasze do pie‐ czenia ciasta Tarta z dżemem 170 2 165 2 (po le‐ wej i po prawej) 30 - 40 W 26 cm foremce do ciasta Biszkopt 170 2 160 2 50 - 60 W 26 cm foremce do ciasta Keks / Ciasto owoco‐ 160 2 150 2 90 - 120 W 20 cm foremce do ciasta 175 1 160 2 50 - 60 W formie do chleba Małe ciastecz‐ ka – je‐
Produkt Górna/dolna grzałka Termoobieg Czas (min) Uwagi Tempera‐ tura (°C) Poziom piekarni‐ ka Tempe‐ ratura (°C) Poziom piekarni‐ ka Ciastecz‐ ka / cias‐ ta prze‐ kładane – dwa po‐ ziomy - - 140 - 150 2i4 35 - 40 Na blasze do pie‐ czenia ciasta Ciastecz‐ ka / cias‐ ta prze‐ kładane – trzy po‐ ziomy - - 140 - 150 1, 3 i 5 35 - 45 Na blasze do pie‐ czenia ciasta Bezy – jeden po‐ ziom 120 3 120 3 80 - 100 Na blasze do pie‐ czenia ciasta Bezy – dwa po‐ - - 120 2i4 80 - 10
Produkt Górna/dolna grzałka Termoobieg Czas (min) Uwagi Tempera‐ tura (°C) Poziom piekarni‐ ka Tempe‐ ratura (°C) Poziom piekarni‐ ka Ciasto owocowe z dużą ilością owoców 160 1 150 2 110 - 120 W 24 cm foremce do ciasta Biszkopt królowej Wiktorii 170 1 160 2 (po le‐ wej i po prawej) 50 - 60 W 20 cm foremce do ciasta Czas (min) Uwagi 1) Nagrzewać wstępnie piekarnik przez 10 minut.
Zapiekanki Produkt Górna/dolna grzałka Termoobieg Czas (min) Uwagi Tempe‐ ratura (°C) Poziom piekarni‐ ka Tempe‐ ratura (°C) Poziom piekarni‐ ka Zapie‐ kanka makaro‐ nowa 200 2 180 2 40 - 50 W formie Zapie‐ kanka warzyw‐ na 200 2 175 2 45 - 60 W formie Quiche1) 180 1 180 1 50 - 60 W formie Lasag‐ 180 - 190 2 180 - 190 2 25 - 40 W formie 180 - 190 2 180 - 190 2 25 - 40 W formie Czas (min) Uwagi ne1) Cannello‐ ni1) 1) Nagrzewać wstępnie piekarnik przez 10 minut
Produkt Górna/dolna grzałka Termoobieg Czas (min) Uwagi Tempe‐ ratura (°C) Poziom piekarni‐ ka Tempe‐ ratura (°C) Poziom piekarni‐ ka Angielska pieczeń wołowa, średnio wypie‐ czona 210 2 200 2 60 - 70 Na rusz‐ cie Angielska pieczeń wołowa, dobrze wypie‐ czona 210 2 200 2 70 - 75 Na rusz‐ cie Łopatka wieprzo‐ wa 180 2 170 2 120 - 150 Ze skórą Goleń wieprzo‐ wa 180 2 160 2 100 - 120 2 sztuki Jagnięci‐ na 190 2 175 2 110 - 130 Udziec Kurczak 220 2 200 2 70 -
Ryba Produkt Górna/dolna grzałka Termoobieg Czas (min) Uwagi Tempe‐ ratura (°C) Poziom piekarni‐ ka Tempe‐ ratura (°C) Poziom piekarni‐ ka Pstrąg / Dorada 190 2 175 2 40 - 55 3 - 4 ryby Tuńczyk / Łosoś 190 2 175 2 35 - 60 4 - 6 file‐ tów Tempe‐ ratura (°C) Czas (min) 1. strona 2. strona Grill Przed rozpoczęciem pieczenia należy nagrzewać wstępnie pusty piekarnik przez 3 minuty. Produkt Ilość Poziom piekarni‐ ka Sztuki (g) Steki 4 800 maks.
Turbo grill Wołowina Produkt Ilość Temperatura (°C) Czas (min) Poziom pie‐ karnika Pieczeń wołowa lub filet, lekko wy‐ na każdy cm grubości 190 - 200 5-6 1 lub 2 na każdy cm grubości 180 - 190 6-8 1 lub 2 na każdy cm grubości 170 - 180 8 - 10 1 lub 2 pieczone1) Pieczeń wołowa lub filet, średnio wypieczone1) Pieczeń wołowa lub filet, dobrze wypieczone1) 1) Rozgrzać wstępnie piekarnik.
Drób Produkt Ilość (kg) Temperatura (°C) Czas (min) Poziom pie‐ karnika Kawałki drobiu po 0,2 - 0,25 każdy 200 - 220 30 - 50 1 lub 2 Kurczak, po‐ łówka po 0,4 - 0,5 każdy 190 - 210 35 - 50 1 lub 2 Kurczak, pular‐ da 1 - 1.5 190 - 210 50 - 70 1 lub 2 Kaczka 1.5 - 2 180 - 200 80 - 100 1 lub 2 Gęś 3.5 - 5 160 - 180 120 - 180 1 lub 2 Indyk 2.5 - 3.
Owoce Produkt Temperatura (°C) Czas (godz.
Chleb i pizza Produkt Ilość (g) Tempera‐ tura (°C) Czas (min) Poziom piekarnika Uwagi Biały 1000 180 - 190 45 - 60 2 1-2 bochen‐ ki, po 500 g każdy Bułki1) 500 190 - 210 20 - 30 2 (2 i 4) 6-8 bułek na blasze do piecze‐ nia Pizza1) - 200 - 220 20 - 30 2 Na blasze do piecze‐ nia ciasta chleb1) 1) Nagrzewać wstępnie piekarnik przez 10 minut.
Produkt Ilość (g) Tempe‐ ratura (°C) Czas (min) Poziom piekarni‐ ka Uwagi Jagnięcina 1000 175 110 130 2 Udziec Kurczak 1000 200 55 - 65 2 W całości Indyk 4000 170 180 240 2 W całości Kaczka 2000 - 2500 170 180 120 150 2 W całości Gęś 3000 160 170 150 200 1 W całości Królik - 170 180 60 - 90 2 W kawałkach Ryba Produkt Ilość (g) Tempera‐ tura (°C) Czas (min) Poziom piekarni‐ ka Uwagi Pstrąg 1500 180 25 - 35 2 3 - 4 Ryba Tuńczyk 1200 175 35 - 50 2
Produkt Temperatu‐ ra (°C) Czas (min) Poziom piekarni‐ ka Uwagi Warzywa1) 140 10 - 15 2 Odgrzewać na talerzu 1) Nagrzewać wstępnie piekarnik przez 10 minut. Pieczenie w naczyniu do potraw dietetycznych Użyć funkcji Termoobieg + para.
Produkt Temperatura (°C) Czas (min) Poziom piekarnika Filet z łososia 150 25 - 30 2 Produkt Temperatura (°C) Czas (min) Poziom piekarnika Ryż 150 35 - 40 2 Ziemniaki w mun‐ durkach, średniej wielkości 150 50 - 60 2 Gotow. ziemniaki, ćwiartki 150 35 - 45 2 Polenta 150 40 - 45 2 Przystawki KONSERWACJA I CZYSZCZENIE OSTRZEŻENIE! Patrz rozdział dotyczący bezpieczeństwa.
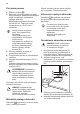
Wyjmowanie prowadnic blach Podczas procedury czyszczenia z otworu wlotowego pary może wyciec nieco wody do komory piekarnika. Umieścić ociekacz na poziomie piekarnika znajdującym się bezpośrednio pod otworem wlotowym pary, aby zapobiec ściekaniu wody na dno komory piekarnika. Aby oczyścić piekarnik, należy wyjąć prowadnice blach. 1. Odciągnąć przednią część prowadnic blach od bocznej ścianki. 2. Odciągnąć tylną część prowadnic blach od bocznej ścianki i wyjąć je.
1. Wlać do zbiornika 850 ml wody i dodać 50 ml kwasku cytrynowego (pięć łyżeczek). Wyłączyć piekarnik i odczekać około 60 minut. 2. Włączyć piekarnik i wybrać funkcję Termoobieg + para. Ustawić temperaturę 230°C. Po upływie 25 minut wyłączyć piekarnik i odczekać 15 minut, aby ostygł. 3. Włączyć piekarnik i wybrać funkcję Termoobieg + para. Ustawić temperaturę od 130°C do 230°C. Wyłączyć urządzenie po upływie 10 minut. Odczekać, aż ostygnie i opróżnić zawartość zbiornika.
4. Umieścić drzwi na stabilnej powierzchni przykrytej miękką szmatką. 5. Chwycić z obu stron górną listwę drzwi (B) i nacisnąć do środka, aby zwolnić zatrzaski. A B 2 B 1 6. Pociągnąć listwę drzwi do przodu, aby ją zdjąć. 7. Chwycić szyby drzwi za górne krawędzie i ostrożnie wyjmować je po kolei. Zacząć od górnej szyby. Upewnić się, że szyba całkowicie wysunie się z prowadnic. Upewnić się, że środkową szybę prawidłowo umieszczono w mocowaniu. A B Wymiana oświetlenia 8.
Tylne oświetlenie 1. Obrócić szklany klosz w kierunku przeciwnym do ruchu wskazówek zegara, aby go zdjąć. 2. Wyczyścić szklany klosz. 3. Wymienić żarówkę na nową, odpowiednią do piekarnika i odporną na działanie wysokiej temperatury (do 300°C). 4. Zamontować klosz. ROZWIĄZYWANIE PROBLEMÓW OSTRZEŻENIE! Patrz rozdział dotyczący bezpieczeństwa. Co zrobić, gdy… Problem Prawdopodobna przyczy‐ na Rozwiązanie Piekarnik nie nagrzewa się. Piekarnik jest wyłączony. Włączyć piekarnik.
Problem Prawdopodobna przyczy‐ na Rozwiązanie Wskaźnik „Zbiornik napeł‐ W zbiorniku jest za mało wo‐ dy. Wlewać wodę, aż zaświeci się wskaźnik sygnalizujący napełnienie zbiornika. Jeżeli wskaźnik sygnalizujący na‐ pełnienie zbiornika nie włą‐ czy się, a woda zacznie się wylewać do komory piekar‐ nika, należy wezwać wykwa‐ lifikowanego serwisanta. W zbiorniku nie ma wody. Napełnić zbiornik. Jeśli wskaźnik będzie nadal włą‐ czony, należy wezwać wy‐ kwalifikowanego serwisanta.
Instalacja elektryczna Zabudowa urządzenia 548 21 558 min. 550 114 16 20 600 min. 560 589 594 573 595 +/-1 5 3 Producent nie ponosi odpowiedzialności za nieprzestrzeganie zaleceń dotyczących bezpieczeństwa, które zawarto w rozdziałach poświęconych bezpieczeństwu. Urządzenie wyposażono w przewód zasilający oraz wtyczkę. Przewody Rodzaje przewodów przeznaczonych do montażu lub wymiany: H07 RN-F, H05 RN-F, H05 RRF, H05 VVF, H05 V2V2-F (T90), H05 BB-F 548 21 min. 550 20 590 558 16 114 min.
EFEKTYWNOŚĆ ENERGETYCZNA Etykieta produktu i informacje zgodnie z normą UE 65-66/2014 Nazwa dostawcy Juno Oznaczenie modelu JB097C5 Wskaźnik efektywności energetycznej 105.9 Klasa efektywności energetycznej A Zużycie energii przy standardowym obciążeniu w trybie tradycyjnym 0.93 kWh/cykl Zużycie energii przy standardowym obciążeniu w trybie z termoobiegiem 0.90 kWh/cykl Liczba komór 1 Źródło ciepła Prąd elektryczny Pojemność 72 l Typ piekarnika Piekarnik do zabudowy Masa 33.
OCHRONA ŚRODOWISKA wyrzucać urządzeń oznaczonych symbolem razem z odpadami domowymi. Należy zwrócić produkt do miejscowego punktu ponownego przetwarzania lub skontaktować się z odpowiednimi władzami miejskimi. Materiały oznaczone symbolem należy poddać utylizacji. Opakowanie urządzenia włożyć do odpowiedniego pojemnika w celu przeprowadzenia recyklingu. Należy zadbać o ponowne przetwarzanie odpadów urządzeń elektrycznych i elektronicznych, aby chronić środowisko naturalne oraz ludzkie zdrowie.
867339711-B-492016