EN User Manual Oven JBK111D5
CONTENTS Safety information Safety instructions Product description Control panel Before first use Daily use Clock functions 2 3 6 6 8 9 10 Automatic programmes Using the accessories Additional functions Hints and tips Care and cleaning Troubleshooting Energy efficiency 12 13 14 16 29 30 32 Subject to change without notice. SAFETY INFORMATION Before the installation and use of the appliance, carefully read the supplied instructions.
General Safety • • • • • • • • • Only a qualified person must install this appliance and replace the cable. WARNING: The appliance and its accessible parts become hot during use. Care should be taken to avoid touching heating elements. Children less than 8 years of age shall be kept away unless continuously supervised. Always use oven gloves to remove or put in accessories or ovenware. Before maintenance cut the power supply.
• Always use a correctly installed shockproof socket. • Do not use multi-plug adapters and extension cables. • Make sure not to cause damage to the mains plug and to the mains cable. Should the mains cable need to be replaced, this must be carried out by our Authorised Service Centre. • Do not let mains cables touch or come near the appliance door, especially when the door is hot. • The shock protection of live and insulated parts must be fastened in such a way that it cannot be removed without tools.
damage to the appliance, the housing unit or the floor. Do not close the furniture panel until the appliance has cooled down completely after use. Care and cleaning WARNING! Risk of injury, fire, or damage to the appliance. • Before maintenance, deactivate the appliance and disconnect the mains plug from the mains socket. • Make sure the appliance is cold. There is the risk that the glass panels can break. • Replace immediately the door glass panels when they are damaged.
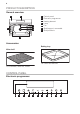
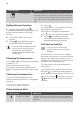
PRODUCT DESCRIPTION General overview 1 7 1 2 3 4 5 6 7 2 3 4 5 4 3 2 1 Control panel Electronic programmer Heating element Lamp Fan Shelf support, removable Shelf positions 6 Accessories Baking tray Wire shelf For cakes and biscuits. For cookware, cake tins, roasts.
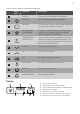
Use the sensor fields to operate the appliance. Sensor Field Function Description - DISPLAY Shows the current settings of the appliance. ON / OFF To activate and deactivate the appliance. OPTIONS To set an oven function or an automatic programme (only when the appliance is activated). MY FAVOURITE PROGRAMME To store your favourite programme. Use it to have access to your favourite programme directly or when the appliance is deactivated.
Other indicators of the display: Symbol / / Name Description Automatic programme You can choose an automatic programme. My favourite programme The favourite programme operates. kg / g An automatic programme with a weight input operates. h / min A clock function operates. Temperature / Fast heat up The function operates. Temperature The current temperature is indicated. Temperature You can change the temperature. Light You deactivated the light.
DAILY USE • the manual mode • automatic programmes WARNING! Refer to Safety chapters. Operating the appliance To operate the appliance you can use: Oven functions Oven function Application True Fan Cooking To bake on up to 2 shelf positions at the same time and to dry food. Set the temperature 20 - 40 °C lower than for Conventional Cooking. Pizza Setting To bake food on 1 shelf position for a more intensive browning and a crispy bottom.
Oven function Application ECO Roasting The ECO functions let you optimize the energy consumption during cooking. It is necessary to set the cooking time first. To get more information about the recommended settings, refer to the cooking tables with the equivalent function. Setting the oven function 1. Activate the appliance with . The display shows the set temperature, the symbol and the number of the oven function. 2. Touch or to set an oven function. 3.
Clock function Application TIME OF DAY To show the time of day. To change the time of day, refer to "Setting the time". DURATION To set how long the appliance operates. END To set when the appliance deactivates. You can use Duration and End at the same time (Time delay) if you want the appliance to activate and deactivate automatically later. SET+GO To start the appliance with necessary settings with only one touch of the sensor field any time later. Count Up Timer 7.
The display shows and with an indicator. This indicator shows which clock function is activated. 5. Touch a sensor field (apart from ON / OFF) to start the SET+GO function. When the set time ends, an acoustic signal sounds for two minutes and 00:00 and flash in the display. 4. Touch a sensor field or open the oven door to stop the acoustic signal. Setting the MINUTE MINDER Setting the Time delay function Use the MINUTE MINDER to set a countdown (maximum 2 h 30 min).
Automatic programmes 1. Activate the appliance. . 2. Touch The display shows and the number of the automatic programme. or to choose the 3. Touch automatic programme. or wait five seconds until the 4. Touch appliance automatically starts to work. 5. When the set time ends, an acoustic signal sounds for two minutes. The symbol flashes. The appliance deactivates. 6. Touch a sensor field or open the door to stop the acoustic signal. Automatic programmes with weight input 1. Activate the appliance. . 2.
• All accessories have small indentations at the top of the right and left side to increase safety. The indentations are also anti-tip devices. • The high rim around the shelf is a device which prevents cookware from slipping. ADDITIONAL FUNCTIONS Using My Favourite Programme function To deactivate the Child Lock function repeat step 2. Use this function to save your favourite temperature and time settings for an oven function or programme. Using the Function Lock 1.
Description Value to set 1 SET+GO ON / OFF 2 RESIDUAL HEAT INDICATOR ON / OFF 3 KEY TONE1) CLICK / BEEP / OFF 4 FAULTY TONE ON / OFF 5 SERVICE MENU - 6 RESTORE SETTINGS ON / OFF 1) It is not possible to deactivate the tone of the ON / OFF sensor field. 1. When the appliance is deactivated, touch and hold for three seconds. The display shows SET1 and "1" flashes. or to set the setting. 2. Touch 3. Touch . 4. Touch or to change the value of the setting. 5. Touch .
HINTS AND TIPS WARNING! Refer to Safety chapters. The temperature and baking times in the tables are guidelines only. They depend on the recipes and the quality and quantity of the ingredients used. Baking • Your oven can bake or roast differently to the appliance you had before. Adapt your usual settings (temperature, cooking times) and shelf positions to the values in the tables. • The manufacturer recommends that you use the lower temperature the first time.
Baking results Possible cause Remedy The cake browns unevenly. The mixture is unevenly distributed. Spread the mixture evenly on the baking tray. The cake is not ready in the baking time given. The oven temperature is too low. The next time you bake, set a slightly higher oven temperature.
Cakes / pastries / breads on baking trays Food Function Temperature (°C) Time (min) Shelf position Plaited bread / bread crown Conventional Cooking 170 - 190 30 - 40 1 Christmas stollen1) Conventional Cooking 160 - 180 50 - 70 1 Bread (rye bread)1) Conventional Cooking 1 first 230 20 then 160 - 180 30 - 60 Cream puffs / eclairs1) Conventional Cooking 190 - 210 20 - 35 2 Swiss Roll1) Conventional Cooking 180 - 200 10 - 20 2 Cake with crumble topping (dry) True Fan Cooki
Biscuits Food Function Temperature (°C) Time (min) Shelf position Short pastry biscuits True Fan Cooking 150 - 160 10 - 20 2 Short bread / Short bread / Pastry Stripes True Fan Cooking 140 20 - 35 2 Short bread / Short Conventional Cooking 160 20 - 30 2 bread / Pastry Stripes1) Biscuits made with sponge mixture True Fan Cooking 150 - 160 15 - 20 2 Pastries made with egg white, meringues True Fan Cooking 80 - 100 120 - 150 Macaroons True Fan Cooking 100 - 120 30 - 50 2 B
Food Function Temperature (°C) Time (min) Shelf position Vegetables au Turbo Grilling 160 - 170 15 - 30 1 Baguettes topped with melted cheese True Fan Cooking 160 - 170 15 - 30 1 Sweet bakes Conventional Cooking 180 - 200 40 - 60 1 Fish bakes Conventional Cooking 180 - 200 30 - 60 1 Stuffed vegetables True Fan Cooking 160 - 170 30 - 60 1 gratin1) 1) Preheat the oven.
Food Temperature (°C) Time (min) Shelf position Dry streusel cake 150 - 160 30 - 45 1/4 1) Preheat the oven.
Pizza Setting Food Temperature (°C) Time (min) Shelf position Pizza (thin crust)1) 200 - 230 15 - 20 2 Pizza (with a lot of top- 180 - 200 20 - 30 2 Tarts 180 - 200 40 - 55 1 Spinach flan 160 - 180 45 - 60 1 Quiche Lorraine (Savoury flan) 170 - 190 45 - 55 1 Swiss Flan 170 - 190 45 - 55 2 Cheesecake 140 - 160 60 - 90 1 Apple cake, covered 150 - 170 50 - 60 1 Vegetable pie 160 - 180 50 - 60 1 Unleavened bread1) 230 - 250 10 - 20 2 Puff pastry flan1) 160 - 180
Roasting tables Beef Food Function Quantity Temperature (°C) Time (min) Shelf position Pot roast Conventional Cooking 1 - 1.5 kg 230 120 - 150 1 Roast beef or fillet: Turbo Grilling per cm of thickness 190 200 5 - 6 per cm of thickness 1 Roast beef or fillet: medium Turbo Grilling per cm of thickness 180 190 6 - 8 per cm of thickness 1 Roast beef or fillet: well done Turbo Grilling per cm of thickness 170 180 8 - 10 per cm of thickness 1 rare1) 1) Preheat the oven.
Lamb Food Function Quantity Temperature (°C) Time (min) Shelf position Leg of lamb, roast lamb Turbo Grilling 1 - 1.5 kg 150 - 180 100 - 120 1 Saddle of lamb Turbo Grilling 1 - 1.5 kg 160 - 180 40 - 60 1 Food Function Quantity Temperature (°C) Time (min) Shelf position Saddle of hare, leg of Conventional Cooking up to 1 kg 230 30 - 40 1 Saddle of venison Conventional Cooking 1.5 - 2 kg 210 - 220 35 - 40 1 Haunch of venison Conventional Cooking 1.
Fish (steamed) Food Function Quantity Temperature (°C) Time (min) Shelf position Whole fish Conventional Cooking 1 - 1.5 kg 210 220 45 - 60 1 Grilling • Always grill with the maximum temperature setting. • Set the shelf into the shelf position as recommended in the grilling table. • Always set the pan to collect the fat into the first shelf position. • Grill only flat pieces of meat or fish. • Always preheat the empty oven with the grill functions for 5 minutes.
Food Grilling time (min) Toast with topping Shelf position 1st side 2nd side 6-8 - 3 1) Preheat the oven. Frozen foods • Do not cover it with a bowl or a plate. This can extend the defrost time. • Remove the food packaging. Put the food on a plate.
Food Function Temperature (°C) Time (min) Shelf position Baguettes Conventional Cooking as per manufacturer's instructions as per manufacturer's instructions 2 Fruit cake Conventional Cooking as per manufacturer's instructions as per manufacturer's instructions 2 1) Turn chips 2 or 3 times during cooking. Defrost • Remove the food packaging and put the food on a plate. • Use the first shelf position from the bottom.
• When the liquid in the jars starts to simmer (after approximately 35 - 60 minutes with one-litre jars), stop the oven or decrease the temperature to 100 °C (see the table).
CARE AND CLEANING WARNING! Refer to Safety chapters. 2 Notes on cleaning • Clean the front of the appliance with a soft cloth with warm water and a cleaning agent. • To clean metal surfaces, use a usual cleaning agent. • Clean the appliance interior after each use. Fat accumulation or other food remains may result in a fire. • Clean stubborn dirt with a special oven cleaner. • Clean all accessories after each use and let them dry. Use a soft cloth with warm water and a cleaning agent.
WARNING! Danger of electrocution! Disconnect the fuse before you replace the lamp. The lamp and the lamp glass cover can be hot. 2 B 1 7. Pull the door trim to the front to remove it. 8. Hold the door glass panels on their top edge one by one and pull them up out of the guide. 9. Clean the glass panel with water and soap. Dry the glass panel carefully. When the cleaning is completed, install the glass panels and the door. Do the above steps in the opposite sequence.
Problem Possible cause Remedy The oven does not heat up. The automatic switch-off is activated. Refer to "Automatic switchoff". The oven does not heat up. The Child Lock is on. Refer to "Using the Child Lock". The oven does not heat up. The fuse is released. Make sure that the fuse is the cause of the malfunction. If the fuse releases again and again, contact a qualified electrician. The lamp does not operate. The lamp is defective. Replace the lamp.
ENERGY EFFICIENCY Product Fiche and information according to EU 65-66/2014 Supplier's name Juno Model identification JBK111D5 Energy Efficiency Index 105.5 Energy efficiency class A Energy consumption with a standard load, conventional mode 0.85 kWh/cycle Energy consumption with a standard load, fan-forced mode 0.77 kWh/cycle Number of cavities 1 Heat source Electricity Volume 43 l Type of oven Built-In Oven Mass 29.
• When you use the ECO functions, the lamp deactivates. You can activate it again according to your preferences. seconds. You can activate it again according to your preferences. ENVIRONMENTAL CONCERNS dispose appliances marked with the symbol with the household waste. Return the product to your local recycling facility or contact your municipal office. Recycle the materials with the symbol . Put the packaging in applicable containers to recycle it.
867314939-B-142016