PL Instrukcja obsługi Zmywarka JGVX60529
SPIS TREŚCI Informacje dotyczące bezpieczeństwa Wskazówki dotyczące bezpieczeństwa Opis produktu Panel sterowania Programy Ustawienia 2 4 6 6 7 9 Opcje Przed pierwszym użyciem Codzienna eksploatacja Wskazówki i porady Konserwacja i czyszczenie Rozwiązywanie problemów Dane techniczne 12 13 14 16 17 20 23 Producent zastrzega sobie możliwość wprowadzenia zmian bez wcześniejszego powiadomienia.
• • Dzieci i zwierzęta domowe nie powinny znajdować się w pobliżu urządzenia, gdy jego drzwi są otworzone. Dzieciom nie wolno zajmować się czyszczeniem ani konserwacją urządzenia bez odpowiedniego nadzoru.
komplecie z urządzeniem. Nie wolno używać starego zestawu węży. WSKAZÓWKI DOTYCZĄCE BEZPIECZEŃSTWA Instalacja OSTRZEŻENIE! Urządzenie może zainstalować wyłącznie wykwalifikowana osoba. • Usunąć wszystkie elementy opakowania. • Nie instalować ani nie używać uszkodzonego urządzenia. • Nie instalować ani nie używać urządzenia w miejscach, w których panuje temperatura poniżej 0°C. • Należy postępować zgodnie z instrukcją instalacji dołączoną do urządzenia.
naczyniach mogą pozostać resztki detergentu. • Po otworzeniu drzwi w czasie pracy urządzenia może dojść do uwolnienia gorącej pary. • Nie umieszczać w urządzeniu, na nim ani w jego pobliżu łatwopalnych substancji ani przedmiotów nasączonych łatwopalnymi substancjami. OSTRZEŻENIE! Niebezpieczne napięcie. • W razie uszkodzenia węża dopływowego należy natychmiast zamknąć zawór wody i wyjąć wtyczkę z gniazda elektrycznego.
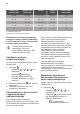
OPIS PRODUKTU 1 2 3 12 11 10 1 2 3 4 5 6 7 Sufitowe ramię spryskujące Górne ramię spryskujące: Dolne ramię spryskujące Filtry Tabliczka znamionowa Zbiornik soli Otwór wentylacyjny 9 8 7 6 5 8 9 10 11 12 Dozownik płynu nabłyszczającego Dozownik detergentu Dolny kosz Górny kosz Szuflada na sztućce 4 PANEL STEROWANIA 1 1 2 3 4 5 Przycisk wł./wył.
Wskaźniki Wskaźnik Opis Wskaźnik poziomu soli. Włącza się, gdy pojemnik na sól wymaga uzupełnie‐ nia. Wskaźnik poziomu płynu nabłyszczającego. Włącza się, gdy dozownik płynu nabłyszczającego wymaga uzupełnienia. PROGRAMY Numeracja programów w tabeli (P1, P2 itd.) odpowiada ich kolejności na panelu sterowania. Kolejność programów w tabeli może nie odpowiadać ich kolejności na panelu sterowania.
Program P5 5) Stopień zabru‐ dzenia Rodzaj załadunku Fazy programu Opcje • • • • • • Świeże Naczynia stoło‐ we i sztućce Zmywanie 60°C Płukanie HygienePlus XtraDry 1) W tym programie uzyskuje się największą efektywność zużycia wody i energii elektrycznej podczas zmywania średnio zabrudzonych naczyń i sztućców. Jest to program standardowy dla ośrodków przeprowadzających testy. 2) Urządzenie rozpoznaje stopień zabrudzenia oraz ilość naczyń znajdujących się w koszach.
USTAWIENIA Tryb wyboru programów i tryb użytkownika Nacisnąć i przytrzymać przycisk Reset, aż urządzenie znajdzie się w trybie wyboru programów. Gdy urządzenie znajduje się w trybie wyboru programu, można ustawić program i przejść do trybu użytkownika. Uruchamianie trybu użytkownika Ustawienia dostępne w trybie użytkownika: • Poziom zmiękczania wody odpowiednio do twardości wody. • Włączenie lub wyłączenie sygnalizacji konieczności uzupełnienia płynu nabłyszczającego.
Stopnie nie‐ mieckie (°dH) Stopnie fran‐ cuskie (°fH) mmol/l Stopnie Clarka Poziom zmięk‐ czania wody 19 - 22 33 - 39 3.3 - 3.9 23 - 27 5 1) 15 - 18 26 - 32 2.6 - 3.2 18 - 22 4 11 - 14 19 - 25 1.9 - 2.5 13 - 17 3 4 - 10 7 - 18 0.7 - 1.8 5 - 12 2 <4 <7 <0.7 <5 1 2) 1) Ustawienie fabryczne. 2) Przy tym poziomie nie stosować soli. Niezależnie od rodzaju stosowanego detergentu należy ustawić prawidłowy poziom twardości wody, aby wskaźnik poziomu soli był włączony.
płynu nabłyszczającego jest wyłączona. = sygnalizacja konieczności – uzupełnienia płynu nabłyszczającego jest włączona. , aby zmienić ustawienie. 2. Nacisnąć 3. Nacisnąć przycisk wł./wył., aby potwierdzić ustawienie. Dozowanie płynu nabłyszczającego Dozowanie płynu nabłyszczającego można ustawić w przedziale od 1 (minimalna ilość) do 6 (maksymalna ilość). Poziom 0 oznacza wyłączenie dozownika płynu nabłyszczającego oraz dozowania. Ustawienie fabryczne: poziom 4.
UWAGA! Nie należy zamykać drzwi urządzenia w ciągu 2 minut od ich automatycznego otworzenia. Może to spowodować uszkodzenie urządzenia. Jeśli następnie użytkownik zamknie drzwi w ciągu kolejnych 3 minut, bieżący program zakończy się. Funkcja AirDry włącza się automatycznie we wszystkich programach z wyjątkiem (jeśli występuje). Aby poprawić skuteczność suszenia, należy skorzystać z opcji XtraDry lub włączyć opcję AirDry.
HygienePlus Opcja ta zapewnia najlepszy efekt higieniczny dzięki utrzymywaniu przez co najmniej 10 minut temperatury 70°C podczas ostatniej fazy płukania. Włączanie opcji HygienePlus Nacisnąć . Włączy się odpowiedni wskaźnik. Wyświetlacz wyświetli zaktualizowany czas trwania programu. PRZED PIERWSZYM UŻYCIEM 1. Sprawdzić, czy bieżący poziom zmiękczania wody odpowiada twardości wody doprowadzanej do urządzenia. Jeśli nie, dostosować poziom zmiękczania wody. 2. Napełnić zbiornik soli. 3.
Napełnianie dozownika płynu nabłyszczającego A UWAGA! Należy stosować wyłącznie płyn nabłyszczający przeznaczony do zmywarek. B 1. Otworzyć pokrywę (C). 2. Napełnić dozownik (B), aż poziom płynu nabłyszczającego osiągnie oznaczenie „MAX”. 3. Rozlany płyn nabłyszczający należy usunąć za pomocą chłonnej szmatki, aby zapobiec powstaniu zbyt dużej ilości piany. 4. Zamknąć pokrywę. Upewnić się, że pokrywa jest zablokowana.
Ustawianie i uruchamianie programu Uruchamianie programu 1. Uchylić drzwi urządzenia. 2. Nacisnąć przycisk wł./wył., aby włączyć urządzenie. Upewnić się, że urządzenie jest w trybie wyboru programów. 3. Kilkakrotnie nacisnąć lub , aż na wyświetlaczu pojawi się numer wybranego programu. Przez około 3 sekundy wyświetlany będzie numer programu, a następnie czas trwania programu. 4. Ustawić odpowiednie opcje. 5. Zamknąć drzwi urządzenia, aby uruchomić program. Uruchamianie programu z opóźnieniem 1.
• Po upływie 5 minut od zakończenia programu. • Po upływie 5 minut, jeśli nie uruchomiono programu. WSKAZÓWKI I PORADY Ogólne wskazówki Stosowanie się do poniższych wskazówek pozwoli zapewnić optymalne efekty zmywania i suszenia w codziennej eksploatacji oraz przyczyni się do ochrony środowiska. • Większe resztki żywności z naczyń należy wyrzucić do kosza. • Nie opłukiwać naczyń ręcznie. W razie potrzeby wybrać program z fazą zmywania wstępnego. • Należy zawsze wykorzystywać całą pojemność koszy.
• Nie myć w urządzeniu przedmiotów, które mogą pochłaniać wodę (gąbki, ściereczki). • Usunąć z naczyń duże resztki potraw. • Namoczyć naczynia z resztkami przypalonych potraw przed ich umyciem w urządzeniu. • Wklęsłe naczynia (kubki, szklanki i miski) układać dnem do góry. • Upewnić się, że szklanki nie stykają się ze sobą. • Lekkie elementy umieścić w górnym koszu. Upewnić się, że naczynia się nie przemieszczają się swobodnie. • Sztućce oraz małe przedmioty umieścić w szufladzie na sztućce.
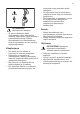
7. Włożyć filtry (B) i (C). 8. Włożyć filtr (B) do filtra płaskiego (A). Obrócić zgodnie z ruchem wskazówek zegara, aż się zablokuje. 2. Wyjąć filtr (C) z filtra (B). 3. Wyjąć filtr płaski (A). 4. Umyć filtry. UWAGA! Nieprawidłowe umiejscowienie filtrów może skutkować niezadowalającymi efektami zmywania i uszkodzeniem urządzenia. Czyszczenie górnego ramienia spryskującego Zaleca się regularne czyszczenie górnego ramienia spryskującego, aby zapobiec zatkaniu znajdujących się w nim otworów. 5.
Czyszczenie obudowy • Czyścić urządzenie za pomocą wilgotnej szmatki. • Używać wyłącznie neutralnych detergentów. • Nie używać produktów ściernych, myjek do szorowania ani rozpuszczalników. Czyszczenie wnętrza 3. Umyć ramię spryskujące pod bieżącą wodą. Za pomocą spiczastego przedmiotu, np. wykałaczki, usunąć zabrudzenia z otworów. 4. Aby ponownie zamontować ramię spryskujące, należy docisnąć je w górę i jednocześnie obrócić przeciwnie do ruchu wskazówek zegara.
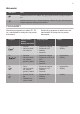
ROZWIĄZYWANIE PROBLEMÓW OSTRZEŻENIE! Nieprawidłowa naprawa urządzenia może stanowić zagrożenie dla użytkownika. Wszystkie naprawy powinny wykonywać odpowiednio wykwalifikowane osoby. kontaktowania się z autoryzowanym centrum serwisowym. W poniższej tabeli zawarto informacje na temat możliwych problemów. Przy niektórych usterkach na wyświetlaczu pojawia się kod alarmowy.
Problem i kod alarmowy Możliwa przyczyna i rozwiązanie Program trwa za długo. • • Jeśli wybrano opcję opóźnienia rozpoczęcia programu, należy ją anulować lub poczekać do końca odliczania cza‐ su. Włączenie opcji może spowodować wydłużenie czasu trwania programu. Pozostały czas do zakoń‐ czenia programu pokazywa‐ ny na wyświetlaczu wydłuża się i przeskakuje niemal do końca programu. • Nie świadczy to o usterce. Urządzenie działa prawidłowo. Niewielki wyciek z drzwi urządzenia.
Efekty zmywania i suszenia są niezadowalające Problem Możliwa przyczyna i rozwiązanie Niezadowalające efekty zmy‐ wania. • • • Niezadowalające efekty su‐ szenia. • • • • • Białawe smugi lub niebieska‐ wy nalot na szklankach i na‐ czyniach. • Plamy i ślady po odparowa‐ nych kroplach wody na szklan‐ kach i naczyniach. • • Naczynia są mokre. • • • • • • Patrz punkty „Codzienna eksploatacja”, „Wskazówki i porady” oraz broszura dotycząca załadunku koszy.
Problem Możliwa przyczyna i rozwiązanie Ślady rdzy na sztućcach. • • Po zakończeniu programu w dozowniku znajdują się pozos‐ tałości detergentu. • • • W wodzie używanej do zmywania jest za dużo soli. Patrz „Zmiękczacz wody”. Umieszczono razem sztućce ze srebra i stali nierdzew‐ nej. Należy unikać umieszczania blisko siebie sztućców ze srebra i stali nierdzewnej. Tabletka z detergentem zablokowała się w dozowniku i woda nie wypłukała jej całkowicie. Woda nie wypłukała detergentu z dozownika.
Podłączenie do sieci elek‐ Napięcie (V) 220 - 240 trycznej 1) Częstotliwość (Hz) 50 Ciśnienie doprowadzanej wo‐ dy bar (minimalne i maksymalne) 0.5 - 8 MPa (minimalne i maksymalne) 0.05 - 0.8 Dopływ wody Zimna lub ciepła woda 2) maks. 60°C Pojemność Liczba kompletów naczyń 15 Pobór mocy Tryb czuwania (W) 5.0 Tryb wyłączenia (W) 0.50 1) Pozostałe wartości znajdują się na tabliczce znamionowej. 2) Jeżeli ciepła woda pochodzi z alternatywnych źródeł energii (np.
117868160-A-252018