User Manual Benutzerin‐ formation Oven JH060A5 Backofen
CONTENTS Safety information Safety instructions Product description Before first use Daily use Additional functions 2 3 5 6 6 7 Hints and tips Care and cleaning Troubleshooting Installation Energy efficiency 8 14 17 18 19 Subject to change without notice. SAFETY INFORMATION Before the installation and use of the appliance, carefully read the supplied instructions. The manufacturer is not responsible if an incorrect installation and use causes injuries and damages.
• • • • • • • • Internally the appliance becomes hot when in operation. Do not touch the heating elements that are in the appliance. Always use oven gloves to remove or put in accessories or ovenware. Before maintenance cut the power supply. Ensure that the appliance is switched off before replacing the lamp to avoid the possibility of electric shock. Do not use a steam cleaner to clean the appliance.
• Make sure not to cause damage to the mains plug and to the mains cable. Should the mains cable need to be replaced, this must be carried out by our Authorised Service Centre. • Do not let mains cables touch or come near the appliance door, especially when the door is hot. • The shock protection of live and insulated parts must be fastened in such a way that it cannot be removed without tools. • Connect the mains plug to the mains socket only at the end of the installation.
• Make sure the appliance is cold. There is the risk that the glass panels can break. • Replace immediately the door glass panels when they are damaged. Contact the Authorised Service Centre. • Be careful when you remove the door from the appliance. The door is heavy! • Clean regularly the appliance to prevent the deterioration of the surface material. • Remaining fat or food in the appliance can cause fire. • Clean the appliance with a moist soft cloth. Only use neutral detergents.
BEFORE FIRST USE WARNING! Refer to Safety chapters. Initial Cleaning Remove all accessories and removable shelf supports from the appliance. Refer to "Care and cleaning" chapter. Clean the appliance before first use. Put the accessories and the removable shelf supports back to their initial position. 1. Set the function and the maximum temperature. 2. Let the appliance operate for 1 hour. 3. Set the function and the maximum temperature. 4. Let the appliance operate for 15 minutes.
Oven function Application Conventional Cooking To bake and roast food on 1 shelf position. Bottom Heat To bake cakes with crispy bottom and to preserve food. Turbo Grilling To roast larger meat joints or poultry with bones on 1 shelf position. Also to make gratins and to brown. Grilling To grill flat food and to toast bread. Defrost To defrost frozen food. Knobs for the cooking zones You can operate the hob with the knobs for the cooking zones. Refer to the hob user manual.
HINTS AND TIPS This can change the baking results and cause damage to the enamel. WARNING! Refer to Safety chapters. Baking cakes The temperature and baking times in the tables are guidelines only. They depend on the recipes and the quality and quantity of the ingredients used. • Do not open the oven door before 3/4 of the set cooking time is up. • If you use two baking trays at the same time, keep one empty level between them. General information • The appliance has four shelf positions.
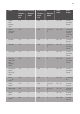
Food Conventional Cooking Fan Cooking Time (min) Comments Temperature (°C) Shelf position Temperature (°C) Shelf position Buttermilk cheese cake 170 1 165 2 70 - 80 In a 26 cm cake mould Apple cake (Apple pie) 170 1 160 2 (1 and 3) 80 - 100 In two 20 cm cake moulds on a wire shelf Strudel 175 2 150 2 60 - 80 In a baking tray Jam-tart 170 2 160 2 (1 and 3) 30 - 40 In a 26 cm cake mould Fruit cake 170 2 155 2 50 - 60 In a 26 cm cake mould Sponge cake (Fatless spo
Food Conventional Cooking Fan Cooking Time (min) Comments Temperature (°C) Shelf position Temperature (°C) Shelf position Choux1) 190 3 180 3 (1 and 3) 15 - 20 In a baking tray Plate tarts 180 3 170 2 25 - 35 In a 20 cm cake mould Victoria sandwich 180 1 or 2 170 2 45 - 70 Left + right in a 20 cm cake mould Rich fruit cake 160 1 150 2 110 - 120 In a 24 cm cake mould Victoria sand- 170 1 160 1 50 - 60 In a 20 cm cake mould Time (min) Comments wich1) 1) Prehea
Flans Food Conventional Cooking Fan Cooking Time (min) Comments Temperature (°C) Shelf position Temperature (°C) Shelf position Pasta flan 180 2 180 2 40 - 50 In a mould Vegetable flan 200 2 200 2 45 - 60 In a mould Quiches 190 1 190 1 40 - 50 In a mould Lasagne 200 2 200 2 25 - 40 In a mould Cannelloni 200 2 200 2 25 - 40 In a mould Yorkshire 220 2 210 2 20 - 30 6 pudding mould Time (min) Comments pudding1) 1) Preheat the oven for 10 minutes.
Food Conventional Cooking Fan Cooking Time (min) Comments Temperature (°C) Shelf position Temperature (°C) Shelf position English roast beef medium 210 2 200 2 51 - 55 On a wire shelf and a deep pan English roast beef well done 210 2 200 2 55 - 60 On a wire shelf and a deep pan Shoulder of pork 180 2 170 2 120 - 150 On a deep pan Shin of pork 180 2 160 2 100 - 120 2 pieces on a deep pan Lamb 190 2 190 2 110 - 130 Leg Chicken 200 2 200 2 70 - 85 Whole Tu
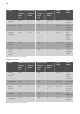
Grilling Preheat the empty oven for 10 minutes before cooking.
Food Quantity Pieces (g) Chicken (cut in two) 2 1000 Chicken drumsticks 6 Quail Vegetable gratin Temperature (°C) Time (min) Shelf position 1st side 2nd side 200 25 - 30 20 - 30 3 - 200 15 - 20 15 - 18 3 4 500 200 25 - 30 20 - 25 3 - - 200 20 - 25 - 3 Scallops - - 200 15 - 20 - 3 Mackerel 2-4 - 200 15 - 20 10 - 15 3 Fish slices 4-6 800 200 12 - 15 8 - 10 3 CARE AND CLEANING WARNING! Refer to Safety chapters.
2. Pull the rear end of the shelf support away from the side wall and remove it. 1 2 2. Lift and turn the levers on the two hinges. Install the shelf supports in the opposite sequence. Cleaning the oven door The oven door has two glass panels. You can remove the oven door and the internal glass panel to clean it. The oven door can close if you try to remove the internal glass panel before you remove the oven door. CAUTION! Do not use the appliance without the internal glass panel. 1.
90° 7. First lift carefully and then remove the glass panel. 4. Put the door on a soft cloth on a stable surface. 1 5. Release the locking system to remove the internal glass panel. 2 8. Clean the glass panel with water and soap. Dry the glass panel carefully. When the cleaning is completed, install the glass panel and the oven door. Do the above steps in the opposite sequence. The screen-printing zone must face the inner side of the door.
Replacing the lamp Put a cloth on the bottom of the interior of the appliance. It prevents damage to the lamp glass cover and the cavity. WARNING! Danger of electrocution! Disconnect the fuse before you replace the lamp. The lamp and the lamp glass cover can be hot. 1. Deactivate the appliance. 2. Remove the fuses from the fuse box or deactivate the circuit breaker. The back lamp 1. Turn the lamp glass cover counterclockwise to remove it. 2. Clean the glass cover. 3.
We recommend that you write the data here: Product number (PNC) ......................................... Serial number (S.N.) ......................................... INSTALLATION WARNING! Refer to Safety chapters. Building In 540 21 Building Under CAUTION! Only a qualified and competent person must do the installation of the appliance. If you do not contact a qualified or competent person, the guarantee becomes invalid if there is damage.
Cable L 1 – 2 – 3 = phase cables Cable types applicable for installation or replacement: N 4 = neutral cable H07 RN-F, H05 RN-F, H05 RRF, H05 VV-F, H05 V2V2-F (T90), H05 BB-F For the section of the cable refer to the total power on the rating plate. You can also refer to the table: Total power (W) = earth cable If the mains voltage is different, rearrange the jumpers on the terminal board (refer to the connection diagram below). Connect the ground cable to the terminal.
Energy consumption with a standard load, conventional mode 0.83 kWh/cycle Energy consumption with a standard load, fan-forced mode 0.82 kWh/cycle Number of cavities 1 Heat source Electricity Volume 57 l Type of oven Built-Under Oven Mass 27.3 kg EN 60350-1 - Household electric cooking appliances - Part 1: Ranges, ovens, steam ovens and grills - Methods for measuring performance. Energy saving The appliance contains features which help you save energy during everyday cooking.
INHALTSVERZEICHNIS Sicherheitsinformationen Sicherheitsanweisungen Gerätebeschreibung Vor der ersten Inbetriebnahme Täglicher Gebrauch Zusatzfunktionen 21 22 25 25 26 27 Tipps und Hinweise Reinigung und Pflege Fehlersuche Montage Energieeffizienz 28 35 38 39 41 Änderungen vorbehalten. SICHERHEITSINFORMATIONEN Lesen Sie vor der Montage und dem Gebrauch des Geräts zuerst die Gebrauchsanleitung.
Allgemeine Sicherheit • • • • • • • • • Nur eine qualifizierte Fachkraft darf den Elektroanschluss des Geräts vornehmen und das Kabel austauschen. Der Geräteinnenraum wird während des Betriebs heiß. Berühren Sie nicht die Heizelemente im Geräteinnern. Verwenden Sie zum Anfassen des Zubehörs und der Töpfe wärmeisolierende Handschuhe. Trennen Sie das Gerät vor Wartungsarbeiten von der Stromversorgung.
• Ziehen Sie das Gerät nicht am Türgriff. • Das Küchenmöbel und die Einbaunische müssen die passenden Abmessungen aufweisen. • Die Mindestabstände zu anderen Geräten und Küchenmöbeln sind einzuhalten. • Stellen Sie sicher, dass das Gerät unterhalb von bzw. zwischen sicheren Konstruktionen montiert wird. • Einige Teile des Geräts sind stromführend. Das Küchenmöbel muss auf allen Seiten mit dem Gerät abschließen, um einen Kontakt mit stromführenden Teilen zu vermeiden.
• Üben Sie keinen Druck auf die geöffnete Gerätetür aus. • Benutzen Sie das Gerät nicht als Arbeits- oder Abstellfläche. • Öffnen Sie die Gerätetür vorsichtig. Bei der Verwendung von Zutaten, die Alkohol enthalten, kann ein AlkoholLuftgemisch entstehen. • Achten Sie beim Öffnen der Tür darauf, dass keine Funken oder offenen Flammen in das Geräts gelangen.
Entsorgung Service WARNUNG! Verletzungs- und Erstickungsgefahr. • Trennen Sie das Gerät von der Stromversorgung. • Schneiden Sie das Netzkabel ab, und entsorgen Sie es. • Entfernen Sie das Türschloss, um zu verhindern, dass sich Kinder oder Haustiere in dem Gerät einschliessen. • Wenden Sie sich zur Reparatur des Geräts an einen autorisierten Kundendienst. • Verwenden Sie ausschließlich Originalersatzteile.
Vorheizen Heizen Sie das leere Gerät vor, um Fettreste zu verbrennen. und die 1. Stellen Sie die Funktion Höchsttemperatur ein. 2. Lassen Sie das Gerät 1 Stunde lang eingeschaltet. 3. Stellen Sie die Funktion und die Höchsttemperatur ein. 4. Lassen Sie das Gerät 15 Minuten lang eingeschaltet. Das Zubehör kann heißer werden als bei normalem Gebrauch. Das Gerät kann Geruch und Rauch verströmen. Das ist normal. Sorgen Sie für eine ausreichende Raumbelüftung.
Backofenfunktion Anwendung Heißluftgrillen Zum Braten von größeren Fleischstücken oder Geflügel mit Knochen auf einer Einschubebene. Auch zum Gratinieren und Überbacken. Grillstufe 1 Zum Grillen flacher Lebensmittel und zum Toasten von Brot. Auftauen Zum Auftauen von tiefgefrorenen Lebensmitteln. Kochzonen-Einstellknöpfe Das Kochfeld kann mit den KochzonenEinstellknöpfen bedient werden. Siehe hierzu die Bedienungsanleitung des Kochfelds.
TIPPS UND HINWEISE WARNUNG! Siehe Kapitel Sicherheitshinweise. Die Temperaturen und Backzeiten in den Tabellen sind nur Richtwerte. Sie sind abhängig von den Rezepten, der Qualität und der Menge der verwendeten Zutaten. Allgemeine Informationen • Das Gerät hat vier Einschubebenen. Die Einschubebenen werden vom Boden des Backofens aus gezählt. • Das Gerät ist mit einem exklusiven Umluft- und Dampfsystem zur Regelung der Luftzirkulation und des Dampfkreislaufs ausgerüstet.
Back- und Brattabelle Kuchen Speise Ober-/Unterhitze Heißluft Dauer (Min.
Speise Ober-/Unterhitze Heißluft Dauer (Min.
Brot und Pizza Speise Ober-/Unterhitze Heißluft Temperatur (°C) Ebene Temperatur (°C) Ebene 190 1 195 Roggenbrot 190 1 Brötch- 190 Pizza1) Scones1) Weißbro Dauer (Min.) Bemerkungen 1 60 - 70 1-2 Stück, 500 g pro Stück 190 1 30 - 45 In einer Brotform 2 180 2 (1 und 3) 25 - 40 6-8 Brötchen auf einem Backblech 190 1 190 1 20 - 30 Auf einem tiefen Blech 200 3 190 2 10 – 20 Auf dem Backblech Dauer (Min.) Bemerkungen t1) en1) 1) Backofen 10 Min. vorheizen.
Speise Yorkshire- Ober-/Unterhitze Heißluft Temperatur (°C) Ebene Temperatur (°C) Ebene 220 2 210 2 Dauer (Min.) Bemerkungen 20 - 30 6 Puddingformen Dauer (Min.) Bemerkungen pudding1) 1) Backofen 10 Min. vorheizen.
Speise Ober-/Unterhitze Heißluft Dauer (Min.
Speise Menge Stück (g) Beefsteaks 4 600 Grillwürste 8 Schweinskotelett Temperatur (°C) Dauer (Min.) Ebene 1. Seite 2.
Speise Menge Stück (g) Wachteln 4 500 Gemüsegratin - Jakobsmuscheln Temperatur (°C) Dauer (Min.) Ebene 1. Seite 2. Seite 200 25 - 30 20 - 25 3 - 200 20 - 25 - 3 - - 200 15 - 20 - 3 Makrele 2-4 - 200 15 - 20 10 - 15 3 Fischscheiben 4-6 800 200 12 - 15 8 - 10 3 REINIGUNG UND PFLEGE WARNUNG! Siehe Kapitel Sicherheitshinweise.
2. Ziehen Sie das Einhängegitter hinten von der Seitenwand weg und nehmen Sie es heraus. 1 2 2. Heben Sie die Hebel der beiden Scharniere an, und klappen Sie sie nach vorn. Führen Sie zum Einsetzen der Einhängegitter die obigen Schritte in umgekehrter Reihenfolge durch. Reinigen der Backofentür Die Backofentür hat zwei Glasscheiben. Die Backofentür und die innere Glasscheibe können zur Reinigung ausgebaut werden.
90° 7. Heben Sie die Glasscheibe vorsichtig an und entfernen Sie sie. 4. Legen Sie die Backofentür auf ein weiches Tuch auf einer stabilen Fläche. 1 5. Lösen Sie das Verriegelungssystem, um die innere Glasscheibe zu entfernen. 2 8. Reinigen Sie die Glasscheibe mit Wasser und Spülmittel. Trocknen Sie die Glasscheibe sorgfältig ab. Nach der Reinigung müssen die Glasscheibe und die Backofentür wieder eingebaut werden. Führen Sie die oben aufgeführten Schritte in umgekehrter Reihenfolge durch.
1. Schalten Sie das Gerät aus. 2. Entfernen Sie die Sicherungen aus dem Sicherungskasten, oder schalten Sie den Schutzschalter aus. Rückwandlampe 1. Drehen Sie die Glasabdeckung der Lampe gegen den Uhrzeigersinn, um sie zu entfernen. 2. Reinigen Sie die Glasabdeckung. 3. Ersetzen Sie die Lampe durch eine geeignete, bis 300 °C hitzebeständige Lampe. 4. Bringen Sie die Glasabdeckung an. Austauschen der Lampe Legen Sie ein Tuch unten in den Garraum des Geräts.
Problem Mögliche Ursache Abhilfe Dampf und Kondenswasser schlagen sich auf den Speisen und im Garraum nieder. Die Speisen standen zu lange im Backofen. Speisen nach Beendigung des Gar- oder Backvorgangs nicht länger als 15 - 20 Minuten im Backofen stehen lassen. Servicedaten Wenn Sie das Problem nicht selbst lösen können, wenden Sie sich an den Händler oder einen autorisierten Kundendienst. Typenschild befindet sich am Frontrahmen des Garraums. Entfernen Sie das Typenschild nicht vom Garraum.
Montage Näheres zum Kabelquerschnitt siehe Gesamtleistung auf dem Typenschild. Weitere Informationen finden Sie in der Tabelle: 540 21 600 min. 550 20 558 19 114 min. 560 589 598 570 594 Gesamtleistung (W) Kabelquerschnitt (mm²) 3 Phasen: 5 x 2,5 maximal 10380 2 Phasen: 4 x 4,0 1 Phase 3 x 6,0 9 Anschluss der Klemmleiste 3 Befestigung des Geräts im Möbel Das Gerät ist mit einer 6-poligen Klemmleiste ausgestattet.
1 2 3 4 5 230V 3~ L3 PE L1 L2 1 2 3 4 5 230V 1~ L1 1 2 3 400V 2N~ L1 L2 1 2 3 400V 3N~ N 4 5 PE N 4 5 PE L1 L2 L3 N PE ENERGIEEFFIZIENZ Produktdatenblatt und Informationen gemäß EU 65-66/2014 Herstellername Juno Modellidentifikation JH060A5 Energieeffizienzindex 103.8 Energieeffizienzklasse A Energieverbrauch bei Standardbeladung, Ober-/Unterhitze 0.83 kWh/Programm Energieverbrauch bei Standardbeladung, Heißluft 0.
öffnen Sie sie nicht öfter als erforderlich. – Verwenden Sie Kochgeschirr aus Metall, um Energie zu sparen. – Wenn immer möglich, geben Sie die Speisen in den kalten Backofen. – Beträgt die Garzeit länger als 30 Minuten, reduzieren Sie die Ofentemperatur je nach Gardauer 3 - 10 Minuten vor Ablauf des Garvorgangs auf die Mindesttemperatur. Durch die Restwärme des Backofens werden die Speisen weiter gegart. – Nutzen Sie die Restwärme, um andere Speisen aufzuwärmen.
867310736-B-492014