JKG 7495 GEBRAUCHSANWEISUNG OPERATING INSTRUCTIONS 2222 215-34
WARNINGS It is most important that this instruction book should be retained with the appliance for future reference. Should the appliance be sold or transferred to another owner, or should you move house and leave the appliance, always ensure that the book is supplied with the appliance in order that the new owner can be acquainted with the functioning of the appliance and the relevant warnings.
¥ Do not place carbonated or fizzy drinks in the freezer as it creates pressure on the container, which may cause it to explode, resulting in damage to the appliance. Installation ¥ During normal operation, the condenser and compressor at the back of the appliance heat up considerably. For safety reasons, minimum ventilation must be as shown in the relevant Figure. Attention: keep ventilation openings clear of obstruction.
USE Cleaning the interior Before using the appliance for the first time, wash the interior and all internal accessories with lukewarm water and some neutral soap so as to remove the typical smell of a brand-new product, then dry thoroughly. Do not use detergents or abrasive powders, as these will damage the finish. Contol Panel A. B. C. D. E. Pilot light Super control light Warning light Normal/Super switch Thermostat knob Use of the freezer Operation Insert the plug into the wall socket.
Storage of frozen food When first starting-up or after a period out of use, before putting the products in the compartment let the appliance run for at least two hours on the fast freeze setting, then turn the thermostat knob to the normal operating position. Important If there is a power failure when food is in the freezer, do not open the door of the freezer compartment.
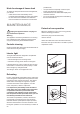
Movable shelves The walls of the refrigerator are equipped with a series of runners so that the shelves can be positioned as desired. D338 Positioning the door shelves To permit storage of food packages of various sizes, the door shelves can be placed at different heights. To make these adjustments proceed as follows: Gradually pull the shelf in the direction of the arrows until it comes free, then reposition as required.
Hints for storage of frozen food To obtain the best performance from this appliance, you should: ¥ make sure that the commercially frozen foodstuffs were adequately stored by the retailer; ¥ be sure that frozen foodstuffs are transferred from the foodstore to the freezer in the shortest ¥ ¥ ¥ possible time; not open the door frequently or leave it open longer than absolutely necessary. Once defrosted, food deteriorates rapidly and cannot be refrozen.
the power supply or to remove the foodstuffs. However, when the ice becomes very thick on the inner liner, complete defrosting should be carried out and it is advisable to carry out this operation when the appliance is empty. To carry out complete defrosting of the freezer compartment proceed as follows: 1. pull out the plug from the wall socket or turn the thermostat knob to the ÇOÈ setting; 2. remove any stored food, wrap it in several layers of newspaper and put it in a cool place; 3.
- 73/23 EEC of 19.2.73 (Low Voltage Directive) and subsequent modifications; - 89/336 EEC of 3.5.89 (Electromagnetic Compatibility Directive) and subsequent modifications. ATTENTION! It must be possible to disconnect the appliance from the mains power supply; the plug must therefore be easily accessible after installation. Door reversibility P P A D B C D C P1 P1 D337 Right opening Remove (P) from both sides and the door.
Apply joint the sealing strip as shown in figure. D765 A Slide the appliance into the recess, pushing it against the wall on the handle side. D023 Open the door and push the appliance against the side of the kitchen unit opposite to that of appliance hinges. Fasten the appliance with 4 screws provided in the kit included with the appliance. Snap vent grille (C) and hinge cover (D) into position. D C D723 Apply covers (B) on joint cover lugs and into hinge holes.
B A Separate parts A, B, C, D as shown in the figure C D PR266 50mm Place guide (A) on the inside part of the furniture door, up and down as shown in the figure and mark the position of external holes. After having drilled holes, fix the guide with the screws supplied. A 20 m m PR166 Fix cover (C) on guide (A) until it clips into place. A C PR33 Open the appliance door and the furniture door at 90¡. Insert the small square (B) into guide (A).
Should the lining up of the furniture door be necessary, use the clearance of slots. At the end of operations, it is necessary to check if the door of the furniture closes properly. PR168 Fix cover (D) on guide (B) until it clips into place. B D PR167/1 In case of side fixing of the appliance, it will be sufficient to loose the screws fixing the bracket (E) and to position it as shown in figure.