Before installation Thank you for using ORINDA wireless router! This manual will take windows 2000/xp as example to guide you how to share Internet through our router. This manual only introduces the most basic setting; please visit our website to download more detailed illustration for your more advanced requirement. Note: There maybe something different between the picture in the manual and material objects, please act according the practices. Hardware unit 1.
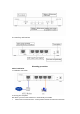
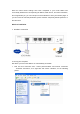
5. Control key and interface Mounting procedure Cable installation 1. Hardware connection 2. Set up your computer We advise you set local IP address as automatically accessible: I.
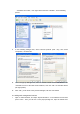
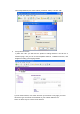
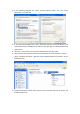
Ænetwork connection", then right-click and choose "attribute", as the following picture: II. In the following dialogue box, select "Internet protocol (TCP / IP)", then select "Properties", as shown left: III. In the new pop-up dialogue box, select "automatic control access to IP address" and "automatic access to the DNS server address," then lick "OK." As indicated above (the right picture) IV. Click "OK", you ill return to the previous dialogue, left-click "OK" button 3.
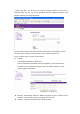
name and password (user name: admin, password: admin). Left-click "OK" II. Set up Internet access 1) After click “OK” you will enter the product’s settings interface. You will see a welcome page, and you can choose Simplified Chinese, Traditional Chinese, and English according your language habits. 2) In the main interface, click "Next" and then you will enter a new page, you need choose the type of Internet access based on your network statues here.
z PPPoE The product set PPPoE as default way Note: Username and password which are supplied by your network service providers (such as telecommunications, CRC and cable modem) is not the router's z login and password. Ethernet: automatically obtain IP address (Dynamic IP) from network service providers .Here doesn't require any settings, just click "OK”.
Now the router's basic settings have been completed. If your router WAN have successfully obtained the corresponding IP address, DNS service, and other information, then congratulate you, you can now open a new IE browser to scan your favorite pages. If you do not see the relevant parameters, please read the "Frequently Asked Questions" in this document. Wireless installation 1. Hardware connection 2. Set up your computer We advise you set local P address as automatically accessible: I.
II. In the following dialogue box, select "Internet protocol (TCP / IP)", then select "Properties", as shown left: III. In the new pop-up dialogue box, select "automatic control access to IP address" and "automatic access to the DNS server address," then lick "OK." As indicated above (the right picture) IV. Click "OK", you ill return to the previous dialogue, left-click "OK" button V.
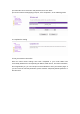
3. Landing web management interface I. Open a new IE browser, and input “http://192.168.1.1” in the address bar and then press “enter”. Then you will see a new pop-up dialog box, input the default user name and password (user name: admin, password: admin). Left-click "OK" II.
1) After click “OK” you will enter the product’s settings interface. You will see a welcome page, and you can choose Simplified Chinese, Traditional Chinese, and English according your language habits. 2) In the main interface, click "Next" and then you will enter a new page, you need choose the type of Internet access based on your network statues here.
3) Confirm the correct username and password, then click "Next" 4) Then the wireless settings page jump out, click "completion", as the following picture 4. Complete the setting 5.Test your Internet connection Now the router's basic settings have been completed. If your router WAN have successfully obtained the corresponding IP address, DNS service, and other information, then congratulate you, you can now open a new IE browser to scan your favorite pages.
Federal Communication Commission Interference Statement This equipment has been tested and found to comply with the limits for a Class B digital device, pursuant to Part 15 of the FCC Rules. These limits are designed to provide reasonable protection against harmful interference in a residential installation. This equipment generates uses and can radiate radio frequency energy and, if not installed and used in accordance with the instructions, may cause harmful interference to radio communications.
separation distance of 20cm is maintained between the radiator (antenna) & user’s/nearby people’s body at all times and must not be co-located or operating in conjunction with any other antenna or transmitter.