Gebruiksaanwijzing D6/D60
Inhoudsopgave Uw D6/D60 Bedieningselementen 4 Belangrijke aanwijzingen 6 Eigenlijk gebruik ............................................................................................................................................ 6 Voor uw veiligheid ........................................................................................................................................ 6 1 Voorbereiden en in gebruik nemen 10 JURA op internet ................................................................
Inhoudsopgave 6 Meldingen op de display 35 7 Storingen verhelpen 36 8 Transport en milieuvriendelijke afvoer 37 Transport / systeem legen ......................................................................................................................... 37 Afvoer ............................................................................................................................................................
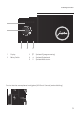
Bedieningselementen Bedieningselementen 9 1 10 2 11 12 3 13 14 4 15 5 6 7 8 1 2 3 4 5 6 7 8 Toets Aan/Uit Q Afdekking waterreservoir Waterreservoir Netsnoer (achterzijde van het apparaat) In hoogte verstelbare koffie-uitloop Koffieresidubak Restwaterbak Kopjesplateau 9 10 11 12 13 14 15 4 Afdekking vultrechter voor reinigingstablet Vultrechter voor reinigingstablet Afdekking bonenreservoir Draaiknop maalgraadinstelling Bonenreservoir met aroma-beschermdeksel Draaiknop voor heetwater- en melk
Bedieningselementen 1 nnnnnnnn 2 1 2 Display Rotary Switch O c n 3 4 5 3 4 5 O c n Symbool P (programmering) Symbool Onderhoud Symbool Melkschuim Service interface voor optioneel verkrijgbare JURA Smart Connect (onder afdekking) 5
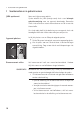
Belangrijke aanwijzingen Belangrijke aanwijzingen Eigenlijk gebruik Het apparaat is voor huishoudelijk gebruik ontwikkeld en geconstrueerd. Het is bedoeld voor de koffiebereiding en het opwarmen van melk en water. Ieder ander gebruik wordt beschouwd als oneigenlijk gebruik. JURA Elektroapparate AG kan niet aansprakelijk worden gesteld voor de gevolgen van oneigenlijk gebruik. Lees deze gebruiksaanwijzing vóór gebruik van het apparaat volledig door en neem deze in acht.
Belangrijke aanwijzingen U U U U Zorg ervoor dat de D6 en het netsnoer zich niet in de buurt van hete oppervlakken bevinden. Zorg ervoor dat het netsnoer niet wordt afgeklemd of langs scherpe randen schuurt. Open het apparaat niet en probeer het nooit zelf te repareren. Breng aan het apparaat geen wijzigingen aan die niet in deze gebruiksaanwijzing zijn beschreven. Het apparaat bevat stroomvoerende onderdelen. Na het openen bestaat levensgevaar.
Belangrijke aanwijzingen Een beschadigd apparaat is niet veilig en kan verwondingen en brand veroorzaken. Om schade en mogelijk gevaar voor verwonding en brandgevaar te voorkomen: U Laat het netsnoer nooit los naar beneden hangen. Het netsnoer kan een struikelblok vormen of beschadigd raken. U Bescherm de D6 tegen weersinvloeden zoals regen, vorst en direct zonlicht. U Dompel de D6, het netsnoer en de aansluitingen niet in water. U Plaats de D6 en de afzonderlijke onderdelen ervan niet in de vaatwasser.
Belangrijke aanwijzingen U U U U U Schakel het apparaat bij langdurige afwezigheid met de toets Aan/Uit uit en trek de netstekker uit het stopcontact. Kinderen mogen reinigings- en onderhoudswerkzaamheden uitsluitend onder toezicht van een verantwoordelijke persoon uitvoeren. Laat kinderen niet met het apparaat spelen. Kinderen onder acht jaar uit de buurt van het apparaat houden resp. permanent in de gaten houden.
1 1 Voorbereiden en in gebruik nemen Voorbereiden en in gebruik nemen JURA op internet Neem een kijkje op onze website. Op de website van JURA (www.jura.com) kunt u een beknopte gebruiksaanwijzing voor uw apparaat downloaden. Bovendien vindt u interessante en actuele informatie over uw D6 en over het thema koffie. Als u hulp nodig heeft bij de bediening van uw apparaat, kunt u de benodigde informatie vinden onder www.jura.com/service.
1 Waterhardheid bepalen Voorbereiden en in gebruik nemen Tijdens de eerste inbedrijfstelling moet u de waterhardheid instellen. Als u de waterhardheid van het gebruikte water niet kent, kunt u deze aanvankelijk bepalen. Gebruik hiervoor het tot de leveringsomvang behorende Aquadur®-teststaafje. T Houd het teststaafje kort (1 seconde) onder stromend water. Schud het water eraf. T Wacht ca. 1 minuut.
1 Voorbereiden en in gebruik nemen T Draai de Rotary Switch om de instelling van de waterhardheid te wijzigen, bijv. in 25 °dH. T Druk de Rotary Switch in. Op de display verschijnt kort OK. FILTER PLAATSEN T Open de afdekking van het waterreservoir. T Verwijder het waterreservoir en spoel dit uit met koud water. T Klap de filterhouder open. T Plaats de meegeleverde CLARIS Smart filterpatroon met lichte druk in het waterreservoir. T Sluit de filterhouder. Deze klikt hoorbaar dicht.
1 Voorbereiden en in gebruik nemen T Leeg de restwaterbak en de koffieresidubak en plaats deze weer terug. T Plaats een bakje onder de koffie-uitloop. WARMT OP SPOELT, het systeem wordt gespoeld. Er stroomt water uit de koffie-uitloop. De spoeling stopt automatisch. Op de display verschijnt CAPPUCC.. Uw D6 is nu klaar voor gebruik. Melk aansluiten Uw D6 zorgt voor romig zachte melkschuim met fijne poriën en een perfecte consistentie.
2 2 Bereiding Bereiding Algemene informatie over de bereiding: Tijdens het maalproces kunt u de koffiesterkte van de producten kiezen door de Rotary Switch te draaien: MILD, NORMAL, STERK of EXTRA. Tijdens de bereiding kunt u de vooraf ingestelde hoeveelheden (bijv. water- en melkschuimhoeveelheid) wijzigen door de Rotary Switch te draaien. U kunt de bereiding op elk moment stoppen. Druk hiervoor op de Rotary Switch (bij een koffiespecialiteit) of sluit de draaiknop (bij melkschuim en heet water).
2 Twee koffiespecialiteiten met één druk op de knop Bereiding Bij de bereiding van twee koffiespecialiteiten wordt de voor het product ingestelde waterhoeveelheid per kopje gebruikt. De bereiding van twee espressi en twee koffie verloopt volgens dit voorbeeld. Voorbeeld: zo bereidt u twee espressi. Voorwaarde: op de display staat CAPPUCC. (voorbeeld). T Plaats twee espressokopjes onder de koffie-uitloop. T Draai de Rotary Switch tot ESPRESSO wordt weergegeven.
2 Bereiding T Sluit hiervoor de draaiknop op positie °. De koffiebereiding start. De vooraf ingestelde waterhoeveelheid voor de espresso stroomt in het kopje. De bereiding stopt automatisch. Op de display verschijnt CAPPUCC.. Voor een correcte werking van de uitloop voor microschuim moet u deze dagelijks reinigen als u melk heeft bereid (zie Hoofdstuk 5 “Onderhoud – Uitloop voor microschuim reinigen”). Melkschuim Voorwaarde: op de display staat CAPPUCC. (voorbeeld).
2 Waterhoeveelheid permanent aan de grootte van de kopjes aanpassen Bereiding U kunt de waterhoeveelheid voor alle koffiespecialiteiten zeer eenvoudig en permanent aan de grootte van de kopjes aanpassen. Zoals in het volgende voorbeeld stelt u de hoeveelheid eenmaal in. Bij alle volgende bereidingen stroomt altijd deze hoeveelheid uit. De permanente aanpassing van de waterhoeveelheid aan de grootte van de kopjes van alle koffiespecialiteiten gaat volgens dit patroon.
2 Bereiding Voorbeeld: zo wijzigt u de maalgraad tijdens de bereiding van een espresso. T Plaats een kopje onder de koffie-uitloop. T Open de afdekking van het bonenreservoir en verwijder het aroma-beschermdeksel. T Draai de Rotary Switch tot ESPRESSO wordt weergegeven. T Druk op de Rotary Switch om de bereiding te starten. T Zet de draaiknop maalgraadinstelling in de gewenste stand terwijl de molen draait. De vooraf ingestelde waterhoeveelheid stroomt in het kopje. De bereiding stopt automatisch.
3 3 Dagelijks gebruik Dagelijks gebruik Waterreservoir vullen VOORZICHTIG Het dagelijkse onderhoud van het apparaat en de hygiëne in de omgang met melk, koffie en water zijn van cruciaal belang voor een constant perfect koffieresultaat in het kopje. U dient het water daarom dagelijks te verversen. Melk, koolzuurhoudend mineraalwater of andere vloeistoffen kunnen het waterreservoir of het apparaat beschadigen. T Vul het waterreservoir uitsluitend met vers, koud water.
3 Dagelijks gebruik T Plaats de koffieresidubak en de restwaterbak weer. T Spoel het waterreservoir met schoon water. T Reinig de uitloop voor microschuim (zie Hoofdstuk 5 “Onderhoud – Uitloop voor microschuim reinigen”). T Verwijder de melkslang en spoel deze grondig onder stromend water. T Demonteer en spoel de uitloop voor microschuim (zie Hoofdstuk 5 “Onderhoud – Uitloop voor microschuim demonteren en spoelen”). T Veeg het apparaat van buiten af met een schone, zachte en vochtige doek (bijv.
3 Dagelijks gebruik Als melk is bereid, maar de melksysteemreiniging niet is gestart, wordt eerst gevraagd om een melksysteemspoeling (M-SPOEL.). DRAAIKN. OPENEN T Open hiervoor de draaiknop op positie m. nnnkkkkk, het melksysteem wordt gespoeld. De spoeling stopt automatisch. DRAAIKN. SLUITEN T Sluit hiervoor de draaiknop op positie °. SPOELT, het systeem wordt gespoeld. De spoeling stopt automatisch. Uw D6 is uitgeschakeld.
4 Permanente instellingen in de programmeerstand 4 Permanente instellingen in de programmeerstand In de programmeerstand kunt u permanente instellingen aanbrengen. Door gewoon de Rotary Switch te draaien en in te drukken navigeert u door de programmapunten en slaat u de gewenste instellingen permanent op. U kunt met de Rotary Switch de volgende instellingen aanbrengen: Programmapunt Subpunt Toelichting ONDERH. M-SPOEL., M-REIN., SPOELEN, REINIGEN, ONTKALK. T Kies het gewenste onderhoudsprogramma.
4 Permanente instellingen in de programmeerstand Product Melkschuim Heet water 2 kopjes Hoeveelheid Koffiesterkte Temperatuur Melkschuim: – – 3 SEC. – 60 SEC. – – Water: 25 ML – 450 ML Bij de bereiding van twee koffiespecialiteiten wordt de voor het product ingestelde temperatuur en de waterhoeveelheid per kopje gebruikt. De permanente instellingen in de programmeerstand gaan altijd volgens hetzelfde patroon. Voorbeeld: zo wijzigt u de koffiesterkte van een koffie van NORMAL in STERK.
4 Permanente instellingen in de programmeerstand Waterhardheid instellen Hoe harder het water, des te vaker moet de D6 worden ontkalkt. Daarom is het belangrijk de juiste waterhardheid in te stellen. De waterhardheid is al tijdens de eerste inbedrijfstelling ingesteld. U kunt deze instelling te allen tijde wijzigen. De waterhardheid kan traploos tussen 1 °dH en 30 °dH ingesteld worden. Voorwaarde: op de display staat CAPPUCC. (voorbeeld). T Raak het symbool P gedurende ca. 2 seconden aan tot ONDERH.
4 Permanente instellingen in de programmeerstand T Druk de Rotary Switch in om de instelling te bevestigen. Op de display verschijnt kort OK. UIT NA T Druk op het symbool P om de programmeerstand te verlaten. CAPPUCC. (voorbeeld) Eenheid waterhoeveelheid In het programmapunt EENHEDEN kunt u de eenheid van de waterhoeveelheid instellen. Voorbeeld: zo wijzigt u de eenheid van de waterhoeveelheid van ML in OZ. Voorwaarde: op de display staat CAPPUCC. (voorbeeld). T Raak het symbool P gedurende ca.
4 Permanente instellingen in de programmeerstand T Druk de Rotary Switch in om de instelling te bevestigen. Op de display verschijnt kort OK. LANGUAGE T Druk op het symbool P om de programmeerstand te verlaten. CAPPUCC.
5 5 Onderhoud Onderhoud Uw D6 beschikt over een geïntegreerd reinigingsprogramma. Uitloop voor microschuim reinigen (M-REIN.) Apparaat reinigen (REINIGEN) Apparaat ontkalken (ONTKALK.) U U U E Voer de onderhoudsprogramma’s uit als u hierom wordt gevraagd. E In de programmeerstand (programmapunt ONDERH.) kunt u de onderhoudsprogramma's te allen tijde starten. Uitloop voor microschuim spoelen Tien minuten na de melkbereiding vraagt de D6 om een melksysteemspoeling.
5 Onderhoud Voorwaarde: op de display staat CAPPUCC. (voorbeeld). T Raak het symbool P gedurende ca. 2 seconden aan tot ONDERH. op de display verschijnt. T Druk de Rotary Switch in om het programmapunt te kiezen. M-SPOEL. T Draai de Rotary Switch tot M-REIN. wordt weergegeven. T Druk de Rotary Switch in. REINIG. / WATER T Verwijder de melkslang uit de melkhouder of de melkkoeler. T Vul een bakje met 250 ml vers water en voeg 1 doseerdop melksysteemreiniger toe. T Dompel de melkslang in het bakje.
5 Uitloop voor microschuim demonteren en spoelen Onderhoud Voor een correcte werking van de uitloop voor microschuim alsmede om hygiënische redenen moet u deze dagelijks demonteren en spoelen als u melk heeft bereid. U wordt door uw D6 niet verzocht de uitloop voor microschuim te demonteren en te spoelen. T Verwijder de melkslang en spoel deze grondig onder stromend water. T Trek de uitloop voor microschuim met een lichte draaibeweging voorzichtig van het Connector System© af.
5 Onderhoud T Plaats een nieuwe CLARIS Smart-filterpatroon met lichte druk in het waterreservoir. T Sluit de filterhouder. Deze klikt hoorbaar dicht. T Vul het waterreservoir met vers, koud water en plaats het weer terug. Het apparaat heeft automatisch herkend dat u de filterpatroon zojuist heeft geplaatst/vervangen. DRAAIKN. OPENEN, het lichtsegment op de draaiknop brandt. T Plaats een bakje onder de uitloop voor microschuim. T Open hiervoor de draaiknop op positie m.
5 Onderhoud T Leeg de restwaterbak en de koffieresidubak en plaats deze weer terug. ONDERH. DRUKKEN T Plaats een bakje onder de koffie-uitloop. T Raak het symbool Onderhoud c aan. REINIGT, er stroomt water uit de koffie-uitloop. Het proces wordt onderbroken, TABLET INWERPEN. T Open de afdekking van de vultrechter voor de reinigingstablet. T Doe een JURA reinigingstablet in de vultrechter. T Sluit de afdekking van de vultrechter. T Raak het symbool Onderhoud c aan.
5 Onderhoud VOORZICHTIG Schade aan gevoelige oppervlakken (bijv. marmer) door contact met het ontkalkingsmiddel kan niet worden uitgesloten. T Verwijder spatten onmiddellijk. E Het ontkalkingsprogramma duurt ca. 45 minuten. E JURA ontkalkingstabletten zijn verkrijgbaar bij de geautoriseerde dealer. Voorwaarde: op de display staat ONTKALK. / CAPPUCC. (voorbeeld). T Raak het symbool Onderhoud c gedurende ca. 2 seconden aan. Op de display verschijnt LADE LEGEN.
5 Onderhoud T Leeg het bakje en plaats het onder de koffie-uitloop en de uitloop voor microschuim. T Verwijder het waterreservoir en spoel dit grondig uit. T Vul het waterreservoir met vers, koud water en plaats het weer terug. DRAAIKN. OPENEN, het lichtsegment op de draaiknop brandt. T Open hiervoor de draaiknop op positie m. ONTKALKT Het proces wordt onderbroken, DRAAIKN. SLUITEN. T Sluit hiervoor de draaiknop op positie °. ONTKALKT Het proces wordt onderbroken, ONTKALKT.
5 Onderhoud Waterreservoir ontkalken 34 Het waterreservoir kan verkalken. Om een probleemloze werking te waarborgen moet u het waterreservoir van tijd tot tijd ontkalken. T Verwijder het waterreservoir. T Als u een CLARIS Smart-filterpatroon gebruikt, dient u deze te verwijderen. T Los 3 JURA ontkalkingstabletten in het volledig gevulde waterreservoir op. T Laat het waterreservoir met het ontkalkingsmiddel meerdere uren (bijv. 's nachts) staan. T Leeg het waterreservoir en spoel dit grondig uit.
6 6 Meldingen op de display Meldingen op de display Melding WATERRES VULLEN Oorzaak/gevolg Het waterreservoir is leeg. Geen bereiding mogelijk. De restwaterbak is vol. Er kunnen geen koffiespecialiteiten worden bereid. Heetwater- en melkschuimbereiding zijn mogelijk. LADE PLAATSEN De restwaterbak is niet goed of helemaal niet geplaatst. Geen bereiding mogelijk. Het bonenreservoir is leeg. Er BONEN VULLEN kunnen geen koffiespecialiteiten worden bereid. Heetwateren melkschuimbereiding zijn mogelijk.
7 Storingen verhelpen 7 Storingen verhelpen Probleem Er ontstaat te weinig schuim bij het opschuimen van melk of de melk spuit uit de uitloop voor microschuim. Bij de koffiebereiding loopt de koffie slechts druppelsgewijs door. WATERRES VULLEN Oorzaak/gevolg Maatregel De uitloop voor T Reinig de uitloop voor microschuim microschuim is vervuild. (zie Hoofdstuk 5 “Onderhoud – Uitloop voor microschuim reinigen”).
8 8 Transport en milieuvriendelijke afvoer Transport en milieuvriendelijke afvoer Transport / systeem legen Bewaar de verpakking van de D6. Deze biedt bescherming tijdens het transport. Om de D6 bij het transport te beschermen tegen vorst, moet het systeem worden geleegd. Voorwaarde: op de display staat CAPPUCC. (voorbeeld). T Verwijder de melkslang uit de uitloop voor microschuim. T Plaats een bakje onder de uitloop voor microschuim. T Raak het symbool Melkschuim n aan.
9 Technische gegevens 9 Technische gegevens Spanning Vermogen Conformiteitsteken Pompdruk Inhoud waterreservoir Inhoud bonenreservoir Inhoud koffieresidubak Snoerlengte Gewicht Afmetingen (b h d) 38 220–240 V ~, 50 Hz 1 450 W A statisch max. 15 bar 1,9 l 200 g max. 16 porties ca. 1,1 m ca.
10 10 A B C Index Index Adressen 44 Afdekking Bonenreservoir 4 Vultrechter voor reinigingstablet 4 Waterreservoir 4 Afvoer 37 Apparaat Dagelijks onderhoud 19 Inschakelen 19 Plaatsen 10 Regelmatig onderhoud 20 Uitschakelen 20 Apparaat Ontkalken 31 Reinigen 30 Aroma-beschermdeksel Bonenreservoir met aromabeschermdeksel 4 Beknopte gebruiksaanwijzing 10 Bereiding 14 Cappuccino 15 Espresso 14 Heet water 18 Koffie 14 Melkschuim 16 Twee koffiespecialiteiten 15 Beschrijving van de symbolen 3 Bonenreservoir Bo
10 K M N O P Index Klantenservice 44 Koffie 14 Koffieresidubak 4 Koffie-uitloop In hoogte verstelbare koffie-uitloop 4 Kopjesplateau 4 R Maalgraad Draaiknop maalgraadinstelling 4 Molen instellen 17 Meldingen op de display 35 Melk Melk aansluiten 13 Melkschuim 16 Melksysteem Uitloop voor microschuim reinigen 27 Uitloop voor microschuim spoelen 27 S Netsnoer 4 T Onderhoud 27 Dagelijks onderhoud 19 Regelmatig onderhoud 20 Ontkalken Apparaat 31 Waterreservoir 34 Permanente instellingen in de program
10 Index W Waterhardheid Waterhardheid bepalen 11 Waterhardheid instellen 24 Waterhoeveelheid Permanent aan de grootte van de kopjes aanpassen 17 Waterreservoir 4 Ontkalken 34 Waterreservoir Vullen 19 Website 10 41
J73432/D6-D60/nl/201708 11 JURA contacten / juridische informatie 11 JURA contacten / juridische informatie JURA Elektroapparate AG Kaffeeweltstrasse 10 CH-4626 Niederbuchsiten Tel. +41 62 38 98 233 @ Meer contactgegevens van uw land staan online op www.jura.com. @ Als u hulp nodig heeft bij de bediening van uw apparaat, kunt u de benodigde informatie vinden onder www.jura.com/service.