
User guide
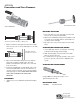

Core Remover Stem
Service Ball Valve
1. With Core Remover Stem pulled out and Service Ball
Valve closed, screw on Service Ball Valve to 1/4" flare
access port.
2. Open Service Ball Valve and push in Core Remover
Stem until it engages Schrader valve. Turn Stem
handle counter-clockwise until valve core is removed
from access valve.
3. Slowly pull straight back on Stem handle until it stops.
Close Service Ball Valve. Unscrew Core Remover. If
core has not been removed, screw-on Stem assembly
and repeat steps 2 and 3. NEVER OPEN BALL VALVE
WITH STEM ASSEMBLY AND VALVE CORE
REMOVED!
EVACUATION
1. Attach line to Service Ball Valve and manifold. Open
Valve.
Valve Closed with Stem Assembly
in "Out" position
Valve Open with Stem
Assembly in "In" position
REPLACING VALVE CORE
1. Insert new valve core onto Stem and screw the Stem
Nut onto the closed Service Ball Valve.
2. Open Service Ball Valve and push stem handle in until
core meets access threads and turn stem handle in a
clockwise motion until tight.
3. Pull stem to the "out" position and close Service Ball
Valve.
CHECKING FOR PROPER CORE SEATING
1. Service Ball Valve must be closed before unscrewing
Stem Nut and removing Stem Assembly.
2. With Stem Assembly removed, crack Service Ball
Valve to check for pressure.
3. If constant pressure is present go back to step 5. If no
pressure is present, remove Service Ball Valve from
system.
CHECKING FOR PROPER TORQUE
Using 32002 Core Torque Tool torque core to
approximately 2.95 in. lbs.
REPLACEMENT ITEMS
A32500N Core Remover Bit
A32500N
JB INDUSTRIES
630.851.9444
Printed in USA
© 2007 J/B Industries Inc.
Evacuation and Core Remover