QUARTZ GLASS TUBE PATIO HEATER INSTRUCTION MANUAL Keep the instructions for future reference 15 0063
WARNlNG SAFETY RULES PLEASE READ THE FOLLOWING SAFETY RULES PRlOR TO OPERATION OF THE HEATER FOR YOUR SAFETY If you smell gas: 1ˊShut off gas to the appliance. 2ˊExtinguish any open flame. 3ˊIf odor continues, immediately call your gas supplier or your fire Department. FOR YOUR SAFETY 1.Do not store or use gasoline or other flammable vapors and liquids in the vicinity of this or any other applianceˊ 2.
warning Read the instructions before installation and use.
TABLE OF CONTENTS Caution ………………………………………………………. 1 Heater Stand and Location ………………………………… 2 Gas Requirements ………………………………………….. 2 Leakage Test ………………………………………………… 2 Operation and Storage ……………………………………... 3 Cleaning and Care ………………………………………….. 4 Parts and Specifications ..………………………………….. 4 Assembly Parts and Procedures ………………………….. 6 Problems Check List ………………………………………...
CAUTION PLEASE READ CAREFULLY THE FOLLOWING SAFETY GUIDELINES BEFORE OPERATION. Do not use the patio heater for indoors, as it may cause personal injury or property damage. This outdoor heater is not intended to be installed on recreational vehicles and/or boats. Installation and repair should be done by a qualified service person. Improper installation, adjustment, alteration can cause personal injury or property damage. Do not attempt to alter the unit in any manner.
HEATER STAND AND LOCATION adequate fresh air ventilation is provided. 100 cm Always maintain proper clearance to non protected combustible materials 100 cm CEILING The heater is primarily for outdoor use only. Always ensure that Heater must be placed on level firm ground. Never operate heater in an explosive atmosphere like in areas where WALL i.e. top 100 cm and sides 100 cm minimum. gasoline or other flammable liquids or vapors are stored.
1. Depress and turn control knob clockwise to OFF position. 2. Fully open gas valve. 3. Depress control knob and turn knob counter-clockwise to IGNITE position, then to PILOT position (you will hear 2 clicks). 4. With the pilot light lit, keep control knob depressed for 30 seconds. NOTE: If the pilot light has not ignited, turn heater control knob to OFF position, fully close gas valve, wait 5 minutes, then repeat steps 2–4 of the Lighting Instructions.
CLEANING AND CARE • Wipe off powder coated surfaces with soft, moist rag. Do not clean heater with cleaners that are combustible or corrosive. • Remove debris from the burner to keep it clean and safe for use. • Cover the burner unit with the optional protective cover when the heater is not in use.
A. Construction and characteristics Transportable terrace/garden heater with tank housing. Casing in steel with powder-coating or in stainless steel. Gas hose connections with metal clamp (screw caps for Germany). Heat emission from reflector. B. Specifications Use propane,butane or their mixtures gas only. Max. wattage: 11000 watts Min.
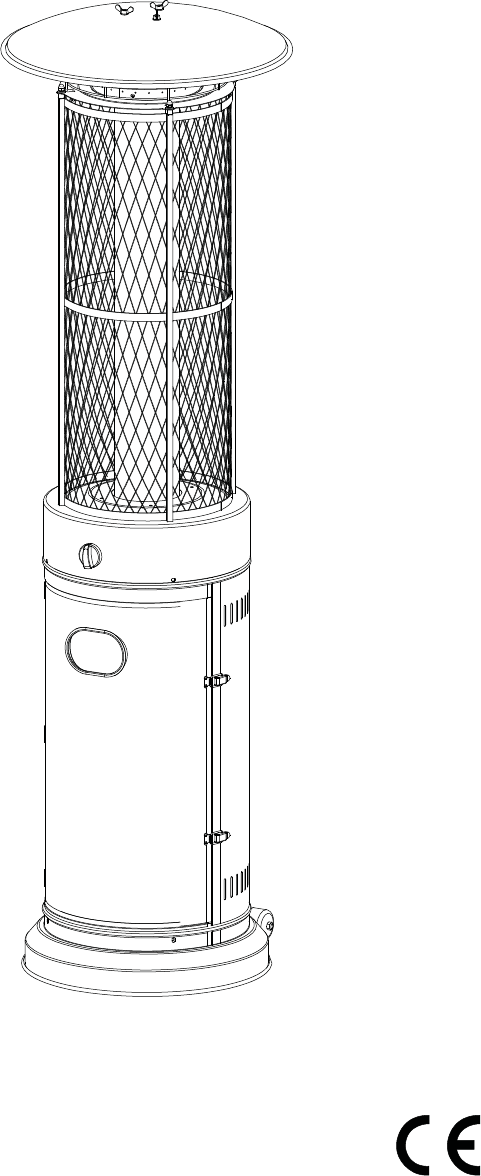
ASSEMBLY PARTS Tools needed: Philips screwdriver w/ medium blade Spray bottle of soap solution for leakage test Parts List: Reflector A Upper Protective Mesh B Mesh C Heating Body D Gas Hose & Regulator E Cylinder Housing F Base G H Wheel PART A B C D E F G H -6- DESCRIPTION Reflector Upper Protective Mesh Mesh Heating Body Gas Hose & Regulator Cylinder Housing Base Wheel QUANTITY 1 1 1 1 1 1 1 1
ASSEMBLY PARTS HARDWARE CONTENTS (shown actual size) AA Wing nut Qty. 3 FF CC BB M8 Flange nut Qty. 2 Stud Qty. 3 Washer Φ6 Qty. 9 GG DD HH Philips screwdriver Qty. 1 Wrench Qty. 1 -7- EE Screw M5 X 10 Qty. 11 Bolt M8 X 16 Qty.
ASSEMBLY PROCEDURES 1.Assemble the tank housing. Secure the tank housing to the base using 4pcs screw M5X10. 1 Hardware Used DD Screw M5 X 10 x4 F GG Philips screwdriver x1 DD 2. Assemble the heating body. Secue the heating body to the tank housing using 4pcs screw M5X10.
3. Assemble the mesh. Secure the mesh to the Heating Body using 3pcs screw M5X10. 3 C DD Hardware Used DD Screw M5 X 10 GG Philips screwdriver x3 x1 4.
5. Assemble the reflector. a. Screw 3pcs stud to the top of mesh, using 3pcs washerΦ6 to the bottom and 3pcs washerΦ6 to the top. b.Put the reflector on the stud and secure them using 3pcs wing nut and 3pcs washer.
6. Propane Only-Proper Hose Connection. WARNING! Ensure the hose does not contact any high temperature surfaces, or it may melt and leak causing a fire. After the cylinder is placed inside the heater, secure the cylinder with block belt tightly. 6 7. Leak Check. WARNING! A leak test must be performed annually and each me a cylinder is hooked up or if a part of the gas system is replaced. WARNING! Never use an open flame to check for gas leaks.
PROBLEMS CHECK LIST PROBLEM PROBABLE CAUSE SOLUTION Pilot will not light Gas valve may be OFF Turn the gas valve ON Tank fuel empty Refill LPG tank Opening blocked Clean or replace opening Air in supply system Purge air from lines Loose connections Check all fittings Debris around pilot Clean dirty area Loose connections Tighten connections Thermocouple bad Replace thermocouple Gas leak in line Check connections Lack of fuel pressure Tank near empty. Refill LPG tank.