
Installation & Assembly


1.2.1.2.a
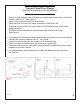
Connect Toilet Tank to Water Supply Line
(Conecte el tanque del inodoro a la línea de suministro de agua)
9
• Connect water supply line to the toilet tank. Hand tighten the coupling nuts.
See Figure 6
• CAUTION! Do not overtighten water supply nuts, as this could result in breakage and
potential ooding. Do not use plumber’s tape or any type of sealant on water supply line
threads.
• Turn on water supply and allow the toilet tank to ll.
• Flush the toilet 5 or more times.
• Check the water supply line and the bottom of the toilet for leaks.
• NOTE: If the water supply line is leaking, slightly tighten the coupling nuts. If leaking
continues, replace water supply line. Do not overtighten!
• NOTE: If the bottom of the toilet is leaking, then the wax seal is broken. Replace wax ring
and repeat steps from “Install New Toilet.”
• Install toilet seat using included nuts, bolts, and washers.
• Install tank lid.
• Trim any shims that are wedged under the toilet with the utility knife.
• Apply a water-based caulk around the front and sides of the bottom of the toilet. Leave the
rear of the toilet base open.
• NOTE: Do not caulk the rear of the toilet base. Leaks due to wax seal failure will not be
visible if caulked. Follow all local codes.
• Conecte la línea de suministro de agua al tanque del inodoro. Apretar a mano las tuercas de
acoplamiento. Ver Figura 6
• ¡PRECAUCIÓN! No apriete demasiado las tuercas de suministro de agua, ya que esto
podría provocar roturas y posibles inundaciones. No use cinta de plomería ni ningún tipo de
sellador en las roscas de la línea de suministro de agua.
• Abra el suministro de agua y deje que se llene el tanque del inodoro.
• Descargue el inodoro 5 o más veces.
• Revise la línea de suministro de agua y la parte inferior del inodoro para detectar fugas.
• NOTA: Si la línea de suministro de agua tiene fugas, apriete ligeramente las tuercas de
acoplamiento. Si la fuga continúa, reemplace la línea de suministro de agua. ¡No apriete
demasiado!
• NOTA: Si la parte inferior del inodoro tiene fugas, el sello de cera se rompe. Reemplace el
anillo de cera y repita los pasos de “Instalar nuevo inodoro”.
• Instale el asiento del inodoro usando las tuercas, los pernos y las arandelas incluidos.
• Instale la tapa del tanque.
• Recorte las calzas que se acuñan debajo del inodoro con el cuchillo.
• Aplique una masilla a base de agua alrededor de la parte frontal y los lados de la parte
inferior del inodoro. Deje la parte trasera de la base del inodoro abierta.
• NOTA: No selle la parte trasera de la base del inodoro. Las fugas debidas a la falla del sello
de cera no serán visibles si están selladas Siga todos los códigos locales.