Instruction Manual Rio 400 www.juwel-aquarium.
Introduction Thank you for choosing a JUWEL Aquarium product. Our products represent over 40 years experience in the manufacturing of aquariums and their acessories applying most modern production techniques bringing together the JUWEL Aquarium system, which is both easy to use and simple to maintain. Important: Please read this instruction manual carefully and completely to make sure you have received all components before setting up the aquarium.
Setting up the Aquarium We have produced your JUWEL Aquarium with the utmost care using most advanced production techniques. Extra strong packaging has been used to prevent damage to the aquarium. Please note however, that your aquarium has been transported and handled several times prior to reaching its final destination. We recommend therefore, that you test the aquarium for leaks in a suitable area (e.g. garage), by filling it with water and checking it very carefully.
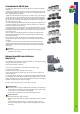
Setting up your JUWEL Aquarium In order to set up your aquarium and to prepare it for its intended use, please follow the following guidelines. 1. Make up the appropriate JUWEL Aquarium cabinet. 2. Place the aquarium in its chosen location. 24 h 3. Ensure that the filter system is set up according to the instructions as described in this manual. 4. Place your substrate in the bottom of the aquarium and plant as desired. 5.
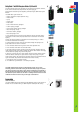
Getting Started - The JUWEL filter system Bioflow 3.0, 6.0 and 8.0 1 3 You should prepare the filter for operation prior to setting up the aquarium. However, do not connect the electrical components to the power supply yet.
Care and maintenance of the JUWEL Filter System The JUWEL Filter System requires very little maintenance if you follow the following instructions. - Replace the white filter wool pad once a week. If you have large fish, then this may require changing slightly more frequently. This will ensure that the filter sponges will not be clogged by larger dirt particles. - Replace the black activated carbon sponge every 4-6 weeks. Again, if you have large fish then this may be to be more frequent.
Installing the heater in the JUWEL filter system The JUWEL aquarium heater is supplied with the heater holder (fig. 1) which you will need for the installation. Please perform the following steps for all JUWEL Aquarium filter systems: (You may need to start by removing an installed separation wall holder.) 1. Install the heater holder. 2. Attach the heater to the filter housing on the inside of the filter and/or initially insert the heater holder into the guide rail of the separation wall.
Lighting for the JUWEL Aquarium Your JUWEL aquarium includes the lighting system "Multilux" High-Lite. The JUWEL High-Lite lighting system represents T5 technology by JUWEL Aquarium and - compared to the conventional lighting standard - provides you with 150% more light in the aquarium.
Care and Maintenance The JUWEL Aquarium Multilux light system requires little care and maintenance. Clean the frames using a soft towel and warm water only. Changing the Tubes: Please note that tubes should always be replaced in pairs and the tube holders should also be replaced as they contain the vital seals that guarantee water tightness.
Proper disposal (electrical waste) The labelling on the product or on the accompanying literature declares that it must not be disposed of, at the end of its service life, together with household rubbish. Please dispose of this equipment separately from other waste, to protect the environment or public health from damage by unregulated waste disposal. Recycle the equipment and support the sustained recycling of material resources.
Aquarien-Pass RIO 400 - MULTILUX Artikel Bestell-Nr.
JUWEL FILTER SYSTEM Bioflow 8.0_JUWEL Eccoflow Artikel Bestell-Nr.