TH-S331B TH-S331B-S Audio Home Theater System 2.
FCC Warning This device complies with part 15 of the FCC Rules. Operation is subject to the following two conditions: (1) This device may not cause harmful interference, and (2) this device must accept any interference received, including interference that may cause undesired operation. Note: This equipment has been tested and found to comply with the limits for a Class B digital device, pursuant to part 15 of the FCC Rules.
/SVUXZGTZ 9GLKZ_ /TYZX[IZOUT Thank you for purchasing the TH-S331B Soundbar. Please read this user manual carefully and keep for future reference. Warning Caution: To reduce the risk of electric shock, do not dismantle the product and do not expose the apparatus to rain or moisture. No user-serviceable parts inside.
6. The unit should not be impeded by covering the ventilation opening with items such as newspaper, table-cloths, curtains etc. Make sure that there are at least 20 cm of space above and at least 5 cm of space on each side of the unit. 7. The apparatus must not be exposed to dripping or splashing and that objects filled with liquids, such as vases, must not be placed on the apparatus. 8. To prevent fire or shock hazard, do not expose this equipment to direct heat, rain, moisture or dust. 9.
9. Refer all servicing to qualified service personal. Servicing is required when the apparatus has been damage in any way, for example, when the power-supply cord or plug is damaged, liquid has been spilled or objects have fallen into the apparatus, the apparatus has been exposed to rain or moisture, does not operate normally, or has been dropped. 10. The AC plug is used to disconnect the device, the disconnected device should remain readily operable.
Important Notes • This sound bar was especially developed for LED/LCD/Plasma TV's: It should not be used in combination with CRTTV's (Cathode Ray Tube TV's) in order to avoid image interference. • Safety and operating instruction manual should be retained for future reference. • The apparatus should not be exposed to dripping, splashing or placed in a humid atmosphere such as a bathroom. • Do not install the product in the following areas: • Places exposed to direct sunlight or close to radiators.
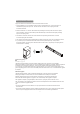
Product Diagram 10 1: LED Volume Indicator 5: HDMI(ARC) 8: Power/Standby 2: LED Mode Indicator 3: AUX 4: OPTICAL 6:USB (FOR UPGRADE ONLY) 7:DC IN 9: VOL- 10: VOL+ 1. LED indicator: It indicates pairing between the soundbar and the subwoofer. 2. USB Port (CAN'T PLAY MP3 MUSIC, FOR SOFTWARE UPGRADE ONLY) 3. WPS Button: It automatically pairs the soundbar with subwoofer. 1 2 3 4 4.
Pair up with the subwoofer Plug the soundbar and the subwoofer into the mains sockets at the same time 1. Press "STANDBY" to turn the soundbar on after it has been connected the the AC. Then press "INPUT" to select Bluetooth (BT) as the input mode. This will cause the soundbar to enter into pairing mode with the wireless subwoofer. 2. Switch the subwoofer on. The blue LED will blink slowly indicating the unit have power but need to be paired with the soundbar.
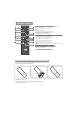
Remote Control 2. Pair button: Press pair button more than 2 seconds to conect and disconect last device. 3. VOL+: to increase the volume. 4. Previous button: Skip to the previous track in BT mode. 5. VOL-: to decrease the volume. 7. Treble-up button: to increase the treble volume. 8. Treble-down button: to decrease the treble volume. 10.
CAUTION Risk of explosion if the battery is replaced by an incorrect type Handling the battery • Improper or incorrect use of batteries may cause corrosion or battery leakage, which could cause fire, personal injury or damage to property. • Only use the battery type indicated in this manual. • Do not install new batteries with used ones and do not mix different types of batteries. • Do not dispose of used batteries as domestic waste. Dispose of them in accordance with local regulations.
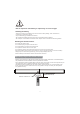
6UYOZOUTOTM ZNK 9U[TJ (GX Table Placement • Place the sound bar horizontally on a solid surface such as a TV unit or shelves and align it centrally with the TV screen. • For best sound output and good airflow around the soundbar, place your soundbar as shown on the right. Follow below steps to mount the sound bar on the wall Step 1: Paste 2 pieces of EVA foam (with holes) on the two wall brackets aligning at the hole position of wall brackets.
Mount the unit on a wall When mounting the soundbar on a wall, all installation musted be performed in right way. The customer must never attempt to install it without authorization. Improper or inadequate installation may cause the sound bar to fall so as to result in personal injury. To prevent the sound bar from falling, attach it to a wall constructed of drywall (plasterboard) Make sure that commercially available screws are used so that can support the weight of the installation.
3. When mode indicator light on, press Standby or Power button button to turn off; when the indicator light off, press any button on the remote control to turn on it. 4. Volume value: the volume value is 00-32, and the factory set value is "10". It has last volume memory function. When pressing the Vol- or Vol+ on the soundbar or remote, the volume indicator will be flickering and scrolling. 5. When pressing the Treb/Bass/EQ mode on the remote, the mode indicator will be flickering once. Auto Standby 1.
. 5. The remote controller includes Bluetooth mode playback controls. Press and hold PAIR button on the remote controller more than two seconds to disconnect paired Bluetooth device or connect back last disconnected Bluetooth device. 6. If you wish, you can change the audio settings by using the relevant buttons on the remote controller. Notes: 1. In Bluetooth mode, the remote can control music play/pause or select previous or next track.
Optical Mode -Remove the cap of optical cable (keep the cap for the future use); check the direction of the plug. Connect the sound bar and TV with the optical cable. -Use this mode to play music from a TV with optical digital output on the sound bar. In TV sound settings, select the sound bar optical connection (output for audio). When the optical cable is connected, the TV audio output is set to PCM format. -The TV must have an optical digital output.
HDMI (ARC) Mode 1. The sound bar supports HDMI(ARC) with audio return channel (ARC). You can hear the TV audio through your sound bar by using a single HDMI(ARC) cable. But on condition that your TV is ARC compliant. 2. Using a high speed HDMI(ARC) cable, connect the HDMI(ARC) connector on the sound bar to the HDMI(ARC) connector on the TV. The HDMI(ARC) connector on the TV might be labeled differently. For details, see the user manual of your TV. 3.
PROBLEM/TROUBLE There is no sound output from sound bar. POSSIBLE CAUSE SOLUTION Another input source is selected. Select an appropriate input source. The mute function is activated. Cancel the mute function. The volume of sound bar or TV/other device is adjusted too low. Increase the volume level on sound bar or by remote control or on TV. The power cable of the unit is not connected properly. Make sure that the power cable of the unit is connected to an AC wall outlet securely.
PROBLEM/TROUBLE Sound quality of audio play from a connected Bluetooth device is poor and connection is not stable. No sound can be heard or sound breaks (Bluetooth mode) POSSIBLE CAUSE SOLUTION Move the device closer to the sound bar, or remove any obstacle between the device and the sound bar. The Bluetooth reception is poor. The volume on the Bluetooth device may be too low. Raise the volume on the Bluetooth device. Bluetooth is not selected as the input source.