Contents COLOUR TELEVISION INSTRUCTIONS Thank you for buying this JVC colour television. To make sure you understand how to use your new TV, please read this manual thoroughly before you begin. Safety precautions Preparation 1 Confirm which remote control you have ...... 3 2 Inserting the batteries ................................... 3 3 Connecting the aerial and external devices ... 4 4 Connecting the power cord ........................ 6 5 SETUP TOUR ..............................................
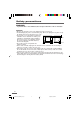
Safety precautions WARNING • To prevent fire or shock hazard, do not expose the TV to rain or moisture. CAUTION • Operate only from the power source indicated on the rear of the TV. • Avoid damaging the power cord and mains plug. When you unplug the TV, pull it out by the mains plug. Do not pull on the power cord. • Never block or cover the cabinet openings for ventilation. Never install the TV where good 15 cm ventilation is unattainable.
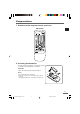
Preparation 1 Confirm which remote control you have RM-C360GY POWER SYSTEM COLOUR SOUND TV/VIDEO OFF TIMER PICTURE MODE 1 2 3 4 5 6 7 CHANNEL RETURN+ SCAN DISPLAY 8 9 0 -/-MUTING MENU CHANNEL VOLUME REMOTE CONTROL UNIT RM-C360GY 2 Inserting the batteries Correctly insert two batteries, observing the , and . polarities and inserting the . end first. CAUTION: Follow the cautions printed on the batteries. Notes: • Use AA/R6/UM-3 dry cell batteries.
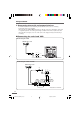
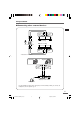
Preparation 3 Connecting the aerial and external devices • For further details, refer to the manuals provided with the devices you are connecting. • Connecting cables are not supplied. • The front and rear AUDIO/VIDEO input jacks are directly connected so that input to either jack is output through both. You cannot provide input to both the front and rear jacks at the same time. Disconnect one input, or use one of the jacks as an output jack only (for monitoring or recording).
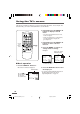
Preparation ■ Connecting other external devices To audio output VIDEO To video output VCR (for playing) AUDIO IN (VIDEO - 1) OUT VCR (for recording) To audio input To video input • Illustration of AV-14A16. Camcorder or TV game To video output To audio output VIDEO IN AUDIO MENU CHANNEL • Illustration of AV-14A16. Headphones • Use the headphones with a stereo mini jack (3.5 mm in diameter). When you connect the headphones, the TV speakers go off.
Preparation 4 Connecting the power cord Connect the power cord to the AC outlet. Operate only from the power source indicated on the rear of the TV. 5 SETUP TOUR When the TV is first turned on it enters the SETUP TOUR mode, and the JVC logo is displayed. Follow the instructions on the on-screen display to perform the SETUP TOUR. • In case of resetting that the reason for such as removal, you can set the SETUP TOUR function on the “MENU 3” menu. For details, see page 13.
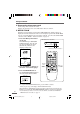
Basic operation 1 Press the POWER button to turn your TV on. POWER SYSTEM COLOUR SOUND TV/VIDEO OFF TIMER PICTURE MODE 1 2 3 4 5 6 7 8 9 0 -/-- CHANNEL RETURN+ SCAN • If your TV does not turn on, press the Main power button on the TV then press the POWER button again. • You can also turn on your TV by pressing any of the following buttons; - the CHANNEL m button - the Number buttons - the TV/VIDEO button 2 Select a channel.
Remote control buttons and functions PICTURE MODE button You can select one of three picture adjustment settings as you like. Press this button to select a mode. BRIGHT: Heightens contrast and sharpness. STANDARD: Standardizes picture adjustments. SOFT: Softens contrast and sharpness. • Pressing this button returns all the picture settings in the “MENU 4” to their default settings.
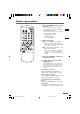
Remote control buttons and functions DISPLAY button CHANNEL SCAN button You can continuously display the current channel number or VIDEO mode on the screen. You can quickly view all TV channels programmes that you can view on your TV, and search for the programme you want to view. Press this button. To turn the display off, press this button again. • When selecting a channel or VIDEO mode with no input signal, indication of selected channel or VIDEO mode becomes fixed on the screen.
Using the TV’s menus This TV has a number of functions you can operate using the menus. To use all your TV’s functions fully, you need to understand how to use the menus. 2 Repeatedly press the MENU T buttons to display a desired menu. POWER SYSTEM COLOUR SOUND TV/VIDEO OFF TIMER 1 2 3 4 5 6 7 8 9 0 -/-- CHANNEL RETURN+ SCAN DISPLAY button • If you hold down the y button, the next menu is displayed.
Using the TV’s menus ON TIMER Your TV will automatically turn on and tune into the channel you set after the period of time you set. 1 Press MENU T to display the “MENU 1” menu, then select “ON TIMER”. MENU INPUT ON TIMER PR 1 VNR 1 TV 0:00 OFF Channel No. OPERATE BY VOL-+ SELECT BY EXIT BY DISPLAY PROGRAM BY -+ When the time set for the ON TIMER function is reached: The TV automatically turns on and the channel set for the ON TIMER function is displayed.
Using the TV’s menus VNR (Video Noise Reduction) CHILD LOCK You can reduce the picture noise. You can disable the front control buttons of the TV. When this function is set to “ON”, the TV can be operated using only the remote control. Use this function to prevent children from operating the TV without parental consent. 1 Press MENU T to display the “MENU 1” menu, then select “VNR”.
Using the TV’s menus SETUP TOUR AUTO CH PRESET You can start the SETUP TOUR function. You can automatically preset all TV channels that can be received by your TV to channels. 1 Press MENU T to display the “MENU 3” menu, then select “SETUP TOUR”. MENU 3 AUTO CH PRESET MANUAL CH PRESET SETUP TOUR LANGUAGE ENGLISH SELECT BY OPERATE BY -+ MENU 3 AUTO CH PRESET MANUAL CH PRESET SETUP TOUR LANGUAGE ENGLISH EXIT BY DISPLAY 2 Press MENU M. JVC logo is appear and the SETUP TOUR function will start.
Using the TV’s menus MANUAL CH PRESET You can manually preset desired TV channels to desired channels. 1 Press MENU T to display the “MENU 3” menu, then select “MANUAL CH PRESET”. MANUAL FINE SKIP SOUND SYSTEM EXIT NO B/G 2 Hold VOLUME m down to fine-tune the TV channel so that the best image is displayed on screen. EXIT BY DISPLAY 2 Press MENU M. The sub-menu is displayed. MANUAL FINE SKIP SOUND SYSTEM EXIT 1 Press MENU t to select “FINE”.
Using the TV’s menus SKIP Picture Adjustments You can set undesired channels to be skipped. Channels set to be skipped cannot be selected by the CHANNEL m buttons nor the CHANNEL SCAN button. You can adjust the picture as you like. • Channels to which TV channels have not been preset are automatically set to be skipped. 1 Press MENU T to display the “MENU 3” menu, then select “MANUAL CH PRESET”. 2 Press MENU M. The sub-menu is displayed. 3 Press MENU T to select “SKIP”.
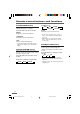
Using the buttons on the TV MENU 1 CHANNEL VOLUME EXIT 2 3 1 MENU button • MENU button 2 CHANNEL m buttons • MENU m buttons 3 VOLUME m buttons • EXIT from MENU buttons 4 Remote control sensor 5 ON TIMER lamp The light is switched on while ON TIMER function is operating. 6 POWER lamp When the Main power is on, the light is red. 7 POWER/ON TIMER lamp When the Main power is on, the light is green. When ON TIMER function is on, it is red.
Using the buttons on the TV Basic operation Operating menus • Check to make sure the CHILD LOCK function is set to “OFF”. When the CHILD LOCK function is set to “ON”, the TV cannot be operated using the front control buttons. For details, see “CHILD LOCK” on page 12. You can operate functions in menus using the front control buttons on the TV. 1 Press CHANNEL M to turn the TV on from standby mode. 2 Press MENU y repeatedly to display the menu you want to use. 2 Press CHANNEL M to select a channel.
Troubleshooting If there is no picture or the TV does not operate normally, make sure the problem isn’t due to the reasons indicated below. If the problem persists even after taking the measures indicated, please contact a service technician. Cannot turn the TV on Poor picture • Press the Main power button on the TV. • Connect the power cord to the AC outlet. • Press the COLOUR SYSTEM button to select another colour system. (see page 8.) • Adjust the picture settings. (see page 15.
Specifications TV RF systems B, G, I, D, K, K1 Colour systems PAL, SECAM, NTSC 3.58 MHz/NTSC 4.43 MHz (in VIDEO mode only) Receiving channels VHF low channel (VL), VHF high channel (VH), UHF channel (U) Receives cable channels in mid band, super band and hyper band. External input / output INPUT: OUTPUT: Headphone jack: VIDEO input (RCA), AUDIO input (RCA) VIDEO output (RCA), AUDIO output (RCA) stereo mini jack (3.
GGT0106-001B-H_Cover 2 16/3/06, 9:55 AM
Contents COLOUR TELEVISION INSTRUCTIONS Thank you for buying this JVC colour television. To make sure you understand how to use your new TV, please read this manual thoroughly before you begin. Safety precautions Preparation 1 Confirm which remote control you have ...... 3 2 Inserting the batteries ................................... 3 3 Connecting the aerial and external devices ... 4 4 Connecting the power cord ........................ 6 5 SETUP TOUR ..............................................
Safety precautions WARNING • To prevent fire or shock hazard, do not expose the TV to rain or moisture. CAUTION • Operate only from the power source indicated on the rear of the TV. • Avoid damaging the power cord and mains plug. When you unplug the TV, pull it out by the mains plug. Do not pull on the power cord. • Never block or cover the cabinet openings for ventilation. Never install the TV where good 15 cm ventilation is unattainable.
Preparation 1 Confirm which remote control you have RM-C360GY POWER SYSTEM COLOUR SOUND TV/VIDEO OFF TIMER PICTURE MODE 1 2 3 4 5 6 7 CHANNEL RETURN+ SCAN DISPLAY 8 9 0 -/-MUTING MENU CHANNEL VOLUME REMOTE CONTROL UNIT RM-C360GY 2 Inserting the batteries Correctly insert two batteries, observing the , and . polarities and inserting the . end first. CAUTION: Follow the cautions printed on the batteries. Notes: • Use AA/R6/UM-3 dry cell batteries.
Preparation 3 Connecting the aerial and external devices • For further details, refer to the manuals provided with the devices you are connecting. • Connecting cables are not supplied. • The front and rear AUDIO/VIDEO input jacks are directly connected so that input to either jack is output through both. You cannot provide input to both the front and rear jacks at the same time. Disconnect one input, or use one of the jacks as an output jack only (for monitoring or recording).
Preparation ■ Connecting other external devices To audio output VIDEO AUDIO To video output VCR (for playing) IN OUT VCR (for recording) To video input To audio input • Illustration of AV-14FMG6B. Camcorder To video output or To audio output TV game To video output To audio output • Illustration of AV-14FMG6B. MENU VIDEO AUDIO IN MENU VIDEO IN AUDIO • Illustration of AV-21TG16. Headphones Headphones • Use the headphones with a stereo mini jack (3.5 mm in diameter).
Preparation 4 Connecting the power cord Connect the power cord to the AC outlet. Operate only from the power source indicated on the rear of the TV. 5 SETUP TOUR When the TV is first turned on it enters the SETUP TOUR mode, and the JVC logo is displayed. Follow the instructions on the on-screen display to perform the SETUP TOUR. • In case of resetting that the reason for such as removal, you can set the SETUP TOUR function on the “MENU 3” menu. For details, see page 13.
Basic operation 1 Press the POWER button to turn your TV on. POWER SYSTEM COLOUR SOUND TV/VIDEO OFF TIMER PICTURE MODE 1 2 3 4 5 6 7 8 9 0 -/-- CHANNEL RETURN+ SCAN • If your TV does not turn on, press the Main power button on the TV then press the POWER button again. • You can also turn on your TV by pressing any of the following buttons; - the CHANNEL m button - the Number buttons - the TV/VIDEO button 2 Select a channel.
Remote control buttons and functions PICTURE MODE button You can select one of three picture adjustment settings as you like. Press this button to select a mode. BRIGHT: Heightens contrast and sharpness. STANDARD: Standardizes picture adjustments. SOFT: Softens contrast and sharpness. • Pressing this button returns all the picture settings in the “MENU 4” to their default settings.
Remote control buttons and functions DISPLAY button CHANNEL SCAN button You can continuously display the current channel number or VIDEO mode on the screen. You can quickly view all TV channels programmes that you can view on your TV, and search for the programme you want to view. Press this button. To turn the display off, press this button again. • When selecting a channel or VIDEO mode with no input signal, indication of selected channel or VIDEO mode becomes fixed on the screen.
Using the TV’s menus This TV has a number of functions you can operate using the menus. To use all your TV’s functions fully, you need to understand how to use the menus. 2 Repeatedly press the MENU T buttons to display a desired menu. POWER SYSTEM COLOUR SOUND TV/VIDEO OFF TIMER 1 2 3 4 5 6 7 8 9 0 -/-- CHANNEL RETURN+ SCAN DISPLAY button • If you hold down the y button, the next menu is displayed.
Using the TV’s menus ON TIMER Your TV will automatically turn on and tune into the channel you set after the period of time you set. 1 Press MENU T to display the “MENU 1” menu, then select “ON TIMER”. MENU INPUT ON TIMER PR 1 VNR 1 TV 0:00 OFF Channel No. OPERATE BY VOL-+ SELECT BY EXIT BY DISPLAY PROGRAM BY -+ When the time set for the ON TIMER function is reached: The TV automatically turns on and the channel set for the ON TIMER function is displayed.
Using the TV’s menus VNR (Video Noise Reduction) CHILD LOCK You can reduce the picture noise. You can disable the front control buttons of the TV. When this function is set to “ON”, the TV can be operated using only the remote control. Use this function to prevent children from operating the TV without parental consent. 1 Press MENU T to display the “MENU 1” menu, then select “VNR”.
Using the TV’s menus SETUP TOUR AUTO CH PRESET You can start the SETUP TOUR function. You can automatically preset all TV channels that can be received by your TV to channels. 1 Press MENU T to display the “MENU 3” menu, then select “SETUP TOUR”. MENU 3 AUTO CH PRESET MANUAL CH PRESET SETUP TOUR LANGUAGE ENGLISH SELECT BY OPERATE BY -+ MENU 3 AUTO CH PRESET MANUAL CH PRESET SETUP TOUR LANGUAGE ENGLISH EXIT BY DISPLAY 2 Press MENU M. JVC logo is appear and the SETUP TOUR function will start.
Using the TV’s menus MANUAL CH PRESET You can manually preset desired TV channels to desired channels. 1 Press MENU T to display the “MENU 3” menu, then select “MANUAL CH PRESET”. MANUAL FINE SKIP SOUND SYSTEM EXIT NO B/G 2 Hold VOLUME m down to fine-tune the TV channel so that the best image is displayed on screen. EXIT BY DISPLAY 2 Press MENU M. The sub-menu is displayed. MANUAL FINE SKIP SOUND SYSTEM EXIT 1 Press MENU t to select “FINE”.
Using the TV’s menus SKIP Picture Adjustments You can set undesired channels to be skipped. Channels set to be skipped cannot be selected by the CHANNEL m buttons nor the CHANNEL SCAN button. You can adjust the picture as you like. • Channels to which TV channels have not been preset are automatically set to be skipped. 1 Press MENU T to display the “MENU 3” menu, then select “MANUAL CH PRESET”. 2 Press MENU M. The sub-menu is displayed. 3 Press MENU T to select “SKIP”.
Using the buttons on the TV The following illustrations are of only some models are shown for explanation purpose only. Your TV may not be exactly the same as illustrated. MENU CHANNEL VOLUME 1 MENU button • MENU button 2 CHANNEL m buttons • MENU m buttons 3 VOLUME m buttons • EXIT from MENU buttons 4 Remote control sensor 5 ON TIMER lamp The light is switched on while ON TIMER function is operating. 6 POWER lamp When the Main power is on, the light is red.
Using the buttons on the TV Basic operation Operating menus • Check to make sure the CHILD LOCK function is set to “OFF”. When the CHILD LOCK function is set to “ON”, the TV cannot be operated using the front control buttons. For details, see “CHILD LOCK” on page 12. You can operate functions in menus using the front control buttons on the TV. 1 Press CHANNEL M to turn the TV on from standby mode. 2 Press MENU y repeatedly to display the menu you want to use. 2 Press CHANNEL M to select a channel.
Troubleshooting If there is no picture or the TV does not operate normally, make sure the problem isn’t due to the reasons indicated below. If the problem persists even after taking the measures indicated, please contact a service technician. Cannot turn the TV on Poor picture • Press the Main power button on the TV. • Connect the power cord to the AC outlet. • Press the COLOUR SYSTEM button to select another colour system. (see page 8.) • Adjust the picture settings. (see page 15.
Specifications TV RF systems B, G, I, D, K, K1, M Colour systems PAL, SECAM, NTSC 3.58 MHz/NTSC 4.43 MHz Receiving channels VHF low channel (VL), VHF high channel (VH), UHF channel (U) Receives cable channels in mid band, super band and hyper band. External input / output INPUT: OUTPUT: Headphone jack: VIDEO input (RCA), AUDIO input (RCA) VIDEO output (RCA), AUDIO output (RCA) stereo mini jack (3.
GGT0109-001B-H_Cover 2 3/17/06, 1:47 PM
Зміст КОЛЬОРОВИЙ ТЕЛЕВІЗОР ІНСТРУКЦІЯ З ЕКСПЛУАТАЦІЇ Дякуємо Вам за придбання цього кольорового телевізора JVC. Щоб переконатися в тому, що Ви вмієте користуватися Вашим новим телевізором, будь ласка, спочатку уважно прочитайте цю інструкцію користувача. AV-1406AE AV-1406FE AV-1407AE AV-1407FE AV-2106BE AV-2106CE AV-2106TE AV-2106YE AV-2106WE AV-2108CE AV-2108TE AV-2108WE 1 Перевірте, яку модель пульту дистанційного керування Ви маєте .............................................
Заходи безпеки ПОПЕРЕЖДЕННЯ • Щоб запобігти виникненню пожежі або удару струмом, оберігайте телевізор від впливу дощу або вологи. ОБЕРЕЖНО • Підключайте телевізор лише до такого джерела струму, яке вказане на задній панелі телевізора. • Уникайте пошкодження шнура живлення та штепсельної вилки. Якщо Ви вимикаєте телевізор з розетки, витягуйте його лише за штепсельну вилку. Не тяніть за шнур живлення. • В жодному випадку не блокуйте та не перекривайте вентиляційних отворів у корпусі.
Підготовка 1 Перевірте, яку модель пульту дистанційного керування Ви маєте RM-C360GY REMOTE CONRTOL UNIT RM-C360GY 2 Вставлення батарей Правильно вставте дві батареї, звертаючи увагу на розташування полюсів , та . і вставляючи спочатку кінець з позначкою .. ОБЕРЕЖНО: Дотримуйтесь правил користування, вказаних на батарейках. • Примітки: Використовуйте сухі батареї типу AA/R6/UM-3. • Якщо пульт дистанційного керування не працює належним чином, вставте нові батареї.
Підготока 3 Приєднання антени та зовнішніх пристроїв • За більш детальною інформацією звертайтеся до інструкцій користувача, що поставляються з пристроями, які Ви приєднуєте. • Кабелі для приєднання не включені до комплекту. • Передні та задні вхідні гнізда AUDIO/VIDEO з’єднані напряму таким чином, що вхідний сигнал для будьякого гнізда є вхідним сигналом для обох. Ви не можете використовувати для вхідного сигналу одночасно як передні так і задні гнізда.
Підготовка ■ Приєднання інших зовнішніх пристроїв До аудіовиходу VIDEO AUDIO IN До відеовиходу Відеомагнітофон (для програвання) OUT Відеомагнітофон (для запису) До аудіовходу До відеовходу • Зображення моделі AV-2106TE До відеовиходу До аудіовиходу Відеокамера або телевізійна ігрова приставка Навушники • Зображення моделі AV-2106TE. • Використовуйте навушники із стереофонічним міні-штекером (3,5 мм у діаметрі).
Підготовка 4 Приєднання шнура живлення Приєднайте шнур живлення до розетки змінного струму. Підключайте телевізор лише до такого джерела струму, яке вказане на задній панелі телевізора. 5 О Д С О К Під час першого ввімкнення телевізору, він перейде в режим О Д С О К і на екрані з’явиться логотип компанії JVC. Щоб виконати розділ О Д С О К , дотримуйтесь інструкцій на екрані.
Основне керування 1 Натисніть кнопку POWER, щоб ввімкнути Ваш телевізор. • Якщо Ваш телевізор не ввімкнеться, натисніть головну кнопку живлення на телевізорі, потім ще раз натисніть кнопку POWER. • Ви також можете ввімкнути Ваш телевізор, натиснувши будь-яку з зазначених нижче кнопок; - кнопку CHANNEL -/+ - цифрові кнопки - кнопку TV/VIDEO 2 Виберіть канал. ■ Натисніть кнопку CHANNEL -/+. • Вибір каналів цією кнопкою неможливий для тих каналів, для яких функція О УСК була встановлена в положення “ К” .
Кнопки пульту дистанційного керування та їх функції Кнопка PICTURE MODE Ви можете вибрати одну з трьох установок режиму зображення за Вашим бажанням. Натисніть цю кнопку для вибору режиму. СК : Підвищує контраст та чіткість. С Д : Стандартизує установки зображення. ’ К : Пом’якшує контраст та чіткість. • Натиснення на цю кнопку повертає всі установки зображення у пункті меню “ 4” до значень, що використовуються за умовчанням.
Кнопки пульту дистанційного керування та їх функції Кнопка DISPLAY Кнопка CHANNEL SCAN Ви можете ввімкнути постійне відображення номеру поточного каналу, або режиму Д О. Ви можете швидко переглянути програми всіх телеканалів, які може приймати Ваш телевізор, а також знайти програму, яку хочете переглянути. Натисніть цю кнопку. Щоб вимкнути індикацію, натисніть цю кнопку ще раз.
Користування меню телевізора Цей телевізор має декілька функцій, якими Ви можете керувати за допомогою меню. Для повного використання всіх функцій телевізора Вам необхідно зрозуміти, як користуватися меню. 2 Натисніть кілька разів кнопки MENU T, щоб вивести потрібне меню . • Якщо Ви будете утримувати кнопку y, буде виведене наступне меню. • Якщо вибрана функція знаходиться у першій строчці, натиснення на кнопку r виведе попереднє меню. 3 Натисніть кілька разів кнопки MENU T, щоб вивести потрібне меню .
Користування меню телевізора КЛ Ваш телевізор автоматично ввімкнеться і налаштується на встановлений канал після закінчення встановленого періоду часу. 1 Скористайтесь кнопками MENU T, щоб вивести на екран меню “ 1” , а потім виберіть опцію “ КЛ” . Якщо був досягнутий час, встановлений для функції КЛ: Телевізор автоматично ввімкнеться і на екран буде виведений канал, встановлений для функції КЛ.
Користування меню телевізора VNR (Система зниження відеошуму) БЛОКУ Ви можете зменшити шум зображення. Ви можете заблокувати кнопки керування на передній панелі телевізора. Коли ця функція встановлена в положення “ КЛ” , телевізором можна керувати лише за допомогою пульту дистанційного керування. Використовуйте цю функцію, щоб запобігти керуванню телевізором дітьми без згоди батьків. 1 Скористайтесь кнопками MENU T, щоб вивести на екран меню “ 1”, а потім виберіть опцію “VNR”.
Користування меню телевізора БЛ К К Якщо телевізійний сигнал не приймається або є нестабільним, телевізор може вимкнути звук і змінити зображення на синій екран. 1 Скористайтесь кнопками MENU T , щоб вивести на екран меню “ 2” , а потім виберіть опцію “БЛ К К ” . 2 Скористайтесь кнопками MENU -/+, щоб вибрати опцію “ КЛ” . Щоб відмінити функцію БЛ К К , виберіть опцію “ КЛ” .
Користування меню телевізора О Д С О К О Ви можете запустити функцію О Д С О К . елевізор може автоматично призначити номери каналів всім телеканалам, які може приймати Ваш телевізор. 1 Скористайтесь кнопками MENU T, щоб вивести на екран меню “ 3” , а потім виберіть опцію “ О Д С О К ” . 2 Натисніть кнопки MENU -/+. На екрані з’явиться логотип компанії JVC і запуститься функція О Д С О К . Для отримання більш детальної інформації зверніться до стор. 6.
Користування меню телевізора У С О К Ви можете вручну призначити потрібні телеканали на бажані канали. 1 Скористайтесь кнопками MENU T, щоб вивести на екран меню “ 3”, а потім виберіть опцію “ У С О К ”. Якщо зображення є нечітким: Проведіть точне налаштування телеканалу. 1 Скористайтесь кнопками MENU t, щоб вибрати опцію “ О ” 2 Утримуйте кнопки VOLUME -/+ для проведення точного налаштування 2 Натисніть кнопки MENU -/+. На екрані з’явиться субменю.
Користування меню телевізора О УСК Регулювання зображення Ви можете встановити функцію пропуску для каналів, які не бажаєте переглядати. Канали, для яких була встановлена функція пропуску, не можуть бути вибрані за допомогою кнопок CHANNEL +/- та CHANNEL SCAN. Ви можете відрегулювати зображення за власним бажанням. 1 Скористайтесь кнопками MENU T, щоб вивести на екран меню “ 4” . • Канали, для яких не було призначено телеканалів, будуть автоматично пропускатися.
Користування кнопками на телевізорі На наступному малюнку зображені окремі моделі лише з метою роз’яснення. Ваш телевізор може відрізнятися від зображених.
Користування кнопками на телевізорі Основне керування Керування меню • Переконайтеся в тому, що функція БЛОКУ встановлена у положення “ КЛ” . Коли функція БЛОКУ встановлена в положення “ КЛ” , телевізором не можна керувати за допомогою кнопок керування на передній панелі телевізора. Для отримання більш детальної інформації зверніться до розділу “БЛОКУ ” на стор. 12. Ви можете керувати функціями меню за допомогою кнопок керування на передній панелі телевізора .
Пошук несправностей Якщо на екрані немає зображення або телевізор не працює належним чином перевірте, чи не виникла проблема через перелічені нижче причини. Якщо проблема залишиться навіть після запровадження вказаних заходів, будь ласка, зверніться до спеціаліста з технічного обслуговування. Телевізор неможливо ввімкнути Нечітке зображення • Натисніть головну кнопку живлення на телевізорі. • Приєднайте шнур живлення до розетки змінного струму.
Технічні характеристики Високочастотні системи звуку B, G, I, D, K, K1 Системи кольору PAL, SECAM, NTSC 3.58/4.43 МГц (лише в режимі VIDEO) Канали, що можуть прийматися Канали нижнього діапазону коротких хвиль VHF (VL), канали верхнього діапазону коротких хвиль VHF (VH), канали ультракоротких хвиль UHF (U). Приймаються кабельні канали у діапазоні середніх хвиль, коротких хвиль і ультракоротких хвиль.