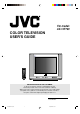
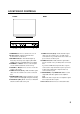
¨ For model: AV-14F703 COLOR TELEVISION USER'S GUIDE TV CATV VCR DVD POWER STANDARD INPUT 1 2 BBE 4 5 DISPLAY 7 8 9 0 RETURN SLEEP TIMER C.C. 3 6 LIGHT AUDIO SELECT RM-C309G ENTER MUTING CH VOL VOL CH MENU EXIT Ð VCR CHANNEL + PREV NEXT REW REC VCR/DVD POWER TV/VCR PLAY FF STOP OPEN/CLOSE PAUSE STILL/PAUSE TV IMPORTANT NOTE TO THE CUSTOMER: In the space below, enter the serial number for your television (located on the rear of the television cabinet).
1. READ INSTRUCTIONS All the safety and operating instructions should be read before the unit is operated. 2. RETAIN INSTRUCTIONS The safety and operating instructions should be retained for future reference. 3. HEED WARNINGS All warnings on the unit and in the operating instructions should be adhered to. 4. FOLLOW INSTRUCTIONS All operating and use instructions should be followed. 5. CLEANING Unplug this unit from the wall outlet before cleaning. Do not use liquid cleaners or aerosol cleaners.
13. LIGHTNING To protect your unit during a lightning storm, or when it is left unattended and unused for long periods of time, unplug it from the wall outlet and disconnect the antenna or cable system. This will prevent damage to the unit due to lightning and power line surges. 14. POWER LINES An outside antenna system should not be located in the vicinity of overhead power lines or other electric light or power circuits, or where it can fall into such power lines or circuits.
IMPORTANT RECYCLING INFORMATION This product utilizes both a Cathode Ray Tube (CRT) and other components that contain lead. Disposal of these materials may be regulated in your community due to environmental considerations. For disposal or recycling information, please contact your local athorities, or the Electronic Industries Alliance: http://www.eiae.org TABLE OF CONTENTS FEATURES ......................................................... 4 LOCATION OF CONTROLS ...............................
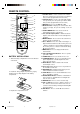
LOCATION OF CONTROLS FRONT BACK VIDEO 3 IN ON TIMER POWER CHANNEL VOLUME VIDEO L/MONO 1 2 3 4 5 6 AUDIO R 7 1. POWER Button - Press to turn the TV on or off. 2. Remote Sensor - Signals from the Remote Control unit are received here. 3. ON TIMER Indicator - This indicator lights up when the powered up. It also lights up when ON TIMER program is turned ON while power is OFF. 4. CHANNEL +/– Buttons - Press to select a higher or lower numbered channel set into memory. 5.
REMOTE CONTROL TV CATV VCR DVD POWER 11 1 STANDARD 2 3 4 5 INPUT 1 2 3 BBE 4 5 6 DISPLAY 7 8 9 0 RETURN SLEEP TIMER C.C. AUDIO SELECT 6 7 8 LIGHT 12 13 14 15 16 RM-C309G MUTING ENTER + CH VOL + VOL 17 18 CH 9 10 MENU EXIT VCR CHANNEL PREV NEXT REW REC VCR /DVD POWER TV/VCR PLAY 19 20 FF STOP PAUSE STILL/PAUSE OPEN/CLOSE TV BATTERY INSTALLATION 1. Slide the battery compartment cover in the direction of the arrow. 2.
REMOTE CONTROL BASICS BATTERY PRECAUTIONS • Before you can operate the remote control, you must first install the batteries (included). See “Changing the Batteries” on this page above for instructions. (For an illustration, please see page 6.) • Press the POWER button to turn the television on or off. • Make sure the TV/CATV switch is set to TV. Move the switch to CATV only if you need to operate a cable box.
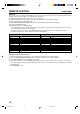
REMOTE CONTROL (CONTINUED) REMOTE PROGRAMMING Setting the CATV, VCR and DVD Codes You can program your remote to operate your cable box, satellite receiver, VCR or DVD player by using the instructions and codes listed below. If the equipment does not respond to any of the codes listed below or to the code search function, use the remote control supplied by the manufacturer.
VCR setup The remote control is programmed with VCR codes for power on, power off, play, stop, fast-forward, rewind, pause, record, channel up, and channel down operation. 1) Find the VCR brand from the list of codes shown below. 2) Slide the first 2-way selector switch to “TV ”and the other 2-way selector switch to “VCR ”. 3) Press and hold down the DISPLAY button. 4) With the DISPLAY button held down, enter the first code number listed with the 10 key pad. 5) Release the DISPLAY button.
REMOTE CONTROL (CONTINUED) DVD setup The remote control is programmed with DVD codes for power on, power off, play, stop, fast-forward, rewind, previous chapter, next chapter, tray open/close, and still/pause operation. 1) Find the DVD player brand from the list of codes shown below. 2) Slide the first 2-way selector switch to “TV ” and the other 2-way selector switch to “DVD ”. 3) Press and hold down the DISPLAY button.
ANT(75) S-VIDEO 11
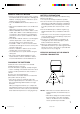
CONNECTION TO OTHER EQUIPMENT The exact arrangement you use to interconnect various video and audio components to the TV is dependent on the model and features of each component. Check the User’s Guide provided with each component for the location of video and audio inputs and outputs. The connection diagrams in the following are offered as suggestions. You may need to modify them to accommodate your particular assortment of components.
SETTING LANGUAGE This TV can display the channel number, on-screen displays and picture adjustments on the screen in English, Spanish or French. On-screen language selection (step 3) will automatically appear on the screen when you press the MENU button initially. Select the language you prefer first, then proceed with the other menu options. 1 Press the MENU button. 2 Press the CH + (▲) or – (▼) button to select the LANGUAGE mode, then press the ENTER button.
TO MEMORIZE CHANNELS This TV is equipped with a channel memory feature which allows channels to skip up or down to the next channel set into memory, skipping over unwanted channels. Before selecting channels, they must be programmed into the TV's memory. In addition to normal VHF and UHF channels, this TV can receive up to 113 Cable TV channels. To use this TV with an antenna, set the TV/CATV menu option to the TV setting. When shipped from the factory, this menu option is in the CATV setting.
TO MEMORIZE CHANNELS (CONTINUED) CH LABEL You can labal every channel up to 4 characters. Channel labels will appear over the channel number display each time you select a channel. Press the MENU button. 3 Press the CH + (▲) or – (▼) button until the indicator next to "CH SET-UP" begins to MENU CLOCK SET flash, then press the ENTER ON/OFF TIMER CH SET-UP button. PICTURE Go to step 7 when you select the "SET". Go to step 9 when you select the "CLEAR". 7 Now the bar for the first space is flashing.
SETTING V-CHIP (CONTINUED) for U.S. TV RATING VOL – ( : under 17 years old parental guidance suggested NC-17 : 17 years old and above : adult only X R NOTES: • If you want to change password, follow steps 1 and 2 and select "CHANGE PASSWORD" option then enter your new password. • The V-Chip function is activated only on programs and tapes that have the rating signal. • Once you block a program using the V-Chip function, the blocked program cannot be watched based on the content of the show.
TV BASIC OPERATION Before operate your TV select TV position of the TV/CATV switch on the remote to control the TV with the remote. 1 2 To turn on the TV, press the POWER button. CH 012 32 The sound level will be indicated on the TV screen by green bars and a number. As the sound level increases, so do the number of bars and the number on the screen. The same is true for decreasing the level. Set the TV/CATV menu option to the appropriate position.
INPUT button Selects the signal input source for the television or Video1,2,3 or Component for video devices like VCR's, DVD players, or camcorders. The input source changes as below. VIDEO 1 VIDEO1 TV VIDEO3 VIDEO2 COMPONENT STEREO AND SEPARATE AUDIO PROGRAM (SAP) The TV is equipped with a feature known as Multi-channel TV Sound or MTS. MTS broadcasts greatly enhance TV viewing by bringing you programs with high fidelity stereo sound.
PICTURE ADJUSTMENTS You can adjust the settings for color, sharpness, contrast, brightness, tint and component. 1 2 3 4 Press the VOL + ( ) or – ( ) button to adjust the setting. Press the MENU button. Press the CH + (▲) or – (▼) button until the indicator next to "PICTURE" begins to flash, then press the ENTER button.
CLOSED CAPTION WHAT IS CLOSED CAPTIONING? This television has the capability to decode and display Closed Captioned television programs. Closed Captioning will display text on the screen for hearing impaired viewers or it will translate and display text in another language. Most other shows provide two or three lined Captions placed near the character who is speaking so the viewer can follow the dialogue.
ON/OFF TIMER ON TIMER SETTING This feature allows you to have the TV automatically turn "ON" at predetermined time. If you program the "ON" timer once the timer will turn "ON" the TV daily at the same time and to the same channel. If the power has been turned on at programmed time, the channel is changed to a programmed one. 1 Press the MENU button. 2 Press the CH + (▲) or CH – (▼) button until the indicator next to "ON/OFF TIMER" begins to flash, then press the ENTER button.
BBE By correcting the phase delay and distortion naturally generated by speaker systems, BBE ensures that the sound that reaches your ears is as natural as the original SONUD. Human voices are clearer and music is natural and well-defined. • BBE is a registered trademark of BBE Sound, Inc. For U.S., licensed from BBE Sound, Inc. under USP 4638258, 4482866 and 5510572. For Canada, licensed from BBE Sound, Inc. BBE is a registered trademark of BBE Sound, Inc.
TROUBLESHOOTING GUIDE Before requesting service, please refer to the following chart for the symptom and possible solution. SYMPTOMS POSSIBLE SOLUTIONS TV does not operate • Make sure the power cord is plugged in. • Try another AC outlet. • Power is off, check fuse or circuit breaker. • Unplug unit for an hour, then plug it back in. • Set the 2 way selector switch on the remote control correctly (See page 6). Poor sound or No sound • Station or CATV experiencing problems, tune to another station.
SPECIFICATIONS AC Power Input: AC Power Consumption: Picture Tube: Audio Power Output Rating: Speaker: Audio/Video Input: Tuner Type: Receiving Channels: VHF UHF CATV Antenna Input Impedance: Dimensions: Weight: 120 V, 60 Hz 80W 14" (measured diagonally) 2.5 W + 2.5 W 1-5/8" (4 cm) x 2-13/16" (7 cm), 8 ohm x 2 COMPONENT Input: Y-Input: 1.0Vp-p, 75 ohm PB, PR-input: 0.7Vp-p, 75 ohm S-Video Input Y-Input: 1.0Vp-p, 75 ohm C-Input: 0.3Vp-p, 75 ohm Video Input: 1.