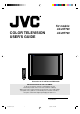
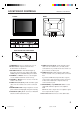
COLOR TELEVISION USER'S GUIDE TV CATV VCR DVD For models: AV-24F703 AV-20F703 POWER STANDARD INPUT 1 2 BBE 4 5 DISPLAY 7 8 0 SLEEP TIMER C.C.
The lightning flash with arrowhead symbol, within an equilateral triangle is intended to alert the user to the presence of uninsulated dangerous voltage within the product's enclosure that may be of sufficient magnitude to constitute a risk of electric shock. CAUTION: TO REDUCE THE RISK OF ELECTRIC SHOCK, DO NOT REMOVE COVER (OR BACK). NO USER-SERVICEABLE PARTS INSIDE. REFER SERVICING TO QUALIFIED SERVICE PERSONNEL.
13. LIGHTNING To protect your unit during a lightning storm, or when it is left unattended and unused for long periods of time, unplug it from the wall outlet and disconnect the antenna or cable system. This will prevent damage to the unit due to lightning and power line surges. 14. POWER LINES An outside antenna system should not be located in the vicinity of overhead power lines or other electric light or power circuits, or where it can fall into such power lines or circuits.
IMPORTANT RECYCLING INFORMATION This product utilizes both a Cathode Ray Tube (CRT) and other components that contain lead. Disposal of these materials may be regulated in your community due to environmental considerations. For disposal or recycling information, please contact your local athorities, or the Electronic Industries Alliance: http://www.eiae.org TABLE OF CONTENTS FEATURES ......................................................... 4 LOCATION OF CONTROLS ...............................
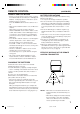
LOCATION OF CONTROLS FRONT Illustration of AV-24F703 BACK IN ANT(75‰) OUT VIDEO VIDEO L/MONO L/MONO AUDIO S-VIDEO AUDIO R POWER 8 POWER VIDEO 1 9 VIDEO 2 R 10 11 12 VIDEO 3 IN VIDEO ON TIMER CHANNEL 1 23 4 L/MONO AUDIO R VOLUME 5 6 7 HOW TO OPEN THE FRONT DOOR 1. POWER Button - Press to turn the TV on or off. 2. Remote Sensor - Signals from the Remote Control unit are received here. 3. ON TIMER Indicator - This indicator lights up when the powered up.
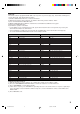
REMOTE CONTROL TV CATV VCR DVD POWER 11 1 STANDARD 2 3 4 5 INPUT 1 2 3 BBE 4 5 6 DISPLAY 7 8 9 0 RETURN SLEEP TIMER C.C. AUDIO SELECT 6 7 8 LIGHT 12 13 14 15 16 RM-C309G ENTER MUTING + CH VOL + VOL 17 18 CH 9 10 EXIT MENU VCR CHANNEL PREV NEXT REW REC VCR /DVD POWER TV/VCR PLAY 19 20 FF STOP PAUSE STILL/PAUSE OPEN/CLOSE TV BATTERY INSTALLATION 1. Slide the battery compartment cover in the direction of the arrow. 2.
REMOTE CONTROL (CONTINUED) REMOTE CONTROL BASICS BATTERY PRECAUTIONS • Before you can operate the remote control, you must first install the batteries (included). See “Changing the Batteries” on this page above for instructions. (For an illustration, please see page 6.) • Press the POWER button to turn the television on or off. • Make sure the TV/CATV switch is set to TV. Move the switch to CATV only if you need to operate a cable box.
REMOTE CONTROL (CONTINUED) REMOTE PROGRAMMING Setting the CATV, VCR and DVD Codes You can program your remote to operate your cable box, satellite receiver, VCR or DVD player by using the instructions and codes listed below. If the equipment does not respond to any of the codes listed below or to the code search function, use the remote control supplied by the manufacturer.
VCR setup The remote control is programmed with VCR codes for power on, power off, play, stop, fast-forward, rewind, pause, record, channel up, and channel down operation. 1) Find the VCR brand from the list of codes shown below. 2) Slide the first 2-way selector switch to “TV ”and the other 2-way selector switch to “VCR ”. 3) Press and hold down the DISPLAY button. 4) With the DISPLAY button held down, enter the first code number listed with the 10 key pad. 5) Release the DISPLAY button.
REMOTE CONTROL (CONTINUED) DVD setup The remote control is programmed with DVD codes for power on, power off, play, stop, fast-forward, rewind, previous chapter, next chapter, tray open/close, and still/pause operation. 1) Find the DVD player brand from the list of codes shown below. 2) Slide the first 2-way selector switch to “TV ” and the other 2-way selector switch to “DVD ”. 3) Press and hold down the DISPLAY button.
ANTENNA/CATV CONNECTIONS Combination VHF/UHF Antenna Single 75 ohm Cable 300 ohm Twin-lead Wire Take off the Splitter Splitter UHF Antenna 300-75 ohm Matching Transformer (not supplied) 300 ohm Twin-lead Wire IN IN ANT(75‰) OUT VIDEO VIDEO L/MONO L/MONO AUDIO S-VIDEO AUDIO R VIDEO 1 VIDEO 2 R Illustration of AV-24F703 This television has an extended tuning range and can tune most cable channels without using a cable company supplied converter box.
CONNECTION TO OTHER EQUIPMENT The exact arrangement you use to interconnect various video and audio components to the TV is dependent on the model and features of each component. Check the User’s Guide provided with each component for the location of video and audio inputs and outputs. The connection diagrams in the following are offered as suggestions. You may need to modify them to accommodate your particular assortment of components.
SETTING LANGUAGE This TV can display the channel number, on-screen displays and picture adjustments on the screen in English, Spanish or French. On-screen language selection (step 3) will automatically appear on the screen when you press the MENU button initially. Select the language you prefer first, then proceed with the other menu options. 1 Press the MENU button. 2 Press the CH + (▲) or – (▼) button to select the LANGUAGE mode, then press the ENTER button.
TO MEMORIZE CHANNELS This TV is equipped with a channel memory feature which allows channels to skip up or down to the next channel set into memory, skipping over unwanted channels. Before selecting channels, they must be programmed into the TV's memory. In addition to normal VHF and UHF channels, this TV can receive up to 113 Cable TV channels. To use this TV with an antenna, set the TV/CATV menu option to the TV setting. When shipped from the factory, this menu option is in the CATV setting.
TO MEMORIZE CHANNELS (CONTINUED) CH LABEL You can labal every channel up to 4 characters. Channel labels will appear over the channel number display each time you select a channel. Press the MENU button. 3 Press the CH + (▲) or – (▼) button until the indicator next to "CH SET-UP" begins to MENU CLOCK SET flash, then press the ENTER ON/OFF TIMER CH SET-UP button. PICTURE Go to step 7 when you select the "SET". Go to step 9 when you select the "CLEAR". 7 Now the bar for the first space is flashing.
SETTING V-CHIP (continued) for U.S. TV RATING MOVIE RATING VOL – ( ) OFF TV–Y VOL + ( ) TV-Y7 TV-PG TV-G VOL – ( ) TV-14 TV-MA TV-Y : all children TV-PG : parental guidance TV-Y7 : 7 years old and above TV-14 : 14 years old and above TV-G : childrens program TV-MA : 17 years old and above When you select TV-Y7, TV-PG, TV-14 or TV-MA, press the DISPLAY button to explain the rating. Press the CH + (▲) or – (▼) button to select the desired rating you want.
TV BASIC OPERATION Before operate your TV select TV position of the TV/CATV switch on the remote to control the TV with the remote. 1 2 To turn on the TV, press the POWER button. CH 012 32 The sound level will be indicated on the TV screen by green bars and a number. As the sound level increases, so do the number of bars and the number on the screen. The same is true for decreasing the level. Set the TV/CATV menu option to the appropriate position.
INPUT button Selects the signal input source for the television or Video1,2,3 or Component for video devices like VCR's, DVD players, or camcorders. The input source changes as below. VIDEO 1 VIDEO1 TV VIDEO3 VIDEO2 COMPONENT STEREO AND SEPARATE AUDIO PROGRAM (SAP) The TV is equipped with a feature known as Multi-channel TV Sound or MTS. MTS broadcasts greatly enhance TV viewing by bringing you programs with high fidelity stereo sound.
PICTURE ADJUSTMENTS You can adjust the settings for color, sharpness, contrast, brightness, tint and component. 1 2 3 4 Press the VOL + ( ) or – ( ) button to adjust the setting. Press the MENU button. Press the CH + (▲) or – (▼) button until the indicator next to "PICTURE" begins to flash, then press the ENTER button.
CLOSED CAPTION WHAT IS CLOSED CAPTIONING? This television has the capability to decode and display Closed Captioned television programs. Closed Captioning will display text on the screen for hearing impaired viewers or it will translate and display text in another language. Most other shows provide two or three lined Captions placed near the character who is speaking so the viewer can follow the dialogue.
ON/OFF TIMER ON TIMER SETTING This feature allows you to have the TV automatically turn "ON" at predetermined time. If you program the "ON" timer once the timer will turn "ON" the TV daily at the same time and to the same channel. If the power has been turned on at programmed time, the channel is changed to a programmed one. 1 Press the MENU button. 2 Press the CH + (▲) or CH – (▼) button until the indicator next to "ON/OFF TIMER" begins to flash, then press the ENTER button.
BBE By correcting the phase delay and distortion naturally generated by speaker systems, BBE ensures that the sound that reaches your ears is as natural as the original SONUD. Human voices are clearer and music is natural and well-defined. • BBE is a registered trademark of BBE Sound, Inc. For U.S., licensed from BBE Sound, Inc. under USP 4638258, 4482866 and 5510572. For Canada, licensed from BBE Sound, Inc. BBE is a registered trademark of BBE Sound, Inc.
TROUBLESHOOTING GUIDE Before requesting service, please refer to the following chart for the symptom and possible solution. SYMPTOMS POSSIBLE SOLUTIONS TV does not operate • Make sure the power cord is plugged in. • Try another AC outlet. • Power is off, check fuse or circuit breaker. • Unplug unit for an hour, then plug it back in. • Set the 2 way selector switch on the remote control correctly (See page 6). Poor sound or No sound • Station or CATV experiencing problems, tune to another station.
SPECIFICATIONS AC Power Input: AC Power Consumption: Picture Tube: Audio Power Output Rating: Speaker: Audio/Video Input: AV-24F703 120 V, 60 Hz 125W 24" (measured diagonally) 5W+5W AV-20F703 105W 20" (measured diagonally) 2.5 W + 2.5 W 2" x 4-3/4", 8 ohm x 2 COMPONENT Input: Y-Input: 1.0Vp-p, 75 ohm PB, PR-input: 0.7Vp-p, 75 ohm S-Video Input Y-Input: 1.0Vp-p, 75 ohm C-Input: 0.3Vp-p, 75 ohm Video Input: 1.
MANUEL D'INSTRUCTIONS TÉLÉCOULEUR TV CATV VCR DVD Pour les modèles: AV-24F703 AV-20F703 POWER STANDARD INPUT 1 2 BBE 4 5 DISPLAY 7 8 0 SLEEP TIMER C.C.
ATTENTION RISQUE DE CHOC ELECTRIQUE NE PAS OUVRIR Le signe représentant un éclair dans un triangle équilatéral a pour but d'avertir l'utilisateur du danger présenté par des pièces non isolées à l'intérieur de l'appareil et dont la tension est suffisante pour provoquer des décharges électriques dangereuses. CAUTION: AFIN DE REDUIRE LES RISQUES DE CHOC ELECTRIQUE, NE PAS RETIRER LE COUVERCLE (OU LE PANNEAU ARRIERE). AUCUNE PIECE NE PEUT ETRE REPAREE PAR L'UTILISATEUR.
13. Orage électrique Pour éviter les dommages causés par la foudre ou les soudaines hausses de tension, débranchez l'appareil de la prise électrique et déconnectez l'antenne ou le système de câblodistribution si l'appareil doit rester sans surveillance et inutilisé pendant une longue période. 14.
IMPORTANTES INFORMATIONS DE RECYCLAGE Ce produit utilise à la fois un tube cathodique et d’autres composants qui contiennent du plomb. Il se peut que l’évacuation de ces matériaux soit réglementée dans votre communauté afin de protéger l’environnement. Pour de plus amples renseignements sur l’évacuation ou le recyclage, veuillez contacter vos autorités locales ou l’association Electronic Industries Alliance à http://www.eiae.org TABLE DES MATIERES CARACTÉRISTIQUES ........................................
EMPLACEMENT DES COMMANDES VUE AVANT Illustration of AV-24F703 VUE ARRIERE IN ANT(75‰) OUT VIDEO VIDEO L/MONO L/MONO AUDIO S-VIDEO AUDIO R POWER 8 POWER VIDEO 1 9 VIDEO 2 R 10 11 12 VIDEO 3 IN VIDEO ON TIMER CHANNEL 1 23 4 L/MONO AUDIO R VOLUME 5 6 7 COMMENT OU VRIR LE PANNEAU FRONTAL 1. Interrupteur - Pour mettre l'appareil en/hors circuit. 2. Capteur de la télécommande - Les signaux de la télécommande sont captés ici. 3.
TÉLÉCOMMANDE TV CATV VCR DVD POWER 11 1 STANDARD 2 3 4 5 INPUT 1 2 3 BBE 4 5 6 DISPLAY 7 8 9 0 RETURN SLEEP TIMER C.C. AUDIO SELECT 6 7 8 LIGHT 12 13 14 15 16 RM-C309G ENTER MUTING + CH VOL + VOL 17 18 CH 9 10 EXIT MENU VCR CHANNEL PREV NEXT REW REC VCR /DVD POWER TV/VCR PLAY 19 20 FF STOP PAUSE STILL/PAUSE OPEN/CLOSE TV INSERTION DES PILES 1. Ouvrez le couvercle du compartiment à piles en le faisant glisser dans la direction de la flèche. 2.
TÉLÉCOMMANDE Fonctiones de base de la télécommande • Avant de pouvoir utiliser la télécommande,vous devez d’abord poser les piles (fournies). Reportez-vous à la section “Changement des piles” au bas de cette page pour instructions. (Vous trouverez une illustration à la page 6.) • Appuyez sur le bouton POWER pour mettre la télévision en marche ou à l’arrêt. • Assurez-vous que le commutateur TV/CATV se trouve sur la position TV.
TÉLÉCOMMANDE (SUITE) PROGRAMMATION AVEC LA TÉLÉCOMMANDE Réglage du récepteur CATV, magnétoscope ou DVD Vous pouvez programmer votre télécommande pour qu'elle puisse commander votre récepteur câble ou satellite en utilisant les instructions et les codes indiqués ci-dessous. Si l'équipement ne répond à aucun de ces codes ou à la fonction de recherche, utilisez la télécommande fournie par le fabricant.
Configuration du magnétoscope Le boîtier de télécommande est programmé à l'aide de codes pour la mise en service, ou la mise hors service du magnétoscope, la lecture, l'arrêt, le bobinage rapide vers la fin de la bande, le bobinage rapide vers le début de la bande, la pause, l'enregistrement, le choix du canal suivant ou du canal précédent. 1. Repérez la marque VCR dans la liste de codes ci-dessous. 2. Placez le sélecteur 2 positions sur "VCR". 3. Maintenez la touche DISPLAY enfoncée. 4.
TELECOMMANDE (SUITE) Configuration du (DVD) La télécommande est programmée avec des codes DVD pour la mise sous tension, la mise hors tension, le canal précédent ou suivant et un fonctionnement sur 10 touches. 1. Repérez la marque dans la liste de codes ci-dessous. 2. Placez le sélecteur 2 positions sur "DVD". 3. Maintenez la touche DISPLAY enfoncée. 4. Avec la touche DISPLAY enfoncée, tapez le premier code indiqué en utilisant le pavé clavier numérique. 5. Relâchez la touche DISPLAY. 6.
RACCORDEMENT DES ANTENNES Antenne combinée VHF/UHF Câble unique de 75 ohms Fil jumelé de 300 ohms Séparateur Supprimer le séparateur Transformateur adapté 300/75 ohms (non fourni) Antenne UHF Fil jumelé de 300 ohms Antenne VHF Câble unique de 75 ohms Fil jumelé de 300 ohms Incoming CATV Multiplexeur (non fourni) Transformateur adapté 300/75 ohms (non fourni) Converter/Descrambler Convertisseur/débrouilleur Converter/Descrambler Convertisseur/débrouilleur Séparateur Commutateur Splitter A/B Switch A/B
CONNEXION À UN AUTRE APPAREIL La configuration exacte des liaisons entre les divers appareils audio et vidéo et le téléviseur, dépend du modèle et des particularités de chacun. Pour connaître l'emplacement des entrées et des sorties audio et vidéo, reportez-vous au mode d'emploi qui est fourni avec chaque appareil. Les schémas de raccordement qui suivent sont proposés à titre indicatif. Vous pouvez être tenu de les modifier pour les adapter aux appareils de votre installation.
CHOIX DE LA LANGUE Ce télécouleur peut afficher à l'écran le numéro du canal et les réglages d'image/sonores en français, en espagnol ou en anglais. En pressant la touche MENU au début, le choix de la langue d'affichage (étape 3) apparaît à l'écran automatiquement. Choisissez la langue pour se servir des autres options du menu. 1 Pressez la touche MENU. 2 Pressez la touche CH + (▲) ou – (▼) pour choisir le mode de réglage de la langue d'affichage (LANGUE), puis pressez la touche ENTER.
MISE EN MÉMOIRE DES CANAUX Les canaux disponibles dans votre région peuvent être emmagasinés dans la mémoire de ce télécouleur. Ce qui permet de balayer tous les canaux mémorisés, en ordre croissant/décroissant, ou de sauter les canaux non désirés. Avant de choisir les canaux, ils doivent avoir été mis en mémoire, En plus de recevoir les canaux VHF et UHF, ce téléviseur peut aussi capter jusqu'à 113 canaux câblodistribués.
MISE EN MÉMOIRE DES CANAUX (SUITE) S-TIT CANAL Vous pouvez donner un nom comportant 4 caractères à chaque canal. Les noms des canaux apparaissent au-dessus de l’affichage du numéro de canal chaque fois qu’un canal est choisi. 2 Pressez la touche MENU. 3 Pressez la touche CH + (▲) ou – (▼) pour choisir l’option "PROG. CNL" puis MENU REGLAGE HORLOGE appuyez sur la touche ENTER. 6 Passez à l'opération 7 si vous avez choisi "REGLAGE". Passez à l'opération 9 si vous avez choisi "EFFACE".
UTILISATION DE LA PUCE V (SUITE) pour les Etats-Unis NIVEAU DE TÉLÉVISION NIVEAU D'UN FILM VOL + ( ) OFF TV–Y TV-Y7 VOL – ( ) TV-G TV-PG TV-14 VOL – ( ) TV-MA OFF TV-PG : assistance des parents TV-Y : tous les enfants TV-Y7 : enfants de plus de 7 ans TV-14 : adolescents de plus de 14 ans TV-G : programme pour enfants TV-MA : adolescents de plus de 17 ans Dans le cas de TV-Y7, TV-PG, TV-14 et TV-MA, appuyez sur la touche DISPLAY pour connaître le niveau.
FONCTIONNEMENT DU TÉLÉCOULEUR Pour agir sur le téléviseur au moyen du boîtier de télécommande, choisissez la position TV du sélecteur TV/ CATV de ce boîtier de télécommande. 1 2 Touche RETURN Cette touche permet d'afficher l'image diffusée sur le canal choisi immédiatement avant le canal actuellement utilisé. Pressez l'interrupteur (POWER) pour mettre l'appareil en circuit. CNL 012 Réglez le volume au niveau désiré en pressant les touches de réglage du VOL (VOLUME) + ou –.
Touche INPUT Cette touche permet de choisir la source appliquée au téléviseur, ou les entrées Vidéo 1, 2, 3 ou Component pour les appareils vidéo tels que magnétoscopes, lecteurs de DVD ou caméscopes. La source change comme suit. VIDEO 1 VIDEO1 TV VIDEO3 VIDEO2 COMPONENT STÉRÉOPHONIE ET CANAL SON SÉPARÉ (SAP) Ce téléviseur est doté des circuits MTS (Multi-channel TV Sound). Les circuits MTS augmentent le plaisir de la télévision puisque la stéréophonie devient possible.
RÉGLAGE DE L'IMAGE Vous pouvez régler différents paramètres concernant l’image, à savoir les couleurs, la netteté, le contraste, la luminosité et la teinte. Appuyez sur la touche MENU. 2 Appuyez sur la touche CH + (▲) ou – (▼) jusqu’à ce que le témoin voisin de “IMAGE” commence à clignoter; cela fait, appuyez sur la touche ENTER.
SOUS-TITRAGE QUE SIGNIFIE SOUS-TITRAGE? Ce télécouleur a la capacité de décoder et d’afficher les émissions télévisées avec sous-titres. Ce genre d’émissions affichent un texte sur l’écran pour les téléspectateurs sourds ou malentendants, ou traduisent et affichent le texte en une autre langue. POUR VOIR LES SOUS-TITRES Appuyez sur la touche C.C.
MINU MAR/ARR POUR RÉGLER L’HEURE DE MISE SOUS TENSION Cette fonction vous permet de mettre le téléviseur sous tension à une heure donnée. Si vous programmez une fois la minuterie de mise sous tension, le téléviseur se mettra sous tension tous les jours à la même heure et sur le même canal. Si l'appareil a été mis en service à l'heure voulue, le canal programmé est sélectionné. 1 Pressez la touche MENU. 2 Pressez la touche CH + (▲) ou – (▼) pour choisir le mode MINU MAR/ARR, puis pressez la touche ENTER.
BBE En corrigeant le retard de phase et la distorsion produites naturellement par les systèmes d’enceintes, BBE assure que le son qui atteint vos oreilles est aussi naturel que le son d’origine. Les voix humaines sont claires et la musique est naturelle et bien définie. BBE est une marque déposée de BBE Sound, Inc. Pour les États-Unis, sous licence de BBE Sound, Inc., en vertu des brevets américains 4638258, 4482866 et 5510572.
GUIDE DE DÉPISTAGE DES PANNES Vérifiez d'abord les points suivants avant de faire appel à un service de réparation. SYMPTÔME SOLUTION POSSIBLE • Assurez-vous que le cordon d'alimentation soit branché. • Essayez une autre prise. L'appareil ne fonctionne pas. • Il n'y a pas de courant. Vérifiez le fusible ou le disjoncteur. • Débranchez l'appareil pendant une heure puis branchez-le de nouveau.
FICHE TECHNIQUE AV-24F703 AV-20F703 Entrée du CA: Consommation de courant: Tube image: Sortie nominale audio: 120V, 60Hz 125 W 24" (mesuré à la diagonale) 5,0 + 5,0 W Haut-parleurs: Entrées audio/vidéo: 2" x 4-3/4" , 8 ohm x 2 Entrée COMPONENT: Y-Entrée: 1,0V c-à-c 75 ohm PB, PR-Entrée: 0,7V c-à-c 75 ohm Entrée S-Vidéo: Y-Entrée: 1,0V c-à-c 75 ohm C-Entrée: 0,3V c-à-c 75 ohm Vidéo Entrée: 1,0V c-à-c 75 ohm Audio Entrée: –8dB, 47K ohm 181 canaux, à synthétiseur de fréquences à quartz (PLL) Syntonisateu