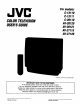
For models: C-13110 C-13111 C-20110 AV-20120 AV-20121 AV-27115 AV-27120 COLORTELEVISION USER'SGUIDE Illustration of AV-27120 and RM-C381 IMPORTANT NOTE TOTHE CUSTOMER In the spaces below, enter the model and serial number for your televisiOn (located at the rear of the television cabinet). Staple your sales receipt or invoice to the inside cover of this guide. Keep this user's guide in a convenient place for future reference. Keep the carton and original packaging for future use.
IMPORTANT SAFETY PRECAUTIONS IMPORTANT SAFEGUARDS CAUTION: CAUTION:To reduce_heriskof elecfficshock. Do not removecover(orback). Please read and retain for your safety. Electrical energy can perform many useful functions. This TV set has been engineered and manufactured Referservlolngto qualifiedsen/Icepersonnel. to assure your personal safety.
6 If an outside antenna is connected to the TV sot, be sure the antenna system is grounded so as to provide some protection against voltage surges and built-up static charges.
Congratulations on your new television purchase! We thank you for choosing JVC. We know you are anxious to start watching your new te ev sion, but before you operate it, please read this guide and then keep it handy for future reference. After all you just bought a great TV with a lot of terrific features, you should know what each feature is and how to use it properly! Please note, as you read though this guide there are illustrations of select models for your reference.
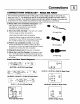
Connections CONNECTIONS CHECKLIST . READ ME FIRST The Connections Checklist section of this guide is a list of ideas to keep in mind while you setup your new TV. It is designed to help us not-so-technically-minded individuals make our connections properly. If you read this section and still can't identify the plugs, connectors and components you have, please ask someone for help in making your connections. 1) Always refer to the connection Instructions user's guide for your components first.
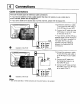
Connections Cable Connections There are two basic types of antenna Or cab e Connections: • If you have an antenna or have a C_ble System that does not require you use a cable box to select channels, please refer to Diagram #1, • If you use a cable box to access any or all the channels, please refer to Diagram #2. 1) Connect the antenna or cable TV wire from the wall outlet, in to the RF Input on your VCR. 2) Connect an RF cable from the VCR Output, in to the RF input on the back of the TV.
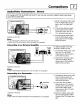
Connections Audio/Video Connections. Stereo For models AV-27120, AV-20120 and AV-20121 only. Use the connection diagram below to get stereo sound from a stereo VCR. VCR 1) Connect the yellow video cable from the VCR's Video Output jack to the TV's Video Input jack. 2) Connect the white (or black) audio cable from the VCR's Left Audio Output jack to the TV's Left Audio Input jack. 3) Connect the red audio cable from the VCR's Right Audio Output jack to the TV's Right Audio Input jack.
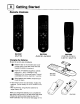
Getting Started Remote Controls RM-C381 AV-27120 RM-C380 AV-20120 • AV-20121 RM-C205 C-13110 • C-13111 C-20110 ° AV-27115 Changing the Batteries Be sure to use only size AA batteries. A Raise the latch on the remote's back cover or push down on the back cover and slide towards the bottom to remove it. Insert two AA batteries (supplied), carefully noting the "+" and "-" markings on the batteries and on the remote control. To avoid RM-C381 RM-C380 a potential short circuit, insert the "-" end first.
Getting Started Power • Press the POWERbutton on the remote control or the front panel of the rM The On Timer lamp will glow red. • Make sure the TV/CATV switch on the remote is set to TV (RM-C380 and RM-C381 only). Move the switch to CATV only if you plan to operate a cable box. On the CATV setting the remote will only operate the cable box functions. • To turn the power off, press the Power button again. The On Timer lamp will go out.
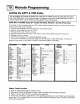
Remote Programming Setting the CATV You can program & VCR Codes your remote to operate and codes listed below, If the equipment I search code function, Cable your cable box or satellite receiver by using the instructions does not respond to any of the codes listed below or to the use the remote control supplied Box or Satellite setup (TV models by the manufacturer.
Remote Programming VCR setup The remote control is programmed with VCR codes for power on, power off, play, stop, fast-forward, rewind, channel up, and channel down operation. 1) Find the VCR brand from the list of codes shown below. 2) Slide the 2-way selector switch to "GATV". 3) Press and hold down the DISPLAYbutton. 4) With the DISPLAYbutton held down, enter the first code number listed with the 10 key pad. 5) Release the DISPLAYbutton. 6) Confirm the operation of the VCR.
Using the Menu O Using this Guide Certain symbols are used throughout this guide to help you learn about the features of your new television. The ones you will see most frequently are.
Initial Setup Auto Tuner Setup Channel In Auto Tuner Setup, the TV automatically scans through all available channels, memorizing the active ones and skipping over blank ones or channels with weak signals. This means when you scan (using the CHANNEL 4-/- buttons) you will receive only clear, active channels.
Initial Setup Channel Summary. Set Lock to CHANNEL SUMMARY • • To operate _i,V To the Lock Column (_) Zero to lock or unlock that channel =o It X - 02 X - 03 X - O6 X : 07 08 -- 04 X - : og x 05 X - : lO x (_ Code (V-Chip, which appears before Set Lock Code in the onscreen menu system, is discussed in the four-page section beginning on page 15). &V 01 Lock : Channel-Guard and V-Chip settings are protected by a four-digit Lock Code.
V.Chip U.S. PARENTAL Your TV is equipped with V-Chip technology which enables TV Parental Guideline and Movie (MPAA) Programs with the following appropriate for Children. Guideline controls. V-Chip technology allows you to program your IV to receive, or not to receive, programs based on content according to the guidelines. Programs which exceed the ratings limits you set will be blocked. When a viewer attempts to watch a blocked channel this message appears: for All Children.
Directions to Block Viewing: Directions to set up Movie Ratings: Line up the cursor in the column (TV PG, TV G, Press the MENU button etc.) with the content row (V/I_, S, etc.) and press the • or • to move the cursor to the correct &• To V-CHIP location. Press • • • To operate (_) • • Press ZERO to access V-Chip options To SET MOVIE RATINGS • • To enter movies or • to turn the locking feature on or off. An item is locked if the I_1 icon appears instead of a "--". For example.
V-Chip R Restricted. Notes About Unrated These films contain material that is explicit nature and is not recommended for in unsupervised children under the age of 17. £3 N0-17 No One Under 17. parents would feel is too adult for their children [] to view Content can consist of strong language, nudi_ violence, and suggestive or explicit subject matter. X No One under 18.
] V-Chip Accessing V-Chip Information: Example To access Rating information about a certain program, press the V-CHIP button while viewing that program.
Picture Settings Tint Noise Tint allows you to adjust the levels of red and green in your TV picture.
Sound Settings ._J Bass Mrs You can increase or decrease the level of low-frequency sound in the TV's audio with the Bass adjustment. MTS technology allows several audio signals to be broadcast at once, giving you a choice in what you wish to hear with a TV program. In addition to meno or stereo sound, an MTS broadcast may also include'a Second Audio Program (SAP).
General Items Set Clock. Auto Set Clock (XDS) Before you use any of your TV's timer functions, you must first set the clock. You may precisely set your clock using the XDS time signal broadcast by most Public Broadcasting (PBS) stations. To set the clock using the XDS signal: .
% General Items On/Off Timer Language The On/Off timer lets you program your television to turn itself on or off You can use it as an alarm to wake up, to help you remember important programs, or as a decoy when you're not home.
Button Functions Display Video The Display screen shows the current status of timers and inputs. The VIDEOSTATUSbutton gives you a choice of three TV picture display settings, including a display of your own preferences. Press the DISPLAYbutton Status D Standard - Resets the picture display to the factory settings. 07 NOW SLEEPTIMER 12:20"PM OFF ON/OFFTIMER ON TIME OFF T!ME EVERYDAY 7:00PM 10:00PM Choice - Displays the setting levels you specified on the "Set Video Status" Menu (see page 19).
Button Functions Number Buttons. 10 Key Pad Return+ To move directly to a specific channel, enter the channel number with the number buttons on the The RETURN+button has two functions: remote. For example, to move to Channel 7. Return - Returns to the channel viewed just before the channel currently onscreen. (_ 0 (zero) (_) 7 (seven) 100+ Return+ - Lets you program a specific channel to return to while scanning through the channels.
Troubleshooting There is no power There is no picture or sound • See if the power cord became unplugged. • Check for a blown fuse or circuit breaker or a power outage. • • ,• • The The The The antenna could be disconnected. input mode could be set improperly. See page 24. tuner (Auto Tuner Setup) could be set improperly, See page 13. TV station may be having difficulties. Check to see if other stations are working.
JVC Limited Warranty For Canad an rtt0_e! televisions, see separate sheets for Warranty/Garantle and JVC Authorized Service Centers in Canada. JVC COMPANY OF AMERICA warrants this product and all parts thereof, except as set forth below ONLY TO THE ORIGINAL PURCHASER to be FREE FROM DEFECTIVE MATERIALS AND WORKMANSHIP Period") (PICTURE TUBE is covered for Two (2) years.) 1YEAR I Parts THIS LIMITED WARRANTY PUERTO RICO.
rr-----m Authorized Service Centers 11271 ooA..JVC SE.V,OE HOW TO LOCATE YOUR JVC SERVICE CENTER TOLL FREE: 1 (800) 537-5722 http://www.jvcservlce.eom Dear Customer; In order to receive the most satisfaction from your purchase, read the instruction booklet before operating the unit. In the event that repair is necessa_ or for the address nearest your location, please refer to the factory service center list below or within the Continental United States, call 1-800-537-5722 for your authorized servicer.
/ Specifications MODEL C-'13110 C-13111 ReceptionFormat C-20110 NTSCSystem AV-27115 AV-27120 NTSC,BTSCSystem_Multi-Channel Sound) VHF2 to 13, UHF14 to 69 Sub Mid,Mid, Super,HyperandUltrahands (181 channelfrequencysynthesizersystem) Reception Range i PowerSource AC120_60Hz Power Consump_on 60W/1.1A ScreenSize 13 inch/ 34 cm measureddiagonally full square 67W/ 1.4A 113W/1.