@ Color gserrs For Models: AV-36050 AV-36020 AV-32050 AV-32020 AV-32015 AV-27050 Television Guide /fiustfatiot} ot A¼32050 IMPORTANT n tre spsces for your televlslor and RM C341 NOTE TO THE CUSTOMER: DeBOW enter the model and serial number uocated on the rear of the television cabinet, Stab e your sa_es receipt or _nvo_ce to the inside cover of this cuide Keep this users guide in a convenient olace fc _ future reference Keeo the carton and orig_na_ packaging for future use Model Number Serial Nu
IMPORTANT SAFETY PRECAUTIONS IMPORTANT SAFEGUARDS CAUTION: CAUTION: To reduce do not remove the risk of electric No user serviceable Refer servicing shock. Please read and retain for your safety. cover (or back). to qualified Electrical energy can perforrn many ciseful functions. This TV parts inside. service set has been engineered personnel.
6 Ifanoutside antenna isconnected totheTVset,besurethe 13 For added protection of the TV set during a lightning storrn or when the TV set is to be left unattended for an extended period antenna system isgrounded soastoprovide sorne protection d time, unplug it ftorn the wall outlet and disconnect the against voltage surges andbuilt-up static charges. Section 810 d the National Electrical Code provides inforrnation with respect antenna.
WELCOME! Congratulations on your new television We Know yOU are anxious ourcnase! to start watching We thanK you for cnoos_no JVC your new telev_s_or out before you operate _t please read tr" s guide and then keeo it hancy for future reference After a yoLjust bought a great TV with a lot of terrific features, you should know wnat eacn feature s and how to use t proper b Please note as you read through tn_s guide, that tnere are n ustrations of select models for your reference, The_e are severa
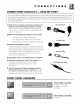
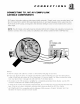
CONNECTIONS CONNECTIONS CHECKLIST -- READ ME FIRST! !o pefformyourconneCtion#_ it,is designedto help usnOt-sO-technic'ally:advanced individuals:/r ] you read this section, and can t !dentify the p!ug s, connectors, and components you bare, donor be afraid to seek help. I 1) Refer to the connection instructions in the user's guide for each component you plan to connect. They will provide more detailed information about their products, and they will tell you what plugs and cables are required.
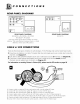
CONNECTIONS REAR PANEL L_ _.
CONNECTIONS CABLE 1) 2) 3) 4) 5) 6) [] & VCR CONNECTIONS CONTINUED Connect the cable RF wire outfrom the wall, into the cable box input, Connect RF wire Outfrom the cable box RF output, in to the VCR RF input, Connect RF wire Outfrom the VCR RF output, in to the TV VHF/UHF input, Connect yellow video cable out from the VCR Video output, in to the TV Video input jack, Connect white audio cable out from the VCR Left audio output, in to the TV Left Audio input jack, Connect red audio cable outfrom the VC
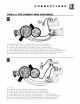
CONNECTIONS CONNECTING TO A CAMCORDER Pfay your home movies back through your TV by connecting your camcorder to the TV3 A!V Inputs, TV CAMCORDER 1) White audio cable out from camcorder, 2) Yellow video cable out from camcorder, 3) If you have a stereo model camcorder, to the TV Right Audio input jack, TO CONNECT in to TV Video input jack, connect the Red Audio cable outfrom the camcorder, S-VHS cable the same as for a non-S-VHS CONNECTING VCR or camcorder (above), and use the that ca
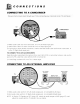
CONNECTIONS CONNECTING TO JVC CAPABLE COMPONENTS AV COMPU LINK AV Compu LInK maKes playing video tapes tota y automatic. Simply nser[ a ore-recorded taue _ nto the JVC brand VCR and the VCR automaticalN turns on and starts :)laying At the same time the VCR sends an AV Compu video inout, LInK s_gnal to the telews_on telling _tto turn on and switch to [ne correct NOTE: The AV Compu Link cable may be included with the AV Compu Link capable intend to connect.
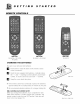
GETTING REMOTE STARTED CONTROLS RM-C341 AV-36050 • AV-32050 AV-27050 CHANGING THE RM-C345 AV-36020 • AV-32020 RM-C241 AV-3201 5 BATTERIES Be sure to use only size AA batteries, D Push down or raise the latch on the remote's cover to remove it, E] lrt back Insert the two supplied AA batteries, carefully noting the "+" and "-" markings on the batteries and remote control, To avoid a short circuit, insert "-" end first, RM_C247 Snap the cover back into place, [] if the remote Typical control
GETTING STARTED POWER [] Make sure that the TV/CATV switch is set to T_ Switch to CAW only to operate a cable box, [] Press the POWERbutton on the remote control or the TV front panel, The On Timer lamp will glow red, [] The first time you turn on the TV, the "Plug In Menu" will appear, [] To turn the power [] When the TV is off, the On-Timer Menu section a reduced (page lamp remains The On Timer lamp will go out, on while the On/Off Timer function is active, but at brightness, VOLUME
GETTING SETTING THE STARTED CA TV & VCR CODES Many CATy If,he in,he Ilsi not o,he Codes listed, It your CATV box or your VOR do not respond to any ot the c'odes listed tbr the manutacturer and search code function, use the remote contro! for that accessory to operate it.
GETTING VCR SETUP FOR RM-C341 STARTED AND RM-C345 The remote is pre-progmmmed with the VCR codes tot power on and power otf, play, stop, fast-torward, rewind, and channel up and down, 1) Determine the correct code from the "VCR Codes" chart (below). 2) Slide the 2-Way Mode Selector Switch to TV. 3) Press and hold down the DISPLAYbutton. 4) Enter the 3-digit code with the 1 0 key pad while continuing to hold down the DISPLAYbutton. 5) Release the DISPLAYbutton. 6) Confirm the operation of the VCR.
THE THE SYMBOLS ONSCREEN USED IN THIS MENUS GUIDE v PICTURE ADJUST AV Whenever you see up and down arrows is this book, press the MENUUP OFMENUDOWNbutton to: • Move vertically in the main menu, • Move through a submenu, • Move to the next letter, number, or other choice in a submenu, or • Back up to correct an error, or • Channel Up or Down Whenever you see left and right arrows, press the MENU LEFT or MENU RIGHT button to: PREVI OUS COLOR PICTURE BRIGHT DETAIL NEXTPAGE SELECT _ OPERATE BY [_ "V',A
PLUG PLUG IN AUTO MENU The Plug In Menu comes up automatically when you first turn on the TV after plugging it in, The Plug In Menu sets the default preferences for you for; [] The Language IN TUNER MENU SETUP During Auto Tuner Setup, the TV will automatically scan through aft available channels and memorize the active ones so that when you scan, you do not pick up weak or noisy channels, in which you want the onscreen displays to appear, [] The Auto Tuner Setup of channels be included in scan,
PLUG You mus_ have the clock set to operate the On/Off Time_ IN MENU SET CLOCK The C/ock is the heart of a// timer functions, The c/ock must be set before the timer functions AV To SET CLOCK • • To operate FINISH Once you have set up the items in the Plug in Menu you must se/ect Finish, work, A• To FINISH "4 • To exit Note: You can reset the preferences that you set here in the Plug In Menu via the regular .
INITIAL CHANNEL CHANNEL SUMMARY You can add or delete channels channel scanning, GUARD - LOCK NOTES: from You can also lock out an}/ "unauthorized" viewers one or up to at 125 channels, from AY To CHANNEL _1• To operate SUMMARY a Press the MENU Button AV SETUP m To CHANNEL SLJMMARY 02 4 04 q C:a o6 4 0r Summary ,A,V You can manually set channels to scan that were too weak to be picked up during Auto Tuner Setup, Conversely, if a channel was too weak to receive a good picture but
INITIAL SETUP V.CHIP U.S. PARENTAL Your TV is equipped V-Chip is availabl_ on the followinc models only..
INITIAL Directions SETUP To set up Movie Ratings... to Block Viewing: Line up the cursor in the column (TV PG, TV G, etc,) with the content row (V/FV, S, etc,) and press the AorV to move the cursor to the correct location, Press the MENU button AV To operate appears) and press _1 or • to turn the locking feature on or off, An item is locked if the icon II]1 appears instead of a "--", An example.
INITIAL [] R SETUP Restricted. These films contain [] material that is explicit in nature and is not recommended For unsupervised children under the age of 17, NC-17 No One Under 17.
INITIAL Accessing Note: V-Chip Information: To access Rating information about a certain program, press the V-CHIP button while viewing that program, this appears: pROGRAM IS RATED _-PG- V If you decide you want to block this category of viewing, press "0" while the above screen is visible, and all programs from that category will be locked, Example SETUP For Childrens programming block TV-Y and Y programs by Pressing "0" when Y is displayed during a program, Programming for audiences other than chi
PICTURE To exit the Picture Adjust menu at ar 7 time press the EXITbutton.
SOUND BASS MTS (Multi-Channel The Bass level adystment feature allows you to raise or lower the level of lower frequencies in the TV_ sound, Press the MENU Button &V Television To emphasize • To reduce gives you a choice among stereo, mono, and Second Audio Programs (SAP), _' AV • • bass bass MTS has no effect on normal sound broadcasts, Press the MENUButton To MTS Select the mode To move to next MTS TREBLE To TREBLE • To increase • To decrease Note: Keep the TV in STEREO mode to ge
CLOCK/TIMERS ON/OFF TIMER YOU tell the TV to turn on and off, Use it as an alarm to wake up, as a program reminder, or to simulate that you're home when you're out of the house, @ Press the MENU Button A• To ON/OFF TIMER • • To operate Note: A Timer Preview window series only) will appear in lower right corner of }/our seconds before the Timer the current channel to the program the PIP, screen, 7 changes timed channel, 33 ON/OFFTIMER ONTIME 7 : 00 PM OFFTIME 10 : 00 PM C_ 02 MODE ONCE EVERYD,_'
INITIAL SETUP TV SPEAKER CLOSED CAPTION You can listen to the TV speakers, or if your set is connected to a stereo, turn them off to listen to the stereo_ If they are incluoeo /n a program, you can view ClOSecl caoHons or Fex[ Regarding the operation of the Language feature, refer tO Page ! 5, information speakers, Dress me MENl 9uflon Press the MENU Button A• To CLOSED To TV SPEAKER • • To ooera[e To turn the speaker or OFF MODE ON TVSPEAKERON TV Speaker an d Audio Out are available on mo
BUTTON UNCTIONS MENU VIDEO The MENU button allows you to access the onscreen menu system, Another The VInEOSTATUSbutton lets you select the "Choice" settings of the Set Video complete discussion of these buttons and the menu system is located on page 14, Status menu, or reset to factory settings, Once you press the menu button, CHANNEL ( "d • -/+ ( ,_,V ) buttons ) and VOLUME work to operate the the • Press (AV) to move up and down in the menu system, a feature "Standard" resets the pictu
BUTTON HYPER UNCTIONS SURROUND Create a deep, 3-dimensional sound effect by channeling the sound through the TV's front firing speakers. MUTING The MUT/NC button turns the sound completely again to restore predous level, HYPER SURROUND HYPERSURROUND ON OFF off when you press it, Press it the volume to the ' AV-36050 ' AV-36020 'AV-32050 • AV-32020 ; AV-27050 RETURN+ There are two kinds of Return.
BUTTON FUNCTIONS ON/MOVE NOTES: Picture in Picture is available On the following models (Picture in FREEZE Picture) PiP a/lows you to view two pictures simultaneously You can freeze the picture in the main screen into the PIP window FREEZE (PIP) ON/MOVE only.: , AV-36050 'AV-27050 02 i;i i i Note: When the PIP is off, pressing FREEZEtakes a snapshot of the main screen and puts it into the PIP window.., great for catching those mail order addresses.
TROUBLESHOOTING "itll"tl No power No picture or sound • See if the power cord became unplugged, • Perhaps you have experienced a blown circuit breaker or fuse or a power outage, • The antenna could be disconnected, • The Input mode (TV or video) could not be set properly, refer to page 27, • The tuner mode (in the menu selection) could be set improperly, refer to page 15, • The station may be having difficulties, check to see if other channels are operating normally, Remote control is not operating You ca
L IMI TED For canadian WARRANTY JVr: model televisi0nsi See Separate Sheets for warranty!Garantie JVC Authorized Service Centers in Canadal and .JVC COMPANY OF AMERICA warrants this product and all parts thereof, except as set forth below TO THE ORIGINAL PURCHASER AT RETAIL to be FREE FROM DEFECTIVE MATERIALS AND WORKMANSHIP from the date of original purchase for the period as shown below (the "Warranty Period"). The picture tube is covered for two years. Model No. Serial No.
AUTHORIZED SERVICE HOW TO LOCATEYOUR TOLL Dear to receive event that repair or within JVC SERVICE CENTER 1 (800) 537-5722 http://www.jvcservice.com Customer; In order FREE: CENTERS the most satisfaction is necessary, the Continental Sale for Warranty United from your or for the address States, purchase, nearest read the instruction your location, carl 1-800-537-5722 for your please booklet before refer to the factory authorized servicer.
SPECIFICATIONS MODEL AV-36050 AV-32050 AV-27050 AV-36020 Color Type Reception NTSC Format Reception (181 Power 130W/1.9A 36"/90cm Size diagonally, External measured 32"/80 cm measured diagonally, full square 27"/68 cm square diagonally, 2" x 4 3/4" 5x 12 cmovalx 2 36"/90cm square Y: 1Vp-p positive, More low 75 (inches) (Ibs.) (kg.) 0 to (400 3.