BLU-RAY DISC & HDD RECORDER SR-HD2500US INSTRUCTIONS HDD REC REC MODE INPUT SELECT BD REC OPEN/ CLOSE STANDBY/ON RESET STOP REV PLAY FWD PAUSE MIDIA SELECT HDD BD/SD DIRECT/ MONITOR REC HDV/DV IN For Customer Use: Enter below the Model No. and Serial No. which are located on the rear of cabinet. Retain this information for future reference. Model No. . Serial No.
Safety Precaution Dear Customer, Thank you for purchasing the JVC BLU-RAY DISC & HDD recorder. Before use, please read the safety information and precautions to ensure safe use of your new unit. CAUTION AVIS &'%*1% %*1%'.'%64+37' '.'%64+37' 4+537' &' 4+5- 1( 1( '.'%64+% 5*1%1784+4 01612'0 12'0 0' 0' 2#5 2#5 1784+4 &1 016 This Class A digital apparatus complies with Canadian ICES-003. Cet appareil numérique de la classe A est conforme à la norme NMB-003 du Canada.
Safety Precaution IMPORTANT SAFETY INSTRUCTIONS 1) 2) 3) 4) 5) 6) 7) Read these instructions. Keep these instructions. Heed all warnings. Follow all instructions. Do not use this apparatus near water. Clean only with dry cloth. Do not block any ventilation openings. Install in accordance with the manufacturer’s instructions. 8) Do not install near any heat sources such as radiators, heat registers, stoves, or other apparatus (including amplifiers) that produce heat.
Safety Precaution ● Manufactured under license from Dolby Laboratories. Dolby and the double-D symbol are trademarks of Dolby Laboratories. ● Manufactured under license under U.S. Patent Nos: 5,956,674; 5,974,380; 6,226,616; 6,487,535; 7,392,195; 7,272,567; 7,333,929; 7,212,872 & other U.S. and worldwide patents issued & pending. DTS-HD, the Symbol, & DTS-HD and the Symbol together are registered trademarks & DTS-HD Master Audio | Essential is a trademark of DTS, Inc. Product includes software.
Contents Contents Safety Precaution Contents Getting Started Key Features ..................................................................... 6 How to Read this Manual .................................................. 6 Other Precautionary Notes ................................................ 7 Hard Disk Drive (HDD) ...................................................... 8 SD Cards ........................................................................... 8 Discs .......................................
Getting Started Key Features Professional Blu-ray Disc recorder of the high-definition era Copy videos to a Blu-ray Disc in high-definition from a highdefinition camcorder, or down convert the videos and record them onto DVDs, all without the need for a PC. The internal hard disk drive enables for easy editing and dubbing multiple discs.
Getting Started Other Precautionary Notes Copyright protection This unit supports copyright protection technologies. Copyrights v v v According to the copyright law, video or music data that you store must not be used for purposes other than personal enjoyment without the authorization of the copyright holder. The copyright protection function prevents copyrighted video images from being saved to equipment such as a video recorder.
Getting Started Hard Disk Drive (HDD) Hard disk drive (HDD) The HDD rotates at a high speed whenever the power is turned “On”. Pay particular attention to the following precautions when using this unit. Warning Do not subject it to vibration or strong impact Subjecting this unit to excessive impact may result in loss of recorded data and even damage of the HDD.
Getting Started Discs BD recording formats v Videos can be edited (chapter edit etc) and new videos can be added to the disc. This format is suitable for recording videos. MPEG2 with HD quality will be recorded as it is onto the disc. This format has low playback compatibility, but performs well when used for backups. BDMV mode m v When using DVD-RW discs Formatting is required. Format the disc using this unit. v Format using “VR MODE” or “VIDEO MODE”.
Getting Started Discs (Continued) Discs that enable both dubbing and playback Disc Type BD-RE BD-R DVD-RW DVD-R Recording Format Format Finalize Repeated Use (Reformat) BDAV mode V - V BDMV mode V - V BDAV mode V V - BDMV mode V - - Video mode V V V VR mode V V V Video mode - V - VR mode V V - Discs that enable playback only Disc Type Description DVD-RAM (4.7 GB) Supports specific forms of playback, but no recording can be done.
Getting Started Precautions on the Use of Discs Disc storage v Maintenance of discs v v v v Dirt attached to the disc, such as fingerprints and dust, may cause distortion in the video image or sound. Keep the disc clean at all times such as by using a soft cloth. Wipe the disc lightly from the center outward using the cloth. If dirt is stubborn, wipe it off using a slightly wet cloth, followed by a dry cloth. Do not use thinner, benzine, alcohol, conventional record cleaners, or antistatic sprays.
Getting Started On-screen Displays Status display Displays the current settings and operating status (such as playback, pause) of this unit. Pressing the [ON SCREEN] button on the remote control displays the status. To cancel the display, press the [ON SCREEN] button again. You can select whether to display the statuses by changing the settings in the settings menu. For more details, refer to “DISPLAY” (A page 83) .
Getting Started Name and Function of Parts Front panel B C D N . A A [ A ] button Turn On/Off the power. B Disc tray C [ M ] button Opens/closes the disc tray. D Display window E Remote control sensor F [RESET] switch Reset the unit. G [REC MODE] button Switches the recording mode. E FG H I J KL M O P [ I ] button Plays back the data. v [ o ] button Stops playback/recording. v [ O ] button Fast reverses playback. v [ N ] button Fast forwards playback. v [ W ] button Pauses playback.
Getting Started Name and Function of Parts (Continued) Display window B C D . A English messages appear for a number of operations. (Examples) : When the power plug is inserted HELLO A HDD/DISC remaining level display B Dubbing display C Disc status display D HDMI output display : When reading the disc ONSCREEN : Upon moving to the playback navigation screen READING Memo: The brightness of the display window can be adjusted. For more details, refer to “PANEL DISPLAY BRIGHTNESS” (A page 78) .
Getting Started I[J/K/H/I] Remote control The cursor can be moved to select an item. J [OPTION] A C B Displays the option screen. T V U M[R] Y G I F H J K L M O Q N Z b d f h j P l R n S Fast reverses the video and starts slow playback. Press the [ R ] and [ I ] buttons together to start recording. X E Move to the chapter just before the current chapter. L[O] W D K[S] p N [REC MODE] a For checking the recording mode settings and amount of time remaining.
Getting Started Name and Function of Parts (Continued) e [RETURN] Returns to the previous screen without applying the selection or entry. f[T] Remote control codes By setting a remote control code for the unit and remote control, you can prevent two recorders from operating simultaneously using the remote control for this unit. (the setting for the unit and remote control at time of purchase is “REMOTE CONTROL 3”.) Memo: v Move to the next chapter.
Preparation Connecting a Monitor To display video images from this unit, connect it to a monitor. v This unit supports connections using “HDMI cable”, “component video cable”, “S-video cable”, or “video cable”. Memo: v Switch to the appropriate monitor input according to the type of connection cable used. For details, refer to the instruction manual of the monitor. Memo: After connecting a component video cable, change the unit setting to “COMPONENT OUTPUT”.
Preparation Connecting a Video Deck or Other Equipment Connecting using an SDI cable (BNC) Connect using an SDI cable (sold separately). You can transmit both digital video and audio signals with a single cable. Connecting a video camera m Connecting via the i.LINK terminal HDD REC REC MODE INPUT SELECT BV REC MIDIA SELECT HDD BD/SD DIRECT/ MONITOR .
Preparation Connecting External Devices Connecting the Power Supply Connect the supplied power cable to this unit as follows. . . Connecting a wired remote control Using a wired connection enables stable control of this unit from an external device. Operation is possible using any code (1 to 4) regardless of the remote control code settings of this unit. Memo: v v There is currently no compatible remote control unit available.
Preparation Setting and Displaying Date/Time 4 Select “CLOCK SET”, and press the [OK] button v The Clock Set menu screen appears. Set the date/time of the built-in clock as follows. The recording date/time is stored on the disc. 5'672 %.1%- 5'6 &+52.#; %.1%- 5'6 �' &+52.#; Setting the date/time /106* &#; ;'#4 6+/' &+52.#; %*1+%' * Set the date/time of the built-in clock as follows. 1 Press the [SET UP] button on the remote control unit v The Settings menu screen appears. 5'.
Preparation 6 After setting is complete, select “ENTER”, and press the [OK] button v Doing so exits date/time setting, and returns to the initial screen. 3 Select “CLOCK SET/DISPLAY”, and press the [OK] button v The Clock Set/Display menu screen appears. 5'672 5'672 #761 219'4 1(( 4'/16' %10641. %1&' %.1%- 5'6 &+52.#; %.1%- 5'6 &+52.#; %.1%- 5'6 %.1%- 5'6 1(( 4'/16' %10641. 2#0'. &+52.#; $4+)*60'55 37+%- 56#4672 ;'#4 /106* &#; ,#0 6+/' #/ 1(( $7<<'4 176276 &'(#7.
Preparation Setting and Displaying Date/Time (Continued) 4 Select “TIME DISPLAY CHOICE”, and press the [OK] button v The Time Display menu screen appears. Memo: v The date display style will be applied in the following information displays. v Recording date of the title that is shown in the playback navigation screen (The recording date will be shown in place of the title if the title has not been input). v Date that is displayed in the title information display screen 5'672 %.1%- 5'6 &+52.#; %.
Preparation Setting the Time Code 4 Select “TIME CODE” or “DATE & TIME” You can add a time code while recording SDI input signals with this unit. 5&+ %100'%6+10 5&+ #7&+1 +0276 5'66+0) 5&+ #7&+1 176276 5'66+0) %108'45+10 Memo: v If recording is performed with the time code added, the time code will be recorded together with the video. In this case, you cannot hide the time code display on the recorded movie. 5'672 #761 219'4 1(( 4'/16' %10641. %1&' %.1%- 5'6 &+52.#; 1(( 4'/16' %10641.
Preparation Setting “TIME CODE DISPLAY POSITION” 1 Press the [SET UP] button on the remote control unit v 4 Press the [ J ] or the [ K ] button to select the display position The Settings menu screen appears. 5&+ %100'%6+10 5&+ #7&+1 +0276 5'66+0) 5&+ #7&+1 176276 5'66+0) %108'45+10 5'672 #761 219'4 1(( 4'/16' %10641. %1&' %.1%- 5'6 &+52.#; %* %* %* %* 10 4'%.1%- 1(( 4'/16' %10641. 10 6+/' %1&' +0276 5'66+0) 6+/' %1&' &+52.#; 215+6+10 �' 6+/' %'06'4 2#0'. &+52.
Dubbing/Importing Dubbing/Importing m Bi-directional dubbing between the HDD and a BD/DVD is possible using this unit alone. Also, data can be imported to the HDD from a video camera by connecting it via i.LINK or USB. Dubbing from the HDD to a BD/DVD High-speed dubbing m Select this option if you want to significantly shorten the time required for dubbing. Make use of a BD/DVD disc that supports high-speed recording.
Dubbing/Importing Dubbing chart Dubbing the video data from the HDD .
Dubbing/Importing Formatting Formatting a disc Unused discs or SD cards may require formatting in some cases. When the need arises, format the disc or SD card accordingly. Memo: 1 Set the DVD or BD to be formatted on the disc tray 2 Press the [MEDIA MANAGE] button on the remote control unit v The Media Management menu screen appears. Formatting a disc or SD card erases all existing data from the media. Double-check carefully before formatting so as not to erase important titles.
Dubbing/Importing Formatting (Continued) 5 Select “YES”, and press the [OK] button in the format confirmation screen m Cancel formatting 1 Press the [OPTION] button while formatting 126+105 $#%5612 %10(+4/ 6*' &+5% 9+.. $' (14/#66'& +0 ::: #.. 4'%14&'& 6+6.'5 9+.. $' '4#5'& +6 6#-'5 #$176 ;;; /+076'5 &1 ;17 9#06 61 (14/#6! ;'5 01 (14/#6 . ;17 %#0 ':+6 (41/ 6*' 126+10 5%4''0 . 2 Select “STOP” and press the [OK] button v v Formatting starts.
Dubbing/Importing Formatting an SD Card 4 Select “YES”, and press the [OK] button 1 Insert the SD card to be formatted into the [SD SLOT] v With the terminal side facing down, insert the SD card until a “click” sound is heard. %10(+4/ 6*' %#4&̉5 %106'06 9+.. $' '4#5'& &1 ;17 9#06 61 56#46 (14/#66'& ! 01 . . ;'5 v Note: v Formatting cannot be performed if the SD card is writeprotected. In this case, turn off the write-protect lock before inserting the SD card.
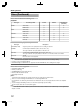
Dubbing/Importing Recording Modes Maximum recording time for each recording mode You can specify a recording mode according to the intended use. Setting the video to a high picture quality shortens the maximum recording time, while setting to a lower picture quality lengthens the recording time. Refer to the following table for the maximum recording time in the respective modes. All figures shown in the table are approximate values.
Dubbing/Importing HD picture quality Using BD enables dubbing to be done with HD picture quality. To dub HD picture quality titles that are imported in the HDD, use BD. Note: v Dubbing to a DVD cannot be done in HD picture quality. v DR mode HDV, MOV* and SD-VIDEO(JVC Everio MPEG2 TS) titles are imported using DR mode. MOV* : MOV files that are taken in SP mode and HQ mode using the JVC ProHD Camcorder GY-HM700/100 v FR mode FR mode is displayed as the recording mode in the following cases.
Dubbing/Importing Importing Data from a BD/ DVD to the HDD Data can be imported from a BD/DVD to the HDD as follows. v File formats that can be imported : BD-MV, BD-AV, AVCHD, DVD-VR, DVDVideos VIDEO, EverioBackup Still Images : EverioBackup, BD-AV(BD-RE) Full import 1 Select “FULL IMPORT” in the import selection screen, and press the [OK] button v A check mark is added to the “FULL IMPORT” item. 2 Select “NEXT”, and press the [OK] button &7$$+0) 56'2 5'.
Dubbing/Importing 5 Select “START”, and press the [OK] button v v Importing of the titles starts. After titles are successfully imported, a “DUBBING IS COMPLETED” message appears on the monitor. 3 Select “RECORDING MODE”, and press the [OK] button v A pop-up menu appears. &7$$+0) 56'2 5'6 6*' 4'%14&+0) /1&' *&& &+5% %10(+4/ 52 4'%14&+0) /1&' &7$$+0) +5 %1/2.'6'& 1%#0%'. ':+6 126+10 0':6 14'6740 . &7$$+0) $#%5'.'%6 . 4 Select the “RECORDING MODE” option.
Dubbing/Importing Importing Data from a BD/ DVD to the HDD (Continued) 1 Select “RECORDING MODE”, press the [OK] button, and select “RECORDING MODE” from the recording mode selection screen v Select the “RECORDING MODE” option. &7$$+0) 7 Select “START”, and press the [OK] button 56'2 5'6 6*' 4'%14&+0) /1&' &7$$+0) *&& &+5% 56'2 2.'#5' %4'#6' # 6+6.' .+56 (14 +/2146 &+5% *&& 52 4'%14&+0) /1&' #$% 5RQTVU %QQMKPI -+&5 914.& 0GYU ### %#0%'. 4GRQTV ':+6 (.19'4 .'5510 &7$$+0) ':+6 5'.
Dubbing/Importing Importing Data from a USBcompatible Device to the HDD m Preparations 1 Connect the USB device (Everio, etc.) to this unit using a USB cable Data on devices connected to the USB terminal can be imported to the HDD as follows. v File formats that can be imported AVCHD, SD-VIDEO(JVC Everio MPEG2 TS, PS), MOV*, and JPEG MOV* : MOV files that are taken in SP mode and HQ mode using the JVC ProHD Camcorder GYHM700/100 BV REC MIDIA SELECT HDD BD/SD DIRECT/ MONITOR .
Dubbing/Importing Importing Data from a USBcompatible Device to the HDD (Continued) v v 4 Select “START”, and press the [OK] button &7$$+0) 56'2 2.'#5' %4'#6' # 6+6.' .+56 (14 +/2146 *&& 75$ 2/ Importing of the titles starts. After titles are successfully imported, a “DUBBING IS COMPLETED” message appears on the monitor. 2/ 2/ #/ #/ #/ #/ #&& 6+6.' .+56 (14 &7$$+0) %#0%'.
Dubbing/Importing Importing Data from an SD Card to the HDD Data can be imported from a SD (SDHC) card to the HDD as follows.
Dubbing/Importing Importing Data from an SD Card to the HDD (Continued) &7$$+0) 56'2 2.'#5' %4'#6' # 6+6.' .+56 (14 +/2146 *&& 5& 2/ 2/ 2/ #/ Specify a title #/ #/ 1 Select “SEL. TITLE(VIDEO)” in the import selection screen, and press the [OK] button v #/ #&& 6+6.' .+56 (14 &7$$+0) %#0%'. A check mark is added to the “SEL. TITLE(VIDEO)” item.
Dubbing/Importing Importing Data from an i.LINK-compatible Device to the HDD Memo: v v Data on devices connected to the i.LINK terminal can be imported to the HDD as follows. v Video formats that can be imported: DV and HDV content Memo: 2 Press the [DUBBING] button on the remote control unit v Only titles that are not copyright-protected can be imported. v Devices that have in-built copyright protection such as D-VHS and digital tuners cannot be connected.
Dubbing/Importing Importing Data from an i.LINK-compatible Device to the HDD (Continued) v 3 Select “RECORDING MODE” and press the [OK] button to display the pop-up menu v Select “XP”, “SP”, “LP”, or “EP” from the “RECORDING MODE” option. &7$$+0) Select “XP”, “SP”, “LP”, or “EP” from the “RECORDING MODE” option. 56'2 5'6 6*' 4'%14&+0) /1&' *&& *&8 &8 &7$$+0) 56'2 5'6 6*' 4'%14&+0) /1&' *&& *&8 &8 &7$$+0) (14 *&8 6#2' %106'065 &4 /1&' &8 %106'065 52'%+(+'& 4'% /1&' %#0%'.
Dubbing/Importing Dubbing a Title from the HDD to a BD/DVD 3 On this screen, select “DISCiVIDEO” &7$$+0) 56'2 5'.'%6 +/2146 &7$$+0) Titles stored in the internal HDD can be dubbed to a BD/DVD as follows. 61 *&& Memo: Disc types that can be used for dubbing with this unit are: BD-RE, BD-R, DVD-RW, and DVD-R. For more details, refer to “Discs that enable both dubbing and playback” (A page 10) .
Dubbing/Importing Dubbing a Title from the HDD to a BD/DVD (Continued) Memo: v v Memo: High-speed dubbing Select this option if you want to significantly shorten the time required for dubbing. Make use of a disc that supports high-speed recording. v AF/AN/AL/AE Can be selected for BD-R and BD-RE. Dubbing is done with HD picture quality. v XP/SP/LP/EP Dubbing is done with SD picture quality.
Dubbing/Importing ② Select “REPEAT”, and choose either “OFF” or “ON” v “OFF” The disc will stop and the menu will be displayed after all the titles are played back. v “ON” Repeat playback from the first title will start automatically after all the titles are played back. ③ Select “RENAME DISC”, and press the [OK] button v Change the disc name when finalizing is performed. Memo: v v v The background image of the disc menu can be selected (only for DVD-Video and BD-MV).
Dubbing/Importing Dubbing Still Images from the HDD Still images stored in the internal HDD can be dubbed to a BD-RE or an SD card as follows. Memo: Only “JPEG” still image format is supported. For more details, refer to “Dubbing the picture data from the HDD” (A page 26) .
Dubbing/Importing 6 Select “START”, and press the [OK] button &7$$+0) m Dubbing from the Playback Navigation screen Dubbing can also be performed from the Playback Navigation screen. 56'2 5'.'%6 56#46 61 $')+0 &7$$+0) 1 Select the still images to dub, and press the [OPTION] button &7$$+0) 56+.. 2+%674'5 0#8+)#6+10 07/$'4 1( 56+.. 2+%674'5 61 $' &7$$'& 8+&'1 6+6.' 6*7/$0#+. 126+105 2+%674' $#%)4172 %#0%'. ':+6 5'.'%6 126+10 2.#; #.. &'.
Dubbing/Importing Enabling Playback on Other Devices (Finalizing) DVD-R and DVD-RW discs may need to be finalized before they can be played on other DVD players. Memo: v To cancel the finalizing operation, select “NO” and press the [OK] button. 5 Setting the top menu items (+0#.+<' Memo: v v v Discs in the Video mode becomes a DVD-Video format with a title menu after finalizing.
Dubbing/Importing ③ Select “CHANGE DISC MENU BACKGROUND” to select a background image for the top menu v You can register and use a background image of your preference. (+0#.+<' 5'.'%6 # 6+6.' #5 $#%-)4170& &'5+)0 (14 6*' /'07 5%4''0 )4172 2CIG #.. Unfinalizing a disc Only DVD-RW discs that are finalized on this unit can be unfinalized. After a disc is unfinalized, addition of new titles and editing are possible. Note: v All discs except DVD-RW (VR mode) cannot be unfinalized.
Dubbing/Importing Copying the entire disc allows all content on a BD (BDMV) or DVD (AVCHD, DVD-Video) to be copied onto another disc. Note: v Content cannot be copied to a formatted BD-R or DVD-R disc. Make use of an unformatted disc. v Use a DVD-R/-RW instead of a BD-R/-RE or DVD when the source disc is a BD disc. v The disc to be copied onto will be formatted when copy is performed. Check that the disc has not been used before or if it is ok to delete data on the disc when using a BD-RE or a DVD-RW.
Dubbing/Importing 9 Complete the entire disc copying v Recording Using External Inputs After copy is complete the tray will open automatically, and copy of the entire disc ends. Videos on an external device that is connected to i.LINK (HDV/ DV) or video / S-video input can be recorded to the HDD. BD, DVD can be recorded from the [VIDEO]/[S-VIDEO] or SDI input. Memo: %10(+4/ %12;+0) 1061 6*' ::: &+5% +5 %1/2.'6'& .
Dubbing/Importing m RECORDABLE MEDIA RECORDING MODE m RECORDABLE MEDIA HDD DVD-R/RW (VR format) BD-R/RE (BD-AV format) DR HDV - HDV AF (HD) - - - AN (HD) - - - AL (HD) - - - AE (HD) - - - XP (SD) SD-SDI/DV/L-1 SD-SDI/DV/L-1 SD-SDI/L-1 SP (SD) SD-SDI/DV/L-1 SD-SDI/DV/L-1 SD-SDI/L-1 LP (SD) SD-SDI/DV/L-1 SD-SDI/DV/L-1 SD-SDI/L-1 EP (SD) SD-SDI/DV/L-1 SD-SDI/DV/L-1 SD-SDI/L-1 DR1(HD) HD-SDI - HD-SDI DR2(HD) HD-SDI - HD-SDI DR3(HD) HD-SDI - HD-SDI DR4(HD) H
Playing Back About Playing Back Videos or edited videos stored on the internal HDD, as well as videos stored on a disc or SD card can be played back on this unit. The types of media that are playable on this unit are as follows.
Playing Back Switching between thumbnail and list displays m You can switch between the thumbnail display and list display of a video. v When the video thumbnail list screen is displayed 0#8+)#6+10 8+&'1 m Switching between video and still image displays You can switch the display between the video thumbnail list screen and still image thumbnail screen. v When the video thumbnail list screen is displayed 0#8+)#6+10 6+6.' 6*7/$0#+. 4'/#+0 2+%674' 8+&'1 6+6.' 6*7/$0#+.
Playing Back Using Playback Navigation (Continued) v EDIT INFO Switches to the menu screen of the sub-items. v Switches to the rename screen for the selected title/ group name. For details, refer to “Changing the Title/Group Name” (A page 65) . 2 Select an operation option, and press the [OK] button Options that cannot be operated are displayed in gray and cannot be selected. For details on the Option menu items, refer to “Option menu list” (A page 53) .
Playing Back Video Playback Operation Frequently used button operations m v v m v v m v m v . v [ I ] button If the stop position (resume point) is memorized in the selected video, pressing the button plays back the video from this position. The video may not resume playback depending on the media and settings used. Refer to “RESUME” (A page 80) . If playback is paused (Still mode), pressing the button resumes playback.
Playing Back Video Playback Operation (Continued) Useful button operations m v [ v ] button m v v v During normal playback, 1.3x playback, slow motion playback, fast forward, or fast reverse, pressing the button moves the playback position forward by about 30 seconds. Pressing the button multiple times moves playback to the position equivalent to the number of times pressed multiplied by 30 seconds. Normal playback will resume after the position has been moved. If pressed during 1.3x playback, 1.
Playing Back Playing Videos on a BD/ DVD Playback starts automatically after a BD/DVD is set. If the Auto Play feature is disabled, play the title using Playback Navigation. Memo: v For details on the button operations during playback, refer to “Video Playback Operation” (A page 54) . Playing an EverioBackup Disc* EverioBackup* : Data disc containing high-definition videos that are recorded in the MPEG2 format using a DVD writer for Everio.
Playing Back Playing Videos on the HDD Titles stored on the HDD can be played back using Playback Navigation. You can select a video to play from “Title”, “Group”, or “Playlist”. Memo: v For details on the button operations during playback, refer to “Video Playback Operation” (A page 54) . Playing titles stored on the HDD Playing Videos on a SD Card Titles stored on an SD card can be played back using Playback Navigation. You can select a video to play from “Title”.
Playing Back Playing Still Images (JPEG) Still images stored on the HDD/BD/DVD/SD card can be played back using Playback Navigation. Enabled button operations during still image playback m v Playing still images 1 Select the playback location m v : If the current playback location is “BD/DVD” or “SD CARD”, press the [HDD] button on the remote control unit to switch it to “HDD”.
Playing Back Changing Playback Settings Playback settings 2.#;$#%- 5'66+0) 4'2'#6 %*#0)' 6+6.' %*#0)' %*#26'4 Displaying the playback settings menu 6+/' ,7/2 The Settings Menu screen appears. The playback settings menu can only be displayed during the playback of a title. Only settings that are supported by the current title being played back can be changed in the playback settings menu. Items displayed in gray cannot be set. v v Playback Settings Menu Audio/subtitle settings .
Playing Back Video settings m 8+&'1 5'66+0) 014/#. 1(( #761 . 2+%674' 37#.+6; &+)+6#. 01+5' 4'&7%6+10 241)4'55+8' 176276 m PICTURE QUALITY The following items can be set. Setting Values Description NORMAL Standard picture quality. CINEMA Effective when playing movies. FINE Produces sharp images with enhanced outlines. SOFT Reduces noise that is prominent in the video image. USER SETTING Enables the Details setting. For more details, refer to “DETAIL SETTING”.
Editing Editing Before editing This unit mainly edits video images stored on the HDD. To edit video images stored in a disc or SD card, do so after importing them to the HDD. Data on a finalized disc cannot be edited. To edit a finalized disc, you have to either unfinalize the disc, or do so after importing the data to the HDD. Memo: Only discs that are finalized using this unit can be unfinalized.
Editing Entering Characters Entering characters 1 Enter characters using the [0]-[9], [Z] or [#] buttons 2 After character input is complete, press the [YELLOW] button Memo: Names can be changed or given to stored videos or groups. You can enter characters while referring to the input on the monitor. Character input screen Switch between alphanumeric and symbol input by pressing the [ w ] button.
Editing 5 Select “GROUP”, and press the [OK] button Grouping v The selected titles and groups are now grouped together. Multiple titles stored on the HDD can be combined into a group. 0#8+)#6+10 8+&'1 Memo: v 6+6.' 6*7/$0#+. 2+%674' Only video data stored on the HDD can be grouped. )4172 )4172 1 Press the [NAVIGATION] button on the remote control unit $#%- The Playback Navigation screen appears. 2 Select the titles or groups to be grouped, and press the [MARK] button v #.. )4172 6*' 5'.
Editing 4 Select “YES”, and press the [OK] button v All titles within the selected group are ungrouped. 3 Press the [OPTION] button on the remote control unit v 0#8+)#6+10 8+&'1 6+6.' 6*7/$0#+. 2+%674' 4'/#+0 2CIG )4172 #.. 4 Select “DO NOT GROUP”, and press the [OK] button v A confirmation screen for group exclusion appears. 5 Select “YES”, and press the [OK] button 70)4172 6*' 5'.'%6'& )4172 9+.. $' 70)4172'& 70)4172! ;'5 A pop-up option list appears.
Editing Changing the Title/Group Name The saved title/group name can be changed as follows. Memo: v v A title/group name can be added to video data stored on the HDD, BD-RE, BD-R, DVD-RW, or DVD-R, and the name can be changed. Video data stored on a DVD-RW or DVD-R in the Video mode cannot be changed. The Playback Navigation screen appears. 2 Select the title/group for which the name is to be changed, and press the [OPTION] button v A pop-up option list appears.
Editing Turning On Title/Group Protection 4 Select “PROTECT”, and press the [OK] button v If only a single title was selected in step 2, a confirmation screen for title protection will appear. Titles/groups can be protected. Editing and deletion cannot be performed on protected titles/ groups. v Title/group protection can be turned on for video data stored on the HDD, BD-RE (BDAV), BD-R (BDAV), and DVD-RW (VR). 0#8+)#6+10 8+&'1 6+6.' 6*7/$0#+. 2+%674' )4172 2416'%6 ;'5 24'8 2) 8+&'1 6+6.
Editing Turning Off Title/Group Protection 4 Select “UNPROTECT”, and press the [OK] button v If only a single title was selected in step 2, a confirmation screen for turning off protection will appear. Protection of a title/group can be turned off. Titles/groups can be edited and deleted after their protection is turned off. v Title/group protection can be turned off for video data stored on the HDD, BD-RE (BDAV), BD-R (BDAV), and DVD-RW (VR). 0#8+)#6+10 8+&'1 6+6.' 6*7/$0#+.
Editing Creating a Playlist A playlist can be created from the video titles on the HDD. Playlists can only be created for titles that are stored on the HDD. : Enables you to create a program by selecting Playlist chapters from a specific title and editing their playback sequence. 5 Edit the playlist accordingly by selecting chapters from the source title according to your preference v v Edit the playlist. For details, refer to “Editing the playlist”. 2.#;.+56 '&+6 5#8' 2.#;.+56 '&+6 2.#;.+56 5174%' 6+6.
Editing Editing a Thumbnail Thumbnails (index images) can be changed to a still image according to your preference. Memo: v v v Thumbnails of titles stored on the HDD, BD-RE, BD-R, DVD-RW, and DVD-R can be edited. However, thumbnails of titles that are stored on an SD card or finalized disc cannot be edited. An information editing screen appears. The displayed still image now becomes the thumbnail image.
Editing Editing a Chapter Creating a chapter mark for a saved title enables you to find a specific scene within the title. Memo: All chapter editing functions can be performed on titles stored on the HDD. Titles stored on a BD-RE (BDAV), BD-R (BDAV), DVD-R (VR), or DVD-RW (VR) only allow chapters to be divided or combined. v The chapters of titles that are stored on an SD card or finalized disc cannot be edited. v Also, protected titles cannot be edited.
Editing Editing a Chapter (Continued) m Chapter mark insertion (divide chapter) m 1 Play the video, and press the [W] button to stop at the scene you want to add a chapter mark 2 Press the [MARK] button on the remote control unit v Deleting a video chapter 1 Select the chapter for which you want to delete the video from the chapter edit screen 2 Press the [DELETE] button on the remote control unit v A confirmation screen for deleting the chapter appears.
Editing 6 Select “EXECUTE”, and press the [OK] button Dividing v A confirmation screen for performing dividing appears. You can select a saved title and divide it into two titles. &+8+&' Memo: Dividing can only be applied to titles stored on the HDD. Titles that are protected cannot be divided. To divide a title, turn off the protection. For details on turning off the title protection, refer to “Turning Off Title/Group Protection” (A page 67) . ;17 %#0 &+8+&' 6*' 6+6.' ;17 %#0 '&+6 6*' 6+6.
Editing Dividing (Continued) Delete Scenes Memo: v v v To cancel the dividing operation, select “CANCEL” and press the [OK] button. Alternatively, you can press the [RETURN] button to cancel the divide operation and return to the initial screen. The dividing edit screen can also be called up from the Playback Navigation screen. ① Select the titles to divide, and press the [OPTION] button ② Select “EDIT”, and press the [OK] button 0#8+)#6+10 8+&'1 6+6.' 6*7/$0#+.
Editing ① Play the video, and press the [W] button at the point where you want to start the delete operation ② Select “START”, and press the [OK] button 5 Select “EXECUTE”, and press the [OK] button v A confirmation screen for performing scene delete appears. 6 Select “EXECUTE”, and press the [OK] button v &'.'6' 5%'0' Scene deletion starts. &'.'6' 5%'0' ;17 %#0 &'.'6' 5%'0'5 ;17 %#0 &'.'6' 5%'0'5 56#46 '0& 0':6 &'.
Editing Changing the Shooting Date/Time Changing the Disc Name The name of a BD or DVD disc can be changed as follows. 1 Set the BD or DVD for which the disc name is to be changed on the disc tray 2 Press the [MEDIA MANAGE] button on the remote control unit v The Media Management menu screen appears. The date/time of the stored video can be changed as follows. The shooting date/time of videos stored on the HDD can be changed.
Editing 5 Select “ENTER”, and press the [OK] button v Memo: v v v Mode conversion The modified shooting date/time is saved. Alternatively, you can press the [RETURN] button to cancel the shooting date/time modification and return to the initial screen. The shooting date/time modification will not be reflected on a title that was dubbed. Pressing the [OPTION] button in the playback navigation screen instead of the [INFORMATION CORRECT] button will also display the shooting date/time edit screen.
Settings Menu Changing Settings of this Unit AUTO MARKING .............................................. (A page 81) AUDIO .................................................................. (A page 81) DYNAMIC RANGE CONTROL ......................... (A page 81) DOWN MIX ....................................................... (A page 81) Settings changed in the Settings Menu screen are stored on this unit even when its power is turned off. DIGITAL OUT ...................................................
Settings Menu CLOCK SET Sets the current date and time. SETUP v Memo: For details on the setting procedures, refer to “Setting the date/time” (A page 20) . v 5'672 #761 219'4 1(( 4'/16' %10641. %1&' %.1%- 5'6 &+52.#; 1(( 4'/16' %10641. 2#0'. &+52.#; $4+)*60'55 37+%- 56#4672 $7<<'4 176276 1(( DATE DISPLAY For setting the date (year, month, and day) display format. Setting Values Description v &'(#7.6 5'66+0) ':+6 5'.'%6 MONTH.DAY.YEAR Displays the date in the month/day/ year order.
Settings Menu DIMMER (POWER OFF) For turning on/off the light of the display window when the power is turned “Off”. Setting Values Description v OFF Turns off the light. ON Turns on the light. PLAYBACK SETTING 2.#;$#%- 5'66+0) $& &8& 8+&'1 2$ 5'66+0) 4'57/' 56+.. /1&' 10 #761 5'#/.'55 2.#;$#%- 10 QUICK STARTUP m The quick startup setting can be specified as follows. Setting Description Values Starts up in the normal way. ON Operation is speedily enabled after turning on the power.
Settings Menu RECORD RESUME m The stop position can be stored when playback of a BDVideo, DVD-Video, BDMV, AVCHD, finalized discs, or SD card is stopped halfway. Setting Values Description OFF Resume information is not stored. ON Stores resume information. 4'%14& :2 /1&' 4'%14&+0) #7&+1 *+)* 52''& &7$$+0) &QND[ &KIKVCN Memo: Resume information is stored at all times for other discs as well as the HDD regardless of this setting.
Settings Menu DISC RECORDING AUDIO For changing the settings of audio to be recorded to the disc when in the AF, AN, AE or AL mode. Setting Description Values v AUTO AUDIO #7&+1 &;0#/+% 4#0)' %10641. &190 /+: &+)+6#. 176 Records “Stereo”, “Surround” or “Dual broadcast” audio sounds as they are. 10 56'4'1 &8 +0 #7&+1 5'66+0) 56'4'1 $& /+: 5170& FIXED Memo: Surround sounds of a title become stereo sounds when reencode dubbing is performed.
Settings Menu DIGITAL OUT m Set this item according to the device connected to the digital audio output terminal (optical digital). v PCM DOWN SAMPLING For specifying settings on sampling frequency conversion. Setting Description Values OFF Sampling frequency is not converted. ON Audio recorded at a sampling frequency of 96 kHz or 88.2 kHz is converted to 48 kHz and 44.1 kHz respectively. Memo: v DTS-HD For setting audio output to “BITSTREAM” or “PCM”.
Settings Menu DISPLAY CONNECTION &+52.#; 10 5%4''0 )7+&' $.7' $#%5%4''0 5#8'4 15& .#0)7#)' ':+6 %100'%6+10 #761 10 10 '0).+5* 5'.'%6 1(( %1/210'06 176276 K 8+&'1 +0276 5'66+0) 8+&'1 14'6740 . 5'672 /10+614 6;2' *&/+ %100'%6+10 *&/+ %'% ':+6 5'.'%6 5'672 m For displaying operation details. Description Setting Values AUTO Appears for five seconds when an operation is performed. OFF Not displayed. m m MONITOR TYPE For setting the aspect ratio according to the connected monitor.
Settings Menu v HDMI OUTPUT RESOLUTION Setting Values Description v v x.v.Color Setting Values Automatically selects an appropriate resolution according to the connected device. AUTO Outputs x.v.Color information with HDMI when video images that include x.v.Color information are played back. 480p Fixes the resolution at 480p. OFF 1080i Fixes the resolution at 1080i. This is applicable when an x.v.Color compatible monitor is connected. 720p Fixes the resolution at 720p.
Settings Menu SDI CONNECTION HDMI-CEC m For setting the HDMI-CEC operation from the connected device. Setting Values Description OFF 5&+ %100'%6+10 %* %* %* %* 5&+ #7&+1 +0276 5'66+0) 5&+ #7&+1 176276 5'66+0) %108'45+10 Disables HDMI-CEC. 10 4'%.1%- ON Enables HDMI-CEC. 10 �' 6+/' 6+/' %1&' +0276 5'66+0) 6+/' %1&' &+52.#; 215+6+10 %'06'4 COMPONENT OUTPUT m For setting the resolution of video output from the [COMPONENT VIDEO OUT] terminals. Setting Values Description ':+6 5'.
Settings Menu SDI AUDIO OUTPUT SETTING Set the channel (Lch, Rch) for outputting the SD-SDI/HD-SDI audio. Setting Description Values v TIME CODE INPUT SETTING You can select whether to add a time code while recording SDI input signals with this unit. Setting Description Values v CH1-CH2 Set the audio output from this unit (Lch, Rch) by assigning Lch to CH1 and Rch to CH2. OFF Use this setting if you want to disable time code input.
Others Locking the Disc Tray By turning on the lock for the disc tray, the tray cannot be opened or closed using the [M] button. Memo: v When the [M] button is pressed while the disc tray lock is turned on, a “LOCKED” message will appear on the display window of the unit for about three seconds.
Others RS-232C Interface Command Table Lower Order Higher Order 0 1 0 Complete 2 Error 3 4 Cassette Out 5 6 7 8 9 Not Target A B ACK NAK C D E F 1 2 3 Play Stop 4 Still 5 Clear 6 Sense Chapter Title Sense 8 Chapter Search Title Search 9 Finalize CancelDisc Finalization A Standby On Standby Off 7 Disc Erase TOP MENU MENU NEXT PREV CHAPTER CHAPTER Setup SET UP DOWN Eject B Fwd Shtl Rev Shtl Select Preset Select Sense Tc Data Sense CTL Data Sense C D
Others Command m Operation Commands Commands for operating functions such as PLAY and REC on the BLU-RAY DISC & HDD RECORDER Command Description A0 Power On 3A Plays the selected deck. A1 Power Off 3F Stops the selected deck. Resume will be cleared when this is pressed while in the Stop mode. Rec Request will be cleared. A3 Eject: Opens/Closes tray. (BD Deck) AB FF: Functions only during playback. Activates forward search. AC REW: Functions only during playback. Activates reverse search.
Others 80-8F 80 : Chapter Search 1st Byte Chapter Search 2nd Byte 3rd Byte Hundreds Tens Ones ASCII codes (30 - 39) 3* 3* 3* E.g. (012) 31 32 30 E.g. : When searching the 12th chapter. 81 : Title Search under “ORIGINAL” 1st Byte 2nd Byte 3rd Byte 4th Byte Title Search (ORIGINAL) 30 Hundreds Tens Ones ASCII codes (30 - 39) 30 3* 3* 3* E.g. (345) 30 33 34 35 E.g.
Others 9F 9F : Remote Data The remote control codes for controlling the wired remote controller via RS-232C is as shown in the following table. The codes apply to all three HDD, BD and SD deck unless otherwise stated. 80 CUSOR 0° Moves the arrow in the Code Items Remarks index list to the right. (I) 01 INPUT SELECT 81 MENU BD/DVD Deck only 03 STOP 82 CUSOR 90° Moves the arrow in the 06 F.F/SPEED+ index list to the up. (J) 07 REW/SPEED84 CUSOR 180° Moves the arrow in the index list to the left.
Others D5 COLOR KEY BLUE E1 L1 Y/C INPUT SELECT HDD Deck only D7 COLOR KEY RED E2 HDD Deck only D9 JOG-1/6 L1 COMPOSITE INPUT SELECT DA JOG +1/6 E3 PLAYBACK SETTING DB JOG +1 E4 DELETE DC INSTANT REPLAY E5 INFORMATION CORRECT DD EDIT ED FWD FRAME DE COLOR KEY GREEN F2 MODE LOCK DF COLOR KEY YELLOW E0 NAVIGATION B8 B8 : Input/Output Selection 1st Byte 2nd Byte External input selection L-1 VIDEO 30 31 External input selection L-1 S-VIDEO 30 39 External input selection
Others Subtitle Selection B8 : Subtitle Selection 1st Byte 2nd Byte 1st Byte 2nd Byte 1st Byte 2nd Byte 1st Byte 2nd Byte OFF 3C 10 EL 3C 31 LO 3C 56 SL 3C 78 JAPANESE 3C 11 EO 3C 32 LT 3C 57 SM 3C 79 ENGLISH 3C 12 ET 3C 33 LV 3C 58 SN 3C 7A GERMAN 3C 13 EU 3C 34 MG 3C 59 SO 3C 7B FRENCH 3C 14 FA 3C 35 MI 3C 5A SQ 3C 7C ITALIAN 3C 15 FJ 3C 36 MK 3C 5B SR 3C 7D SPANISH 3C 16 FO 3C 37 ML 3C 5C SS 3C 7E DUTCH 3C 17 F
Others Audio Language Selection B8 : Audio Language Selection 1st Byte 2nd Byte 1st Byte 2nd Byte 1st Byte 2nd Byte 1st Byte 2nd Byte JAPANESE 39 11 EO 39 32 LT 39 57 SM 39 79 ENGLISH 39 12 ET 39 33 LV 39 58 SN 39 7A GERMAN 39 13 EU 39 34 MG 39 59 SO 39 7B FRENCH 39 14 FA 39 35 MI 39 5A SQ 39 7C ITALIAN 39 15 FJ 39 36 MK 39 5B SR 39 7D SPANISH 39 16 FO 39 37 ML 39 5C SS 39 7E DUTCH 39 17 FY 39 38 MN 39 5D ST 39 7F SW
Others Response Commands Commands relating to RS-232C control system. Command Description 01 Complete: Issued by the external recorder upon completing all specified operations by commands. 02 Error: Issued by the external recorder when receiving invalid commands in the context. In such cases, commands that are sent will not be accepted. However, a return command will be issued but only to the Status Sense. To clear the Error status, perform command 56 (Clear).
Others v Title/Track Sense under “ORIGINAL” 1st Byte 2nd Byte 3rd Byte 4th Byte Title/Track Sense (ORIGINAL) 30 Hundreds Tens Ones 61 30 3* 3* 3* E.g. (345) 30 33 34 35 E.g. : When the current title under “ORIGINAL” is the 345th title. v Title/Track Sense in “PLAY LIST” 1st Byte 2nd Byte 3rd Byte 4th Byte Title/Track Sense (PLAY LIST) 38 Hundreds Tens Ones 61 38 3* 3* 3* E.g. (028) 38 30 32 38 E.g. : When the current title under “PLAY LIST” is the 28th title.
Others v Status Data Sense For acquiring the remaining time in the current recording mode in hours, minutes and seconds for HDD/DVD. D7 STATUS SENSE v 1byte 1byte 1byte 2byte 3byte 4byte 5byte HDD BD SD HDD/BD/SD HDD/BD/SD HDD/BD/SD HDD/BD/SD bit7 1 (Fixed) 1 (Fixed) 1 (Fixed) Video EE 0 (Fixed) During PLAY During PAUSE (Set to 1 simultaneously with “During PLAY” in STILL mode.
Others v SEARCH SPEED bit3 v bit2 bit1 bit0 STILL 0 0 0 0 x1 0 0 0 1 SEARCH1 0 1 0 0 SEARCH2 0 1 0 1 SEARCH3 0 1 1 0 SEARCH4 0 1 1 1 SEARCH5 1 0 0 0 CTL Data Sense For acquiring lapse counter of selected deck in hours, minutes and seconds. 1st Byte 2nd Byte 3rd Byte 4th Byte 5th Byte 6th Byte 7th Byte 8th Byte CTL Data Sense Hr (Tens) Hr (Ones) Min (Tens) Min (Ones) Sec (Tens) Sec (Ones) Frame (Tens) Frame (Ones) D9 3* 3* 3* 3* 3* 3* 3* 3* E.g.
Others Language Code List Code Language Code Language Code Language AA Afar HI Hindi OS Ossetian AB Abkhazian HO Hiri Motu PA Panjabi AF Afrikaans HU Hungarian FA Persian AK Akan IG Igbo PI Pali SQ Albanian IS Icelandic PL Polish AM Amharic IO Ido PT Portuguese AR Arabic II Sichuan Yi PS Pashto AN Aragonese IU Inuktitut QU Quechua HY Armenian IE Interlingue RM Rhaeto-Romance AS Assamese IA Interlingua (International Auxiliary language Associati
Others DV Divehi LU Luba-Katanga TL Tagalog NL Dutch LG Ganda TH Thai DZ Dzongkha MK Macedonian BO Tibetan EN English MH Marshallese TI Tigrinya EO Esperanto ML Malayalam TO Tongan ET Estonian MI Māori TN Tswana EE Ewe MR Marathi TS Tsonga FO Faroese MS Malay TK Turkmen FJ Fijian MG Malagasy TR Turkish FI Finnish MT Maltese TW Twi FR French MO Moldavian UG Uighur FY Western Frisian MN Mongolian UK Ukrainian FF Fulah NA Nauruan UR U
Others Country Code List Code AD Country Name Andorra Code GM Country Name Gambia Code NU Country Name Niue AE United Arab Emirates GN Guinea NZ New Zealand AF Afghanistan GP Guadeloupe OM Oman AG Antigua and Barbuda GQ Equatorial Guinea PA Panama AI Anguilla GR Greece PE Peru AL Albania GS South Georgia and South Sandwich Islands PF Polynesia AM Armenia GT Guatemala PG Papua New Guinea AN Netherlands Antilles GU Guam PH Philippines AO Angola GW Guinea-Bis
Others CK Cook Islands LC Saint Lucia TD Chad CL Chile LI Liechtenstein TF French Southern Territories CM Cameroon LK Sri Lanka TG Togo CN China LR Liberia TH Thailand CO Colombia LS Lesotho TJ Tajikistan CR Costa Rica LT Lithuania TK Tokelau CU Cuba LU Luxembourg TM Turkmenistan CV Cape Verde LV Latvia TN Tunisia CX Christmas Island LY Libya TO Tonga CY Cyprus MA Morocco TP East Timor CZ Czech Republic MC Monaco TR Turkey DE Germany MD Mo
Others Using the HDMI Consumer Electronics Control (HDMI CEC) HDMI Consumer Electronics Control v v By using a HDMI cable to connect this unit with a TV that supports the HDMI CEC standard, this unit and the TV can be linked and operated together. HDMI CEC (Consumer Electronics Control) is an industrial standard that allows HDMI devices to be linked and operated among each other by connecting them with a HDMI cable.
Others Troubleshooting Problem Symptom Action Power does not turn on The “HELLO” message remains displayed, and the unit does not start up. Press the [RESET] button on the front panel. If it does not start up, stop using this unit, unplug the plug from the power point, and bring it to the dealer or “Service Center”. (A page 13) “FAN LOCKED” is displayed on the display window of this unit The cooling fan motor is not working. The cooling fan motor is spoiled.
Others Troubleshooting (Continued) Problem Data cannot be imported Symptom Action Reference Page The title to be dubbed is copyright protected. Titles that are copyright-protected cannot be dubbed. Select a title that is not copyright-protected. (A page 25) The number of titles stored in the HDD has reached the maximum amount. Delete or combine the titles in the HDD to reduce the amount of titles to less than 500. (A page 65) The remaining space on the HDD is running out.
Others Specifications General m C DV Remote Input Power requirement AC 120 V H, 60 Hz Power consumption : 41 W Power on : 3.0 W Power off Laser specification For CD Output For DVD : 656 nm to 663 nm : No hazardous radiation is emitted with the safety protection. Wavelength Output Serial Command : D-SUB 9-PIN Component video output: : 1.0 Vp-p, 75 K Y CB/CR, PB/PR : 0.
. 2012/3/8 13:53:0 Users are urged to read the details for the relevant license carefully before using the software component covered by "GPL/LGPL" and embedded in the Product. Since the terms and conditions of individual licenses are provided by parties other than JVC KENWOOD, the original English version will be included.
2012/3/8 13:53:0 Copyright (C) 1989, 1991 Free Software Foundation, Inc., 51 Franklin Street, Fifth Floor, Boston, MA 02110-1301 USA Everyone is permitted to copy and distribute verbatim copies of this license document, but changing it is not allowed. GNU GENERAL PUBLIC LICENSE Version 2, June 1991 0. This License applies to any program or other work which contains a notice placed by the copyright holder saying it may be distributed under the terms of this General Public License.
2012/3/8 13:53:0 Copyright (C) 1989, 1991 Free Software Foundation, Inc., 51 Franklin Street, Fifth Floor, Boston, MA 02110-1301 USA Everyone is permitted to copy and distribute verbatim copies of this license document, but changing it is not allowed. [This is the first released version of the Lesser GPL. It also counts as the successor of the GNU Library Public License, version 2, hence the version number 2.1.] GNU LESSER GENERAL PUBLIC LICENSE Version 2.
. 110 2012/3/8 13:53:0 5. A program that contains no derivative of any portion of the Library, but is designed to work with the Library by being compiled or linked with it, is called a "work that uses the Library". Such a work, in isolation, is not a derivative work of the Library, and therefore falls outside the scope of this License.
Others Index A AUDIO CABLE ................................................ 14, 18, 17 AUDIO LANGUAGE ........................................ 59, 79, 94 AUDIO/SUBTITLE SETTINGS ..................................... 59 AUTO MARKING ......................................................... 81 B BD (BD-R/BD-RE) ........................... 9, 10, 27, 41, 61, 98 BD MIX SOUND ........................................................... 82 BD VIDEO DATA ...........................................................
SR-HD2500US BLU-RAY DISC & HDD RECORDER ©2012 JVC KENWOOD Corporation 2012/3/8 13:55:3 LST1302-001A