
User's Manual


Importing Data from a USB-
compatible Device to the
HDD
Data on devices connected to the USB terminal can be
imported to the HDD as follows.
v
File formats that can be imported
AVCHD, SD-VIDEO(JVC Everio MPEG2 TS, PS), MOV*,
and JPEG
MOV*
:
MOV files that are taken in SP mode and HQ
mode using the JVC ProHD Camcorder GY-
HM700/100
Memo:
v
Titles that are imported using “FULL IMPORT” combined
into one title. This unit does not support combining of titles
during the editing operation after import is complete. To
combine and import data, select “FULL IMPORT”.
v
For data that is selected for import via “SEL.
TITLE(VIDEO)”, titles with the same date are combined.
v
Titles of two or more scenes cannot be combined if the
recording criteria, such as video size, are different.
v
Import of MOV files recorded using JVC GY-HM700/100
SP mode 1080i (25 Mbps) requires a duration that is about
1.3 times longer than the usual time.
Note:
v
Turn off the power for this unit and the connecting device if
an USB compatible device is to be connected to this unit.
v
Do not unplug the USB cable while importing a title.
Doing so may result in loss or damage of the titles.
v
Only titles that are not copyright-protected can be imported.
v
For MOV format videos, only videos in MOV format (SP
mode and HQ mode) taken using JVC ProHD camcorder
GY-HM700/100 are compatible. There is no guarantee for
importing videos taken on devices by other company.
v
Recognizing the device and importing the files may take a
long time depending on the amount of files in the USB
device.
v
If a USB connection is used, this unit will only recognize one
device out of all the recording devices.
Depending on the video camera, the memory card slot will be
recognized but the internal device will not be recognized.
Use the following methods to solve this.
v
If the internal device is not recognized:
Copy the data from the camera’s internal memory or
HDD onto the SD card.
v
If using a JVC camcorder that has two memory card
slots:
Put the memory card that has the required data in slot A.
v
If the target device is not recognized using the USB
connection, use the camcorder’s burner or a similar device
to dub the disc before proceeding with dubbing on this unit.
For more details, refer to “Importing Data from a BD/DVD to
the HDD” (A page 32) .
v
When importing videos from a USB-connected camcorder,
data reading from the internal memory of the camcorder
may fail. If both the camcorder’s internal memory and SD
card are available, the SD card may be detected first. To
prevent this from occurring, remove the SD card before
reading data from the internal memory.
m
Preparations
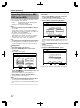
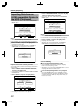
1
Connect the USB device (Everio, etc.) to this unit
using a USB cable
.
HDV/DV IN
RECHDD RECBV
REC
MODE
INPUT
SELECT
HDD
MIDIA SELECT
BD/SD
DIRECT/
MONITOR
Memo:
v
After connecting the USB cable, turn on the camera and
switch the mode of the camera.
(Choose “Connect to a computer” or a similar option. For
details refer to the camera’s instruction manual.)
v
“USB RDY” appears on the display window of the unit when
an USB device is recognized.
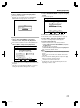
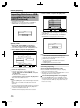
2
Press the [DUBBING] button on the remote
control unit
v
The importing screen appears.
.
75$
5&
&+5%
*&8&8
&+5%
&+5%
&+5%
&+5%5&
126+10
1-
4'6740
':+6
5'.'%6
&7$$+0)
56'2
5'.'%6+/2146&7$$+0)
*&&
*&&
*&&
*&&
61*&& 61&8&
&+5%%12;
%#0%'. 0':6
&7$$+0)
8+&'1
2+%674'
3
Select “USBhHDD” in the importing screen, and
press the [OK] button
v
A check mark is added to the “USBhHDD” item.
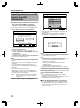
4
Select “NEXT”, and press the [OK] button
v
The import selection screen appears.
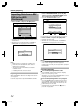
Full import
1
Select “FULL IMPORT” in the import selection
screen, and press the [OK] button
v
A check mark is added to the “FULL IMPORT” item.
2
Select “START”, and press the [OK] button
.
75$
126+10
1-
4'6740
&7$$+0)
56'2
5'.'%66*'/'6*1&1(+/2146
*&&
(7..+/2146 5'.6+6.'8+&'1
5'.6+6.'2+%674'
%#0%'. $#%-
':+6
5'.'%6
&7$$+0)
56#46
Dubbing/Importing
35
2012/3/8 13:53:0