
User's Manual


Importing Data from an
i.LINK-compatible Device to
the HDD
Data on devices connected to the i.LINK terminal can be
imported to the HDD as follows.
v
Video formats that can be imported:
DV and HDV content
Memo:
v
Only titles that are not copyright-protected can be imported.
v
Devices that have in-built copyright protection such as D-VHS and digital
tuners cannot be connected. This unit only allows import from tape media.
v
Importing will not be performed if no tape has been inserted
into the HDV/DV camera.
v
Importing will be cancelled when the mode is changed from
HDV to DV or vice versa.
v
For camcorders that support both HDV and DV recording, use
only one of the modes for recording and playback.
v
There is no support for editing using a connected PC.
v
Only one i.LINK device can be connected to this unit at a time.
Note:
v
Turn off the power for this unit and the connecting device
when connecting using an i.LINK compatible device.
v
Do not unplug the i.LINK cable while importing to the HDD is in progress.
Doing so may result in loss or damage of the titles.
v
For example, during full import of HDV content from JVC GY-
HD100 via i.LINK connection, the beginning of the image may
not be captured if GY-HD100 is not set as follows.
(1) Set the [IEEE1394] switch at the rear of the GY-HD100
unit to [HDV] or [DV] according to the recorded content.
(2) Set [MENU]/[VIDEO FORMAT]/[PB TAPE] on the GY-
HD100 unit to [HDV] or [DV].
(As with (1), set according to the recorded content. Setting to
[AUTO] is not allowed.)
(3) Check to ensure that the [HDV] or [DV] lamp on the side of
the GY-HD100 unit is lit.
(Check to ensure that the lamp that is lit corresponds to the
setting in (1) and (2).)
When importing from a tape that contains data captured in the
HDV recording and DV recording modes, change the video
camera setting according to each recording mode, check to
ensure that the corresponding lamp in (3) is lit, and choose to
start import from the current position.
m
Preparations
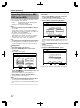
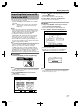
1
Connect the device (camera, etc.) to this unit
using an i.LINK cable
.
HDV/DV IN
RECHDD RECBV
REC
MODE
INPUT DIRECT/
MONITORSELECT
HDD
MIDIA SELECT
BD/SD
Memo:
v
After the device (camera, etc.) has been connected using
an i.Link cable, turn on the power of the device and switch
it to playback mode. (refer to the device’s (camera, etc.)
instruction manual for more details.)
v
“HDV/DV RDY” appears on the display window of the unit
when an iLINK device is recognized.
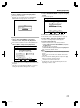
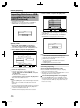
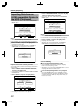
2
Press the [DUBBING] button on the remote
control unit
v
The importing screen appears.
.
75$
5&
&+5%
*&8&8
&+5%
&+5%
&+5%
&+5%5&
126+10
1-
4'6740
':+6
5'.'%6
&7$$+0)
56'2
5'.'%6+/2146&7$$+0)
*&&
*&&
*&&
*&&
61*&& 61&8&
&+5%%12;
%#0%'. 0':6
&7$$+0)
8+&'1
2+%674'
3
Select “HDV/DVhHDD” in the importing screen,
and press the [OK] button
v
A check mark is added to the “HDV/DVhHDD” item.
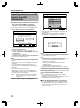
4
Select “NEXT”, and press the [OK] button
v
The import selection screen appears.
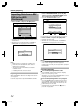
Imports data from the beginning
You can import videos from the beginning till the end as
follows. If the current position is halfway through the tape,
import after rewinding the tape to the beginning.
1
Select “IMPORT FROM BEGINNING”, and press
the [OK] button
v
A check mark is added to the “IMPORT FROM
BEGINNING” item.
2
Select “NEXT”, and press the [OK] button
.
*&8&8
126+10
1-
4'6740
':+6
5'.'%6
&7$$+0)
56'2
5'.'%66*'/'6*1&1(+/2146
+/2146(41/$')+00+0)
+/2146(41/%744'06215+6+10
%#0%'. $#%-
*&&
&7$$+0)
0':6
v
A recording mode selection screen appears.
3
Select “RECORDING MODE”, press the [OK]
button, and select from the pop-up menu
Dubbing/Importing
39
2012/3/8 13:53:0