
User's Manual


Importing Data from an
i.LINK-compatible Device to
the HDD (Continued)
v
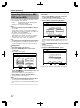
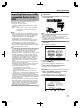
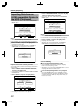
Select “XP”, “SP”, “LP”, or “EP” from the “RECORDING
MODE” option.
.
*&8&8
52
126+10
1-
4'6740
&7$$+0)
56'2
5'66*'4'%14&+0)/1&'
*&&
&7$$+0)(14*&86#2'%106'065 &4/1&'&8%106'065 52'%+(+'&4'%/1&'
%#0%'. $#%- 56#46
':+6
5'.'%6
&7$$+0)
4'%14&+0)/1&'
Memo:
v
HDV contents will be imported in DR mode.
For more details, refer to “Recording Modes” (A page 30) .
4
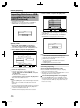
Select “START”, and press the [OK] button
v
Importing of the titles starts.
v
After titles are successfully imported, a “DUBBING IS
COMPLETED” message appears on the monitor.
.
%10(+4/
&7$$+0)+5%1/2.'6'&
1-
Imports data from current position
You can import videos from the current tape position till the
end as follows.
1
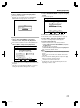
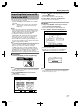
Select “IMPORT FROM CURRENT POSITION”,
and press the [OK] button
v
A check mark is added to the “IMPORT FROM CURRENT
POSITION” item.
2
Select “NEXT”, and press the [OK] button
.
*&8&8
126+10
1-
4'6740
':+6
5'.'%6
&7$$+0)
56'2
5'.'%66*'/'6*1&1(+/2146
+/2146(41/$')+00+0)
+/2146(41/%744'06215+6+10
%#0%'. $#%-
*&&
&7$$+0)
0':6
v
A recording mode selection screen appears.
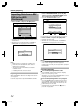
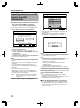
3
Select “RECORDING MODE” and press the [OK]
button to display the pop-up menu
v
Select “XP”, “SP”, “LP”, or “EP” from the “RECORDING
MODE” option.
.
*&8&8
52
126+10
1-
4'6740
&7$$+0)
56'2
5'66*'4'%14&+0)/1&'
*&&
&7$$+0)(14*&86#2'%106'065 &4/1&'&8%106'065 52'%+(+'&4'%/1&'
%#0%'. $#%- 56#46
':+6
5'.'%6
&7$$+0)
4'%14&+0)/1&'
Memo:
v
HDV contents will be imported in DR mode.
For more details, refer to “Recording Modes” (A page 30) .
4
Select “START”, and press the [OK] button
v
Importing of the titles starts.
v
After titles are successfully imported, a “DUBBING IS
COMPLETED” message appears on the monitor.
.
%10(+4/
&7$$+0)+5%1/2.'6'&
1-
Cancel dubbing
m
To cancel importing before it starts
v
Select “CANCEL” from the menu, and press the [OK]
button to cancel importing of a title.
v
Alternatively, you can press the [RETURN] button to cancel
importing and return to the initial screen.
m
To cancel importing while it is in progress
v
Press the [OPTION] button. Select “CANCEL” from the
Cancel Importing menu, and press the [OK] button. Doing
so imports data to the HDD up to the position where you
have chosen to stop.
Dubbing/Importing
40
2012/3/8 13:53:0