
User's Manual


9
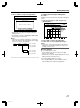
Complete the entire disc copying
v
After copy is complete the tray will open automatically, and
copy of the entire disc ends.
.
%10(+4/
%12;+0)10616*':::&+5%+5%1/2.'6'&
1-
Memo:
v
The screen prompting you to insert a new disc appears
repeatedly until this unit has finished copying the number of
discs specified in Step 3. When the message appears, set
a new BD or DVD on the disc tray, select “START”, and
press the [OK] button.
.
126+10
1-
4'6740
&7$$+0)
56'2
5'.'%656#4661$')+0&7$$+0)
&+5%%12;
%12;+0)10616*'56&+5%+5%1/2.'6'&
+05'46#0'9&+5%
%#0%'. $#%- 56#46
':+6
5'.'%6
&7$$+0)
v
After copy is complete, the data copied onto the HDD will
be deleted.
v
Select “CANCEL” from the menu, and press the [OK]
button to cancel disc copying.
.
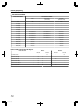
126+10
1-
4'6740
&7$$+0)
56'2
5'.'%656#4661$')+0&7$$+0)
&+5%%12;
%#0%'. $#%- 56#46
':+6
5'.'%6
&7$$+0)
%10(+4/
;'5 01
&1;179#0661%#0%'.&7$$+0)!
Recording Using External
Inputs
Videos on an external device that is connected to i.LINK (HDV/
DV) or video / S-video input can be recorded to the HDD.
BD, DVD can be recorded from the [VIDEO]/[S-VIDEO] or
SDI input.
Memo:
v
Only titles that are not copyright-protected can be imported.
1
Press the [HDD] or [BD/SD] button to select the
location to record the file
2
Press the [INPUT SELECT] button on the remote
control, and choose external input (SDI or HDV/DV
or L-1)
3
Press the [REC MODE] button and select a
recording mode
4
Press the [ R ] and [ I ] remote control buttons
together to start the recording process
v
Recording can also be start by pressing the [ R ] button on
this unit.
5
Operate the external device using i.LINK(HDV/
DV) or the video/S-video input or SDI input to
output the videos to be recorded
6
Press the [ o ] button on either this unit or the
remote control to display the pop-up screen,
choose “STOP” and press the [OK] button
v
End the recording.
Memo:
v
When recording images via a video camera using i.LINK
connection, recording may stopped if the video camera is
loaded with a DV tape while in the shooting mode. In this
case, remove the DV tape before recording.
v
Recording will be stopped if the maximum recording time has
been reached, or if there is insufficient memory in the media.
v
For HDV contents, “DR” will be used to record instead of the
selected recording mode.
v
MAXIMUM CONTINUOUS RECORDING TIME
HDD
:
24 hours (*1)
DVD-RW
:
8 hours
BD-RE
:
8 hours
*1
:
Title will automatically be split into time separated by 8
hours. The dividing point will not be recorded.
For the recording modes and maximum recording time for
each disc, refer to “Recording Modes” (A page 30) .
m
Checking whether SDI input signals can be
recorded
1
Press the [OPTION] button on the remote
control, and select “SDI INPUT SIGNAL”
A screen showing the details of the SDI input signal appears.
2
Check to ensure that “RECORD” is displayed as
“POSSIBLE”
Recording is not possible if it is displayed as “IMPOSSIBLE”.
Memo:
v
It takes a little moment to start recording after the button is
pressed.
Dubbing/Importing
49
2012/3/8 13:53:0