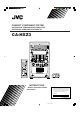
COMPACT COMPONENT SYSTEM SISTEMAS DE COMPONENTES COMPACTOS SISTEMA DE COMPONENTE COMPACTO CA-HXZ3 COMPACT DIGITAL AUDIO SO UND MODE PRESET L VO UM E INSTRUCTIONS MANUAL DE INSTRUCCIONES INSTRUÇÕES For Customer Use: Enter below the Model No. and Serial No. which are located either on the rear, bottom or side of the cabinet. Retain this information for future reference. Model No. Serial No. GVT0086-012A [UW, UJ] Cover.CA-HXZ3[UW]f.
Warnings, Cautions and Others Avisos, precauciones y otras notas Advertências, precauções e outras notas Caution— (standby/on) button! Disconnect the mains plug to shut the power off completely. The (standby/on) button in any position does not disconnect the mains line. The power can be remote controlled. Precaución––Interruptor (encendido/apagado)! Desconectar el cable de alimentación para desactivar la alimentación totalmente.
English PRECAUCIÓN Para reducir riesgos de choques eléctricos, incendio, etc.: 1. No extraiga los tornillos, los cubiertas ni la caja. 2. No exponga este aparato a la lluvia o a la humedad. PRECAUCIÓN • No obstruya las rendijas o los orificios de ventilación. (Si las rendijas o los orificios de ventilación quedan tapados con un periódico, un trozo de tela, etc., no se podrá disipar el calor). • No ponga sobre el aparato ninguna llama al descubierto, como velas encendidas.
Caution: Proper Ventilation To avoid risk of electric shock and fire, and to prevent damage, locate the apparatus as follows: 1 Front: No obstructions and open spacing. 2 Sides/ Top/ Back: No obstructions should be placed in the areas shown by the dimensions below. 3 Bottom: Place on the level surface. Maintain an adequate air path for ventilation by placing on a stand with a height of 10 cm or more.
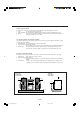
English 1 CLASSIFICATION LABEL, PLACED ON EXTERIOR SURFACE 2 WARNING LABEL, PLACED INSIDE THE UNIT 1 ETIQUETA DE CLASIFICACIÓN, PROVISTA SOBRE LA SUPERFICIE EXTERIOR 2 ETIQUETA DE ADVERTENCIA, PEGADA EN EL INTERIOR DE LA UNIDAD 1 ETIQUETA DE CLASSIFICAÇÃO LOCALIZADA NA PARTE POSTERIOR DA CAIXA DO APARELHO 2 ETIQUETA DE ADVERTÊNCIA LOCALIZADA NA PARTE INTERNA DA UNIDADE 1. CLASS 1 LASER PRODUCT 2. DANGER: Invisible laser radiation when open and interlock failed or defeated.
English Introduction We would like to thank you for purchasing one of our JVC products. Before operating this unit, read this manual carefully and thoroughly to obtain the best possible performance from your unit, and retain this manual for future reference. About This Manual Power sources This manual is organized as follows: • When unplugging from the wall outlet, always pull the plug, not the AC power cord. • The manual mainly explains operations using the buttons and controls on the unit.
English Contents Location of the Buttons and Controls ....................... 3 Playing Back Tapes ................................................... 21 Front Panel ................................................................. 3 Remote Control .......................................................... 5 Playing Back a Tape ................................................. 21 Locating the Beginning of a Song—Music Scan ..... 21 Getting Started .......................................................
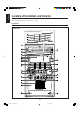
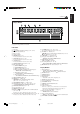
English Location of the Buttons and Controls Become familiar with the buttons and controls on your unit. Front Panel Front Panel Top view of Indication-lamp panel p COMPACT DIGITAL AUDIO UND MODE SO L VO PRESET UM E –3– EN01-08.CA-HXZ3[UW]f.
Display Window TITLE GROUP TRACK MP 3 See pages in the parentheses for details. Front Panel 1 2 3 4 5 6 7 8 9 p q w e r t y u i o Disc trays (standby/on) button and lamp (9, 12, 27, 28) ECO (Ecology) button (9) Remote sensor Display window FM/AM button (9, 13) Pressing this button also turns on the unit. TAPE 2 3 button (9, 21, 22) Pressing this button also turns on the unit. AUX button (9) Pressing this button also turns on the unit.
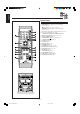
English Remote Control Remote Control 1 Number buttons (13, 17, 18) 2 4 (1) (reverse skip/reverse search) button (13, 17, 19, 21) 7 (stop) button (17 – 19, 21 – 25, 28) ¢ (¡) (forward skip/forward search) button (13, 17, 19, 21) 3 Disc number (CD1, CD2, and CD3) buttons (16 – 19) 4 Disc play mode buttons (18 – 20) • REPEAT, RANDOM, and PROGRAM buttons 5 REC START/STOP button (22, 24, 25, 28) 6 SOUND MODE button (11) 7 SUBWOOFER LEVEL + / – buttons (11) 8 STANDBY/ON button (9) 9 SLEEP button (29) p AUX bu
Continued Supplied Accessories Connecting Antennas Make sure that you have all the following items. The number in the parentheses indicates the quantity of the pieces supplied. FM antenna NNA • • • • • ANTE AM loop antenna (1) FM antenna (1) Remote control (1) Batteries (2) AC plug adaptor (1) FM antenna (supplied) EXT AM LOOP 5 FM 7 IAL X COA If anything is missing, consult your dealer immediately.
English AM antenna Connecting Speakers 1 1 2 ANTENNA 2 3 Speaker cords (black/blue) Speaker cords (black/blue) Vinyl-covered wire (not supplied) AM EXT AM LOOP RIGHT LEFT MAIN SPEAKERS FM 75 COAXIAL SUBWOOFERS CAUTION: SPEAKER IMPEDANCE 6 3 16 Speaker cords (black/red) AM loop antenna (supplied) From right subwoofer From left subwoofer 1 If cords are covered with insulation, twist the core of the cord at the end of each cord, then remove the insulation.
English Connecting Other Equipment Adjusting the Voltage Selector You can connect both analog and digital equipment. Before plugging in the unit, set the correct voltage for your area with the voltage selector on the rear of the unit. • DO NOT connect any equipment while the power is on. • DO NOT plug in any equipment until all connections are complete.
English Common Operations Turning On or Off the Power Saving the Power Consumption while on Standby —Ecology Mode To turn on the unit, press (or STANDBY/ON on the remote control) so that the lamp on the button goes off. You can save the power consumption while the unit is turned off (on standby). • You can set Ecology Mode whether the unit is on or off. On the unit ONLY: To activate the Ecology Mode, press ECO.
Setting the Clock Adjusting the Volume You can set the clock whether the unit is on or off; however, if Ecology Mode is activated, you cannot set the clock while the unit is off (on standby). If Ecology Mode is not in use while the unit is turned off (on standby), “0:00” flashes on the display until you set the clock. You can adjust the volume level only while the unit is turned on. The volume level can be adjusted in 32 steps (VOLUME MIN, VOLUME 1 – VOLUME 30, and VOLUME MAX).
English Reinforcing the Bass Sound The sound modes change as follows: You can select one of the 5 subwoofer levels. This function only affects the playback sound, but does not affect your recording. The subwoofer level can be adjusted in 5 steps— LEVEL 0 (MIN LEVEL), LEVEL 1, LEVEL 2, LEVEL 3, and LEVEL 4 (MAX LEVEL). ROCK DANCE POP HALL CLASSIC STADIUM Y CD2 READ OFF POP (Canceled) USER 3 USER 2 • The SUBWOOFER lamp lights up in red when LEVEL 1 to LEVEL 4 (MAX LEVEL) is selected.
English Creating Your Own Sound Mode—User Mode 5 You can change SEA pattern to suit your preference. The SEA pattern can be adjusted into 5 frequency ranges—LOW1, LOW2, MID, HIGH1, and HIGH2. These changed settings can be stored in the USER 1, USER 2, and USER 3 modes. • There is a time limit in doing the following steps. If the setting is canceled before you finish, start from step 1 again.
English Listening to FM and AM Broadcasts Tuning in to a Station 1 On the unit ONLY: 1 Press FM/AM. The unit automatically turns on and tunes in to the previously received station (either FM or AM). • Each time you press the button, the band alternates between FM and AM. 2 Tune in to the station you want to preset. • See “Tuning in to a Station.” FM / AM 2 Press SET/DISPLAY. 3 Turn PRESET + / – to select a preset number. 4 Press SET/DISPLAY again. SET / DISPLAY Start searching for stations.
Continued This unit has been designed to play back the following discs: • CD (Audio CD) • CD-R (CD-Recordable) • CD-RW (CD-ReWritable) • MP3 disc (MP3 files recorded on a CD-R or CD-RW) When playing a CD-R or CD-RW User-edited CD-Rs (CD-Recordable) and CD-RWs (CD-ReWritable) can be played back only if they are already “finalized.” • You can play back your original CD-Rs or CD-RWs recorded in music CD format or in MP3 format.
English How are MP3 files recorded and played back? MP3 “tracks (files)” can be recorded in “group”—folders or directories, in PC terminology. During recording, the tracks and groups can be arranged similarly to the tracks and folders/directories of computer data. “Root” is similar to the root of a tree. Every track and group can be linked to the root. In compliance with ISO 9660, the maximum allowable depth of nested directories—so called “hierarchy”—is eight (inclusive of the root).
English Playing Back Discs Continued Loading Discs Playing Back the Entire Discs—Continuous Play On the unit ONLY: You can play discs continuously. • If you start Continuous Play with an MP3 disc, you can select a track you want to start playback with. 1 Press 0 for the disc tray (CD1, CD2, or CD3) you want to load a disc onto. 7 For audio CDs The unit automatically turns on and the disc tray comes out. 2 Place a disc correctly on the circle of the disc tray, with its label side up.
English 3 Basic Disc Operations Select a track to start playing with. 1) Turn 4 / ¢ (or press 4 (1) / ¢ (¡) on the remote control) to select a group you want, then press CD 3¥8. The track number starts flashing. 2) Turn 4 / ¢ (or press 4 (1) / ¢ (¡) on the remote control) to select a track you want to start playback with, then press CD 3¥8 again. GROUP PRESET While playing a disc, you can do the following operations.
English Continued Programming the Playing Order of the Tracks —Program Play 4 2 Turn 4 / ¢ to select the track number, then press SET/DISPLAY. SET / DISPLAY Load discs. On the remote control: • If the current playing source is not the CD player, press CD 3¥8, then 7 before going to the next step. Press the number buttons. • For how to use the number buttons, see “To go to another track directly using the number buttons” on page 17. Activate the Program Play mode.
English To check the program contents Playing at Random—Random Play On the remote control ONLY: The tracks of the currently selected disc will be played at random. • To use Repeat Play (see page 20) for Random Play, press REPEAT after starting Random Play. Only REPEAT 1 and REPEAT ALL can be selected for Random Play. Before playing, you can check the program contents by pressing 4 (1) or ¢ (¡). • 4 (1) : Shows the programed tracks in the reverse order. • ¢ (¡) : Shows them in the programed order.
English Repeating Tracks or Discs—Repeat Play Prohibiting Disc Ejection—Tray Lock You can have all the discs, the program or the individual track currently playing repeat as many times as you like. You can prohibit disc ejection from the unit and lock discs. • This operation is possible only when the source is the CD player. To repeat playing, press REPEAT during or before play.
English Playing Back Tapes You can play back type I tapes without changing any settings. To play both sides repeatedly—Reverse Mode Playing Back a Tape When using Reverse Mode, the tape automatically reverses at the end of one side, starts playing the other side of the tape, and repeats the same process. 1 On the unit ONLY: Press 0 EJECT for the cassette deck. To use Reverse Mode, press REVERSE MODE so that the Reverse Mode indicator lights up on the display like— .
Continued IMPORTANT: Recording on a Tape • It may be unlawful to record or play back copyrighted material without the consent of the copyright owner. • The recording level is automatically set correctly, so it is not affected by the VOLUME, the SUBWOOFER LEVEL, and the SOUND MODE controls. Thus, during recording you can adjust the sound you are actually listening to without affecting the recording level.
English Synchronized Recording 4 CD REC START “CD REC” appears on the display and the REC (recording) lamp flashes when recording starts. The cassette deck starts recording while the CD player starts playing. When the recording is done, “CD REC FINISHED” appears scrolling on the display, and the REC (recording) lamp turns off. Both the cassette deck and the CD player stop automatically. By using Synchronized Recording methods, you can start and stop both disc play and tape recording at the same time.
English 7 Auto Edit Recording (only for audio CDs) Using Auto Edit Recording, you can record the tracks on a CD onto both sides of the tape. However, if the tracks are recorded segmentally starting from track 1, the track recorded on the end portion of the front side of the tape may be cut off; to prevent this, the unit automatically selects an appropriate-length track so it fits the remaining tape length properly.
English Using the Microphones You can enjoy singing along (Karaoke) and microphone mixing by using two microphones. • MIC LEVEL adjustment is valid for both microphones connected to MIC 1 and MIC 2 jacks. If howling or squealing (feedback) occurs while using the microphone(s) Take the following actions to prevent these noises. • Adjust MIC LEVEL and the volume level. • Avoid pointing the microphone(s) towards the speakers.
English Using the Timers Continued There are three timers available—DAILY (Daily Timer), REC (Recording Timer), and SLEEP (Sleep Timer). You can set the timers whether the unit is on or off; however, if Ecology Mode is activated, you cannot set the timers while the unit is off. On the unit ONLY: 1 Press CLOCK/TIMER repeatedly until “DAILY” appears on the display. CLOCK / TIMER The (Timer) indicator lights up and the DAILY (Daily Timer) indicator also starts flashing on the display.
English 4 Set the off-time you want the unit to turn off (on standby) at. 1) Turn 4 / ¢ to set the hour, then press SET/DISPLAY. “SET” appears for 1 second. 2) Turn 4 / ¢ to set the minute, then press SET/DISPLAY. “SET” appears for 1 second, then the unit enters source selecting mode. 8 Press SET/DISPLAY to complete the Daily Timer setting. The DAILY (Daily Timer) indicator stops flashing and remains lit. “OK ” appears on the display for 2 seconds.
Using Recording Timer 4 With Recording Timer, you can make a tape of a radio broadcast automatically. 1) Turn 4 / ¢ to set the hour, then press SET/DISPLAY. “SET” appears for 1 second. 2) Turn 4 / ¢ to set the minute, then press SET/DISPLAY. “SET” appears for 1 second, then the unit enters off-time setting mode.
English To turn on or off Recording Timer after its setting is done CLOCK 1 Press CLOCK/TIMER repeatedly until / TIMER “REC” appears on the display. The REC (Recording Timer) indicator starts flashing on the display and the (Timer) indicator remains lit. To check the remaining time until the shut-off time, press SLEEP once so that the remaining time (minute) until the shut-off time appears for about 5 seconds.
English Maintenance To get the best performance of the unit, keep your discs, tapes, and mechanism clean. Handling cassette tapes General Notes In general, you will have the best performance by keeping your discs and the mechanism clean. • Store discs in their cases, and keep them in cabinets or on shelves. • Keep the unit’s disc trays closed when not in use. • If the tape is loose in its cassette, take up the slack by inserting a pencil in one of the reels and rotating.
English Troubleshooting If you are having a problem with your unit, check this list for a possible solution before calling for service. If you cannot solve the problem from the hints given here, or the unit has been physically damaged, call a qualified person, such as your dealer, for service. REC TAPE MP3 DISC AUDIO CD TUNER GENERAL Symptom Cause Action Unable to cancel the demonstration. The button other than CANCEL/DEMO is pressed to cancel the demonstration temporarily.
English Specifications Amplifier section Output Power (IEC 268-3) SUBWOOFERS: 100 W per channel, min. RMS, both channels driven into 6 Ω at 63 Hz with no more than 0.9% total harmonic distortion. MAIN SPEAKERS: 30 W per channel, min. RMS, both channels driven into 6 Ω at 1 kHz with no more than 0.9% total harmonic distortion. Audio input sensitivity/Impedance (Measured at 1 kHz, with tape recording signal 300 mV) AUX: 390 mV/50 kΩ ΜΙΧ 1/2: 1.
MEMO MEMO_2 pg (A4).
MEMO MEMO_2 pg (A4).
Mains (AC) Line Instruction (not applicable for Europe, U.S.A., Canada, Australia, and U.K.) Instrucción sobre la línea de la red (CA) (no aplicable para Europa, EE.UU., Canadá, Australia, ni el Grã-Bretanha) Instrução sobre a tensão da rede eléctrica (CA) (não aplicável para a Europa, os E.U.A.
NOTICE / AVISO / AVISO / / / COMPACT DIGITAL AUDIO FM/AM CD3 TAPE CD2 AUX CD1 CLOCK / TIMER CD CANCEL / DEMO SO UND MODE PRESET L VO CD-R /RW PLAYBACK UM E EXTENDED SUPER BASS CANCEL / DEMO SET/ DISPLAY REPEAT REVERSE REC START CD REC CD PLAY MODE SUBWOOFER LEVEL English Demonstration When connecting the AC power cord into a wall outlet, the unit automatically starts the demonstration.