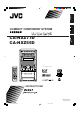
English COMPACT COMPONENT SYSTEM CA-HXZ77D CA-HXZ55D D I G I T A L INSTRUCTIONS GVT0119-001C [US, UN, UG, UX] Cover_HX-Z77D&55D[U]fff.p65 1 03.11.
Warnings, Cautions and Others Caution— button! Disconnect the mains plug to shut the power off completely. The button in any position does not disconnect the mains line. The power can be remote controlled. G-1 safety_HX-Z77&55[U]6.p65 1 03.8.
CAUTION To reduce the risk of electrical shocks, fire, etc.: 1. Do not remove screws, covers or cabinet. 2. Do not expose this appliance to rain or moisture. CAUTION • Do not block the ventilation openings or holes. (If the ventilation openings or holes are blocked by a newspaper or cloth, etc., the heat may not be able to get out.) • Do not place any naked flame sources, such as lighted candles, on the apparatus.
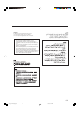
Caution: Proper Ventilation To avoid risk of electric shock and fire, and to prevent damage, locate the apparatus as follows: 1 Front: No obstructions and open spacing. 2 Sides/ Top/ Back: No obstructions should be placed in the areas shown by the dimensions below. 3 Bottom: Place on the level surface. Maintain an adequate air path for ventilation by placing on a stand with a height of 10 cm or more.
IMPORTANT FOR LASER PRODUCTS 1. CLASS 1 LASER PRODUCT 2. CAUTION: Do not open the top cover. There are no user serviceable parts inside the Unit; leave all servicing to qualified service personnel. 3. CAUTION: Visible and invisible laser radiation when open and interlock failed or defeated. Avoid direct exposure to beam. 4. REPRODUCTION OF LABEL: CAUTION LABEL, PLACED INSIDE THE UNIT. G-4 safety_HX-Z77&55[U]6.p65 4 03.8.
English Introduction We would like to thank you for purchasing one of our JVC products. Before operating this unit, read this manual carefully and thoroughly to obtain the best possible performance from your unit, and retain this manual for future reference. Power sources About This Manual This manual is organized as follows: • The manual mainly explains operations using the buttons on the remote control.
English Contents Location of the Buttons and Controls ....................... 3 Advanced Disc Operations ....................................... 35 Main Unit ................................................................... 3 Remote Control .......................................................... 5 About the On-screen Bar .......................................... Operation through the On-screen Bar ...................... Selecting a View Angle ............................................
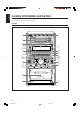
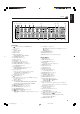
English Location of the Buttons and Controls Become familiar with the buttons and controls on your unit.
English Continued Display Window 1234 5 e 6 r 7 8 p 9 t y u i q w o ; See pages in parentheses for details.
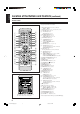
English Location of the Buttons and Controls (continued) Remote Control See pages in parentheses for details.
Continued Supplied Accessories Connecting Antennas Make sure that you have all the following items. The number in parentheses indicates the quantity of each piece supplied. FM antenna • • • • • • English Getting Started FM antenna (supplied) AM loop antenna (1) FM antenna (1) Remote control (1) Batteries (2) Composite video cord (1) AC plug adaptor (1) NA TEN AN T AM EX AM OP LO 75 L FMAXIA CO If anything is missing, consult your dealer immediately.
English Getting Started (continued) AM antenna Connecting Speakers 1 IMPORTANT: Use only speakers with the same speaker impedance as indicated by the speaker terminals on the rear of the unit. 3 2 4 1 2 ANTENNA AM EXT AM LOOP 4 3 Vinyl-covered wire (not supplied) FM 75 COAXIAL 5 Speaker cords (black/ blue) AM loop antenna (supplied) 1 If the cords are covered with insulation, remove a short section of insulation at the end of each cord by twisting and pulling it off.
English To connect a center speaker and surround speakers By connecting a center speaker to the CENTER SPEAKER jack and surround speakers to the SURROUND SPEAKERS jacks, you can enjoy multi-channel Surround modes. (See pages 18 to 20.) Center speaker Connecting a TV Connect your TV and this unit using the composite video cord (supplied), an S-video cord (not supplied) or Component video cord (not supplied). • You can also connect a JVC’s TV through the AV COMPU LINK control system. (See page 67.
English Getting Started (continued) To select the color system Connecting Other Equipment You need to select the color system setting of this unit to match to your TV. Set the NTSC/PAL switch on the rear while in standby mode correctly by referring to the table below. You can connect other equipment such as a digital decoder to reproduce multi-channel sounds or audio equipment which can be used as a playback device. When you connect and use such equipment, refer also to its manual.
English Adjusting the Voltage Selector Before plugging in the unit, set the correct voltage for your area with the voltage selector on the rear of the unit. To cancel only beep sounds during the demonstration, press BEEP ON/OFF or press and hold BEEP (7) for more than 2 seconds on the front panel. The BEEP ON indicator goes off from the display. On the remote control • “0:00” flashes on the display until you set the built-in clock.
English Getting Started (continued) For the following procedure, use the remote control. To select the on-screen language for the choice menu —Step 1: 1 Turn on the TV and select the correct input mode on the TV. 7 Press ENTER. The language for the choice menu changes to the one you chose. • Other indications shown on the TV while you operate the unit will also be shown in the language you chose. Go to “To select the monitor type—Step 2” below. 2 Press DISC 3, then 7.
You need to adjust the each speaker’s distance from where you usually take seat (listening position) to get the best surround effect. Center speaker English 6 Press cursor ∞ / 5 repeatedly to To adjust the speaker distance—Step 3: Front subwoofer select (highlight) the desired speaker distance. For each speaker (FRONT SPEAKER, CENTER SPEAKER, SURROUND SPEAKER), set the distance from the listening point within the range of 0.3 m to 9.0 m in 0.3 m intervals. DISTANCE CENTER SPEAKER 3.0m 3.0m 3.
English Getting Started (continued) 5 Press SET/DISPLAY to finish setting the clock. Setting the Clock You can set the clock when the unit is either turned on or off (on standby). “CLOCK OK” appears on the display, then the built-in clock starts. To check the clock time while playing a source Press and hold SET/DISPLAY. • Each time you press and hold the button, the source indication and the clock time alternate on the display.
English Basic Operations The buttons emphasized in the illustration below are used and explained in the following section (pages 15 to 17). Remote Control DISC1 DISC2 DISC4 DISC5 ECHO DISC3 RESERVE RM-SHXZ55DU REMOTE CONTROL Front Panel 14 14-17HX-Z77&55[U]6.p65 14 03.8.
English Basic Operations (continued) Adjusting the Volume Turning On the Power Press STANDBY/ON (or on the front panel). The STANDBY lamp goes off. “POWER ON” appears on the display. (or To turn off the unit (standby), press STANDBY/ON on the front panel) again. The STANDBY lamp lights up. • When you use the Resume function (see page 63), turning off the power while playing a disc stops playback and stores the interrupted point.
English Changing the Display Brightness You can dim the display window. On the remote control ONLY: Press DIMMER. • Each time you press the button, the display dims and brightens alternately. On the remote control: 1 Press LEVEL SELECT repeatedly until “S.WOOFER” appears on the display. 2 Press LEVEL + / –. • To increase the Subwoofer level, press LEVEL +. • To decrease the Subwoofer level, press LEVEL –.
English Basic Operations (continued) Creating Your Own Sound Mode—User Mode Changing the Scanning Mode You can change the SEA pattern to suit your preference. The SEA pattern can be adjusted using 3 frequency ranges—BASS, MID (middle), and TRE (treble). These changed settings can be stored as the USER 1, USER 2, and USER 3 modes. • There is a time limit in doing the following steps. If the setting is canceled before you finish, start from step 1 again.
English Using Surround Mode The buttons emphasized in the illustration below are used and explained in the following section (pages 19 and 20). Remote Control Front Panel 18 18-20HX-Z77&55[U]6.p65 18 03.8.
English Using Surround Mode (continued) Available Surround Modes You can use the following Surround modes to reproduce a realistic sound field: • To obtain the best possible surround effect, make sure that you have set the speakers’ distance information correctly (see pages 12 and 63). • For details of each Surround mode, see “Glossary” on page 69.
English When 2-channel source is played back: Adjusting DSP Modes and Output Sound • With the SURROUND SETTING set to “ON,” Dolby Pro Logic is selected automatically, and the DOLBY PL indicator lights up on the display. – You cannot select other Surround mode or turn off the Surround mode. When playing back a source with the DSP mode, you can adjust the effect levels. Once you have made an adjustment, it is memorized.
English Listening to FM and AM Broadcasts The buttons emphasized in the illustration below are used and explained in the following section (page 22). Remote Control Front Panel 21 21-24HX-Z77&55[U]6.p65 21 03.8.
English Setting the AM Tuner Interval Spacing Presetting Stations Some countries space AM stations 10 kHz apart, and some countries space 9 kHz apart. • You can only change the AM tuner interval spacing while tuning in to an AM station. (9 kHz is the initial setting.) You can preset 30 FM and 15 AM stations. In some cases, test frequencies have been already memorized for the tuner since the factory examined the tuner preset function before shipment. This is not a malfunction.
English Playing Back Tapes The buttons emphasized in the illustration below are used and explained in the following section (page 24). Remote Control Front Panel 23 21-24HX-Z77&55[U]6.p65 23 03.8.
English You can play back type I tapes. To play both sides repeatedly—Reverse mode Playing Back a Tape When using the Reverse mode, the tape automatically reverses at the end of one side, starts playing the other side of the tape, and repeats the same process. 1 On the remote control: Press 0 EJECT for the cassette deck. Press REV. MODE while holding down SHIFT. On the front panel: Press REVERSE MODE. The Reverse mode indicator lights up on the display like— .
English Playing Back Discs The buttons emphasized in the illustration below are used and explained in the following section (pages 26 to 34). SVCD CD shows the types of discs the operation is available for. DVD VCD • For MP3 and JPEG disc playback, see pages 44 and 45. (For how to make a program using MP3 discs is explained in this section.) Remote Control Front Panel 25 25-34HX-Z77&55[U]6.p65 25 03.8.
English Disc Information Playable disc types This unit has been designed to play back the following discs: DVD VIDEO, DVD-R, DVD-RW, Video CD (VCD)*, Super Video CD (SVCD)*, Audio CD*, CD-R, and CD-RW. * This instruction refers to Video CD as “VCD,” Super Video CD as “SVCD,” and audio CD as “CD.
English Playing Back Discs (continued) Disc structure Playback Control function (PBC)—SVCD and VCD only DVD VIDEO consists of “titles,” and each title may be divided into some “chapters.” For example, if a DVD VIDEO contains some movies, each movie may have its own title number and it may be further divided into some chapters. In a DVD VIDEO Karaoke, each song may have its own title number, but it may not be further divided into chapters. The Playback Control function enables menu-driven operation.
English Loading Discs About the DISC playback indications 1 Press 0 for the disc tray (DISC1 – DISC5) you Ex. 1: While playing a DVD. want to load a disc onto. Elapsed playing time The unit automatically turns on and the corresponding disc tray comes out. 2 Place a disc correctly on the circle of the disc tray, with its label side up. Current title No. Current chapter No. Ex. 2: While playing a SVCD/VCD/CD. Current track No.
English Playing Back Discs (continued) Continuous Playback DVD SVCD VCD CD You can play discs continuously. • Make sure you do not select “REPEAT 1” or “REPEAT 1 DISC” to operate this function. 1 Load discs. 2 Select the disc to start playing back. On the remote control: Disc playback sequence When more than one disc* are loaded on the disc trays, they are played in the following sequence: Ex.
English Changing the Disc to Play Back Basic Disc Operations While playing a disc, you can select and play back the disc. For details about MP3/JPEG discs playback, see pages 44 and 45. To select a disc to play back To go to another chapter On the remote control: Press the corresponding disc number button (DISC1 – DISC5) while holding down SHIFT. and On the front panel: Press the corresponding disc number button (DISC1 – DISC5). The disc on the selected disc tray is played back.
English Playing Back Discs (continued) To go to a particular track directly using the number buttons SVCD VCD CD On the remote control ONLY: Pressing the number buttons before or during playback allows you to start playing with the track number you want. Ex.: To select number 5, press 5. To select number 10, press 10. To select number 20, press +10, then 10. To select number 23, press +10, +10, then 3.
English Playing Back by Using the Disc Menu On the remote control ONLY: DVD SVCD VCD Some DVDs are recorded with their own menus which show their contents. SVCDs or VCDs with the Playback Control (PBC) function also have their own menus, such as lists of songs. You can play back the discs by using these menus. To select the number of the desired item, press the number buttons. Ex.: To select number 5, press 5. To select number 10, press 10. To select number 20, press +10, then 10.
English Playing Back Discs (continued) CHAP (chapter) Repeats the current chapter (the REPEAT 1 indicator lights up on the display) 3 • Each time you press the button, the play mode changes as follows: TRACK (STEP*) Repeats the current track (the REPEAT 1 indicator lights up on the display) * “STEP” appears during Program Play or Random Play. TITLE PROGRAM The PROGRAM indicator also lights up on the display.
English To stop playing, press 7. Playback stops, but Program Play is still activated. • To exit from Program Play, see “To exit from Program Play” below. To go to the next step, press ¢. If your entry is ignored You have tried to program a title/track/group number that does not exist on the disc (for example, selecting track 14 on a disc that only has 12 tracks). Such entries are ignored, and are erased from the program.
English Advanced Disc Operations The buttons emphasized in the illustration below are used and explained in the following section (pages 36 to 45). DVD SVCD VCD CD shows the types of discs the operation is available for. Remote Control This section explains advanced disc operations by using the remote control. For MP3 and JPEG playback, see pages 44 and 45. • See also “Basic Disc Operations” on pages 30 and 31. • Turn on your TV and select the correct input mode on the TV.
English About the On-screen Bar SVCD DVD CD VCD You can check the information on a disc while the disc is loaded and use some functions through the on-screen bar. 1 Disc type 2 Playback information Indication Mbps Meanings shows the current transfer rate (Megabits per second). Available discs DISC 3 shows the the current disc number DVD, SVCD, VCD, CD TITLE 2 shows the current title. DVD DVD & Whenever a disc is loaded with the disc player selected as the source Press ON SCREEN.
English Advanced Disc Operations (continued) 7 Changing the Time Indication Operation through the On-screen Bar DVD SVCD VCD Ex.: When selecting Repeat Play for DVD. You can change the time information in the on-screen bar and the display window on the front panel. 1 Press ON SCREEN twice. & During playback The on-screen bar with pull-down menu appears on the TV. DVD-VIDEO 8.5Mbps TIME OFF DISC 3 TITLE 14 CHAP 23 TOTAL 1:25:58 CHAP.
DVD When playing back a disc, you can search for the chapter/track number to play. DISC 3 TITLE 14 CHAP 23 TOTAL 1:25:58 DVD-VIDEO 8.5Mbps TIME 1 Press ON SCREEN twice. 1/3 1/3 CHAP. 1/3 1/3 1/3 4 Use the number buttons (0 – 9) to enter the time. DISC 3 TITLE 14 CHAP 23 TOTAL 1:25:58 DVD-VIDEO 8.5Mbps CHAP. OFF TIME _ : _ _ : _ _ The on-screen bar with pull-down menu appears on the TV. OFF 3 Press ENTER. The pop-up window appears under the pull-down menu.
English Advanced Disc Operations (continued) 7 Repeating Playback DVD SVCD VCD CD You can repeat playback of the current title or chapter (for DVD), or track (for SVCD/VCD/CD). • You can also repeat playback of a desired portion (A-B Repeat). 5 Press ENTER. The setting changes and the pop-up window goes off. DVD-VIDEO 8.5Mbps TIME To repeat a current title, group, chapter, or all tracks & For DVD/SVCD/VCD: During playback During playback or while stopped For CD: 1 Press ON SCREEN twice.
English 6 Press ENTER at the end of the portion you want Selecting the Subtitle Language DVD SVCD to repeat (point B). A-B repeat playback starts. The selected part (between point A and B) is played repeatedly. Point A Point B To turn off the on-screen bar Press ON SCREEN. While playing back a DVD or SVCD containing subtitles in different languages, you can select the subtitle language to display on the TV. icon appears at the beginning of playback when the current The scene has plural subtitles.
English Advanced Disc Operations (continued) Selecting the Audio Language DVD When a DVD contains audio languages (sound track), you can select the language (sound track) to listen to. icon appears at the beginning of playback when the current The scene has plural audio languages. • You can also select the audio language using the on-screen bar. See page 36 for details. & During playback 1 Press AUDIO.
Special Picture Playback DVD SVCD VCD English 7 Zooming in & During playback or while paused This unit provides special picture playback functions including still picture, frame-by-frame, slow-motion, and zoom. 7 Still picture and frame-by-frame playback Press ZOOM. • Each time you press the button, the magnification changes as follows: & During playback 1 Press 8 once. For DVD: x 1 (normal size) ] x 1.8 ] x 3 ] (back to the beginning) Still picture appears—Still picture playback.
English Advanced Disc Operations (continued) Changing the VFP Setting DVD SVCD VCD 2 Press cursor ∞ / 5 repeatedly to select a parameter you want to adjust. The VFP (Video Fine Processor) function enables you to adjust the picture based on the picture tone, or personal preference. • There is a time limit in doing the following steps. If the setting is canceled before you finish, start from step 1 again. Adjust the parameters so that the picture you are viewing appears as you prefer.
English MP3/JPEG Disc Playback This unit can play back MP3/JPEG files on a CD-R or CD-RW. We call a disc containing MP3 files “MP3 disc” and a disc containing JPEG files “JPEG disc” in this instruction. • For details about other discs (DVD, SVCD, VCD, CD) playback, see pages 29 to 33. • In this instruction, “file” is also referred to as “track.” • Turn on your TV and select the correct input mode on the TV.
English Advanced Disc Operations (continued) Operations through the MP3/JPEG CONTROL Screens 5 For MP3: Press DISC 3 (or ENTER). Playback starts from the selected file. You can search for and play the desired files in a group through the MP3/JPEG CONTROL screens shown on TV. MP3/JPEG CONTROL screen Ex.
English Recording The buttons emphasized in the illustration below are used and explained in the following section (pages 47 and 48). Remote Control Front Panel 46 46-52HX-Z77&55[U]6.p65 46 03.8.
English Recording (continued) 5 Start recording. IMPORTANT: • It may be unlawful to record or play back copyrighted material without the consent of the copyright owner. • The recording level is automatically set correctly. Thus, during recording you can adjust the sound you are actually listening to without affecting the recording level. • If there are excessive noise or static in the recording you have made, the unit may be too close to a TV. Increase the distance between the TV and the unit.
Synchronized Recording By using Synchronized Recording, you can start and stop both disc play and tape recording at the same time. Everything on the disc goes onto the tape in the order it is on the disc, or according to the order you have made for Program Play. • You cannot use Synchronized Recording with Repeat Play (Repeat Play will be canceled). 1 Press 0 EJECT and insert a recordable cassette with the exposed part of the tape down. English 4 Press DISC REC START.
English Enjoying Karaoke The buttons emphasized in the illustration below are used and explained in the following section (pages 50 to 52). Remote Control Front Panel 49 46-52HX-Z77&55[U]6.p65 49 03.8.
English Singing Along (Karaoke) To cancel from the Karaoke mode, change the source to play. • Turning off the unit also cancels the Karaoke mode. You can enjoy singing along (Karaoke) and microphone mixing by using two microphones. • MIC LEVEL adjustment is valid for both microphones connected to the MIC 1 and MIC 2 jacks. To exit from the Karaoke mode, press KARAOKE while holding down SHIFT repeatedly until “MIC OFF” appears on the display.
English Enjoying Karaoke (continued) 7 To use microphone only Microphone Mixing When the playback source is a multi-channel software, it will be played back as a 2-channel source. & For DVD/SVCD/VCD/CD: During playback or while stopped For MP3: During playback 1 Connect the microphone(s). 2 Start playing the source—FM, AM, disc player, or auxiliary equipment connected to the AUX IN jacks. 3 Press KARAOKE repeatedly while holding down SHIFT until “MIC MIX” appears on the display.
Reserving Karaoke Songs—Karaoke Program Play SHIFT until “MIC MIX” appears on the display. You can determine the playback order of the titles or tracks on the disc player. You can program up to 12 steps. • Each time you press the buttons, the Karaoke mode changes as follows. MIC MIX On the remote control ONLY: 1 Load discs. 2 Press DISC 3, then 7. 3 Press RESERVE while holding down SHIFT. The Karaoke reserve screen appears on the TV.
English Using the Timers The buttons emphasized in the illustration below are used and explained in the following section (pages 54 to 57). Remote Control Front Panel 53 53-57HX-Z77&55[U]6.p65 53 03.8.
There are three timers available—DAILY (Daily Timer), REC (Recording Timer), and SLEEP (Sleep Timer). • Before using the timers, set the clock built in the unit. (See page 13.) English 2 Press CLOCK/TIMER again. “TIMER” appears for about 2 seconds, then the unit enters ontime setting mode. Using Daily Timer With Daily Timer, you can wake up to your favorite music or radio program. • You can set the timers whether the unit is on or off.
English Using the Timers (continued) 6 When selecting “TUNER FM” or “TUNER AM”: Turn ¢ / 4 to select a preset station number, then press SET/DISPLAY. “SET” appears for about 1 second each time you select the number, then the unit enters volume setting mode. When selecting “DISC”: (1) Turn ¢ / 4 to select the disc number, then press SET/DISPLAY. “SET” appears for about 1 second.
English 4 Set the on-time you want the unit to turn on at. Using Recording Timer With Recording Timer, you can make a tape of a radio broadcast automatically. Before you set the recording timer, set the preset numbers for the radio stations (see page 22). • You can set the timers whether the unit is on or off. (1) Turn ¢ / 4 to set the hour, then press SET/DISPLAY. (2) Turn ¢ / 4 to set the minute, then press SET/ DISPLAY. “SET” appears for about 1 second, then the unit enters offtime setting mode.
English Using the Timers (continued) To turn on or off Recording Timer 1 Press CLOCK/TIMER repeatedly until “REC” appears on the display. The REC (Recording Timer) indicator starts flashing. 2 To turn off the Recording Timer, press CANCEL/DEMO. The REC (Recording Timer) and the (Timer) indicators go off from the display (“REC OFF” appears for a while). The Recording Timer is canceled, but the settings for the Recording Timer remain in memory.
English Choice Menu Operations The buttons emphasized in the illustration below are used and explained in the following section (pages 59 to 66). Remote Control This section explains the choice menu operations by using the remote control. • Turn on your TV and select the correct input mode on the TV. If “ ” appears on the TV when you press a button, the disc cannot accept an operation you have tried to do, or data required for that operation is not recorded on the disc. 58 58-66HX-Z77&55[U]6.
English Choice Menu Operations (continued) You can adjust the initial settings through the choice menu on the TV. You can use the choice menu only when the selected source is disc player and its playback is not started. Before operating... • Turn on your TV and select the correct input mode on the TV. • You can use only the remote control for the choice menu operations. • You can change the language used in the choice menu. See page 61.
English 5 Press cursor ∞ / 5 repeatedly to select (highlight) Operating Procedure the desired option. Make sure that the disc player is selected for the source. Ex.: When setting MP3/JPEG. 1 Press CHOICE. PICTURE MONITOR TYPE 4:3 LB SCREEN SAVER ON MP3/JPEG MP3 MP3 JPEG The LANGUAGE menu appears on the TV. LANGUAGE SELECT MENU LANGUAGE ENGLISH AUDIO LANGUAGE ENGLISH SUBTITLE ENGLISH ON SCREEN LANGUAGE ENGLISH ENTER USE TO SELECT. USE ENTER TO CONFIRM TO EXIT, PRESS CHOICE Ex.
English Choice Menu Operations (continued) 7 Language selection menu—LANGUAGE LANGUAGE MENU LANGUAGE ENGLISH AUDIO LANGUAGE ENGLISH SUBTITLE ENGLISH ON SCREEN LANGUAGE ENGLISH You can select “MENU LANGUAGE,” “AUDIO LANGUAGE,” and “SUBTITLE” only before playback. • MENU LANGUAGE Some discs have multiple menu languages. Select one of the languages or language codes from AA to ZU (see “Language Code List” on page 68). • AUDIO LANGUAGE Some discs have multiple audio languages.
English 7 Audio selection menu—AUDIO AUDIO DIGITAL AUDIO OUTPUT STREAM/PCM D. RANGE COMPRESSION AUTO SURROUND SETTING AUTO • SURROUND SETTING You can enjoy the Surround mode simply by playing back a disc when the surround setting is in use—“AUTO” or “ON.” This setting takes effect only when the source is disc player. This setting does not affect DIGITAL AUDIO OUTPUT setting. Select one of the following settings: You can select “DIGITAL AUDIO OUTPUT,” “D.
English Choice Menu Operations (continued) 7 Speaker setting menu—SPK. SETTING 7 Other setting menu—OTHERS OTHERS SPK. SETTING LEVEL RESUME ON DISTANCE ON SCREEN GUIDE ON AV COMPULINK MODE DVD1 PARENTAL LOCK Speaker diagrams Front speakers Center speaker • RESUME You can activate or deactivate the resume play function of the built-in disc player. • You cannot use Resume Play for all CD/MP3/JPEG discs and some DVD/SVCD/VCD discs.
English Restricting the Access Level—Parental Lock 5 Press ENTER. The pop-up window for level setting appears. You can restrict playback of DVD VIDEO containing violent scenes and those unsuitable for your family members. Nobody can play such a disc unless this function is canceled. • You can set the Parental Lock only while a disc is not playing. • This setting takes effect only for a DVD VIDEO containing Parental Lock level information—Level 1 (most restrictive) to Level 8 (least restrictive).
English Choice Menu Operations (continued) 7 Changing the Parental Lock setting 7 Releasing Parental Lock temporarily 1 Press CHOICE, then press cursor 3 / 2 to When you set a strict parental level, some discs may not be played back at all. When you load such a disc and try to play it, the following display appears on the TV. You can release Parental Lock temporarily. display the OTHERS menu. 2 Press cursor ∞ / 5 repeatedly to select (highlight) “PARENTAL LOCK,” then press ENTER.
English Country/Area codes list for Parental Lock AD AE AF AG AI AL AM AN AO AQ AR AS AT AU AW AZ BA BB BD BE BF BG BH BI BJ BM BN BO BR BS BT BV BW BY BZ CA CC CF CG CH CI CK CL CM CN CO CR CU CV CX CY CZ DE DJ DK DM DO DZ EC EE EG EH Andorra United Arab Emirates Afghanistan Antigua and Barbuda Anguilla Albania Armenia Netherlands Antilles Angola Antarctica Argentina American Samoa Austria Australia Aruba Azerbaijan Bosnia and Herzegovina Barbados Bangladesh Belgium Burkina Faso Bulgaria Bahrain Burundi B
English Additional Information Using AV COMPU LINK Control System The AV COMPU LINK control system allows you to use JVC’s TV with simple operations. To use AV COMPU LINK control system, you need to connect this unit and a TV through the AV COMPU LINK terminals. • You can connect to a TV that has AV COMPU LINK II, AV COMPU LINK III or AV COMPU LINK EX terminals.
English Output Signals through the OPTICAL DIGITAL OUTPUT Terminal Output signals differ according to the “DIGITAL AUDIO OUTPUT” setting. (See page 62.
English Additional Information (continued) Glossary Aspect ratio The ratio of vertical and horizontal sizes of a displayed image. The horizontal vs. vertical ratio of conventional TVs is 4:3 and that of wide-screen TVs is 16:9. Component video signal A video signal system where elements necessary for reproducing image signal comprised of the three primary colors of light are transmitted via separate signal lines. Types of signal, such as R/G/ B, Y/PB/PR, etc., are available.
English Maintenance To get the best performance of the unit, keep your discs, tapes, and mechanism clean. Handling discs Handling cassette tapes • Remove the disc from its case by holding it at the edge while pressing the center hole lightly. • Do not touch the shiny surface of the disc, or bend the disc. • Put the disc back in its case after use to prevent warping. • If the tape is loose in its cassette, take up the slack by inserting a pencil in one of the reels and rotating.
English Additional Information (continued) Troubleshooting If you are having a problem with your unit, check this list for a possible solution before calling for service. If you cannot solve the problem from the hints given here, or the unit has been physically damaged, call a qualified person, such as your dealer, for service. Symptom Cause Action Display demonstration automatically restarts in certain intervals. The display demonstration is not yet canceled. Press CANCEL/DEMO on the front panel.
English Specifications Amplifier DVD player Output Power Disc capacity: Readable disc: FRONT SUBWOOFERS: 80 W per channel, min. RMS, driven into 6 Ω at 63 Hz with no more than 10% total harmonic distortion. FRONT MAIN SPEAKERS: 45 W per channel, min. RMS, driven into 6 Ω at 1 kHz with no more than 10% total harmonic distortion. CENTER SPEAKER: 45 W per channel, min. RMS, driven into 8 Ω at 1 kHz with no more than 10% total harmonic distortion. SURROUND SPEAKERS: 25 W per channel, min.
Mains (AC) Line Instruction (not applicable for Europe, U.S.A., Canada, Australia, and U.K.) VOLTAGE SELECTOR CAUTION for mains (AC) line BEFORE PLUGGING IN, do check that your mains (AC) line voltage corresponds with the position of the voltage selector switch provided on the outside of this equipment and, if different, reset the voltage selector switch, to prevent from a damage or risk of fire/electric shock.