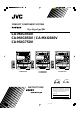
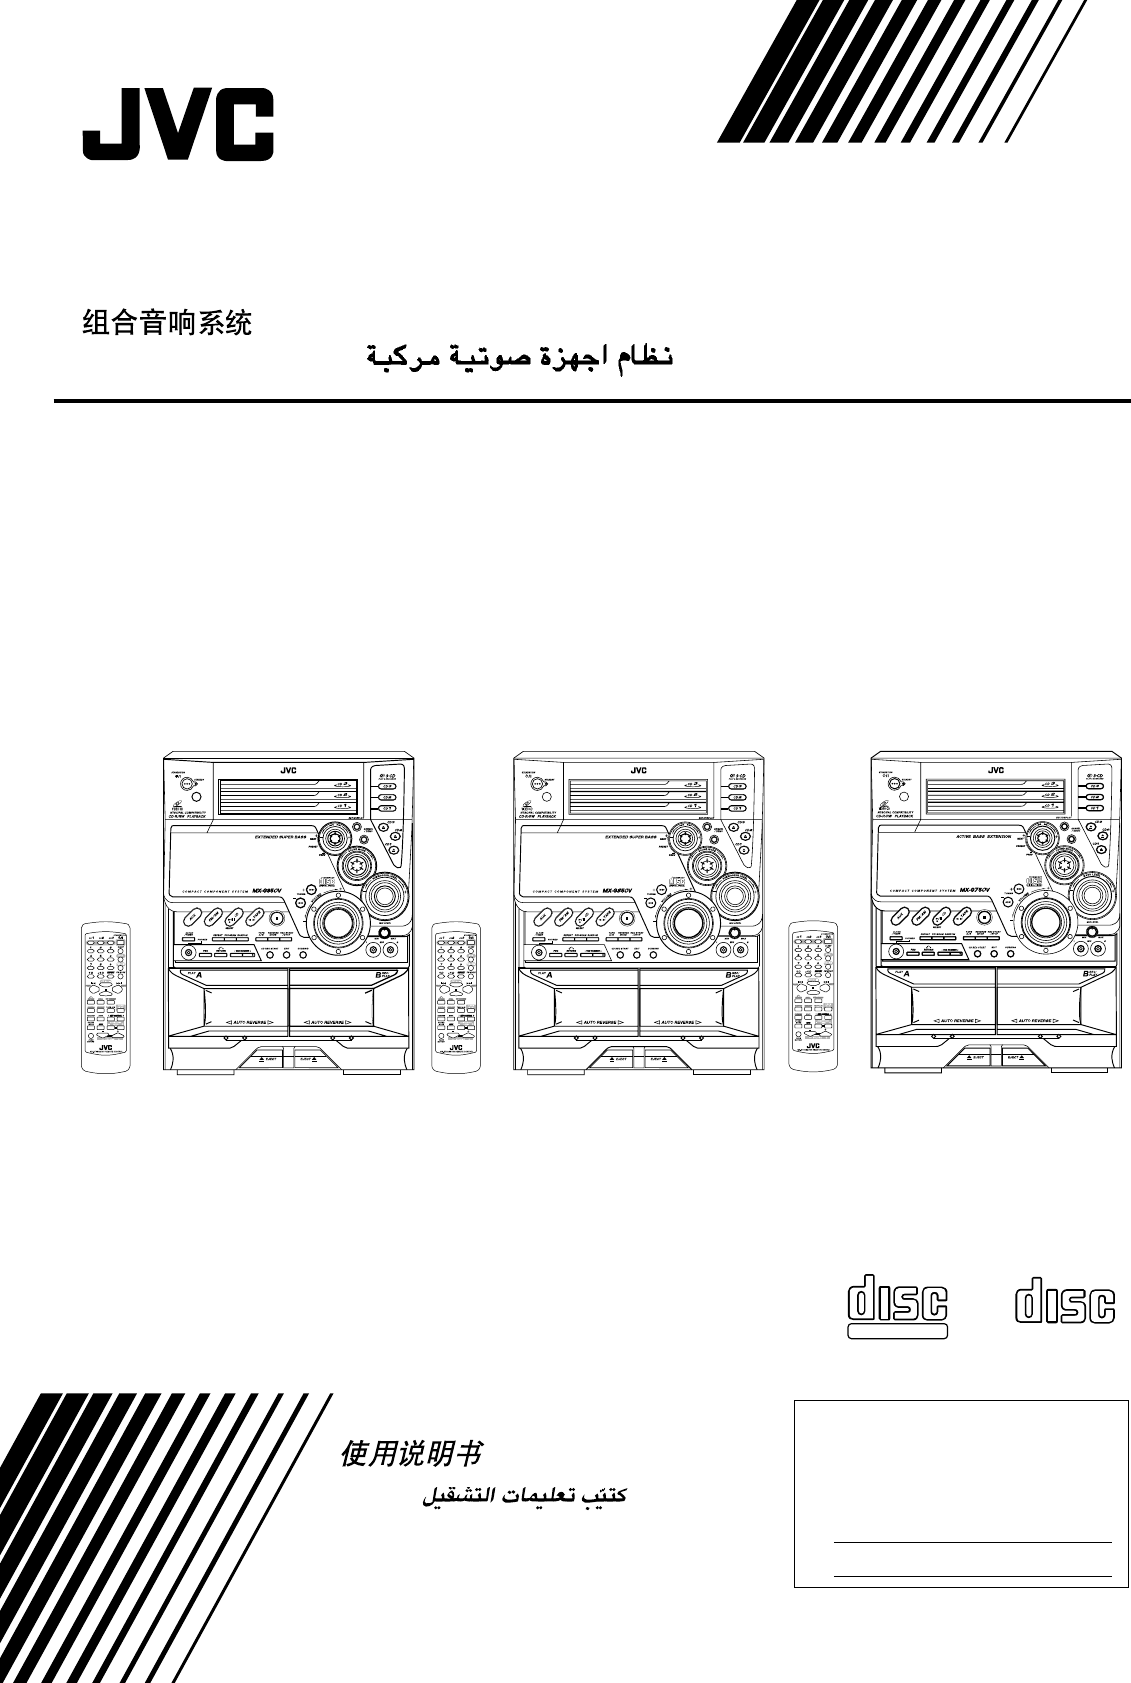
COMPACT COMPONENT SYSTEM CA-MXG950V CA-MXG850V / CA-MXG880V CA-MXG750V CA-MXG950V CA-MXG850V CA-MXG880V CA-MXG750V INSTRUCTIONS COMPACT COMPACT DIGITAL VIDEO DIGITAL AUDIO For Customer Use: Enter below the Model No. and Serial No. which are located either on the rear, bottom or side of the cabinet. Retain this information for future reference. Model No. Serial No.
Warnings, Cautions and Others Caution — STANDBY/ON button! Disconnect the mains plug to shut the power off completely. button in any position does not The STANDBY/ON disconnect the mains line. The power can be remote controlled.
English CAUTION To reduce the risk of electrical shocks, fire, etc.: 1. Do not remove screws, covers or cabinet. 2. Do not expose this appliance to rain or moisture. CAUTION • Do not block the ventilation openings or holes. (If the ventilation openings or holes are blocked by a newspaper or cloth, etc., the heat may not be able to get out.) • Do not place any naked flame sources, such as lighted candles, on the apparatus.
IMPORTANT FOR LASER PRODUCTS / / REPRODUCTION OF LABELS / ➽Ò➴➩➛➻➦ / 1 CLASSIFICATION LABEL, PLACED ON REAR ENCLOSURE CLASS LASER 2 WARNING LABEL, PLACED INSIDE THE UNIT DANGER: Invisible laser radiation when open and interlock failed or defeated. AVOID DIRECT EXPOSURE TO BEAM. (e) 1 PRODUCT VARNING: Osynlig laserstrålning när denna del är öppnad och spärren är urkopplad. Betrakta ej strålen. (s) ADVARSEL: Usynlig laserstråling ved åbning, når sikkerhedsafbrydere er ude af funktion.
English Introduction We would like to thank you for purchasing one of our JVC products. Before operating this unit, read this manual carefully and thoroughly to obtain the best possible performance from your unit, and retain this manual for future reference. About This Manual Moisture condensation Moisture may condense on the lens inside the unit in the following cases: • After starting heating in the room • In a damp room • If the unit is brought directly from a cold to a warm place.
English Contents Location of the Buttons and Controls ....................... 3 MP3 Disc Playback ................................................... 22 Remote Control .......................................................... 3 Front Panel ................................................................. 4 Playing Back Tapes ................................................... 23 Playing Back a Tape ................................................. 23 Locating the Beginning of a Song — Music Scan ...
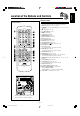
Remote Control Remote Control 1 Disc number buttons (CD1, CD2, and CD3) (15 – 16, 22) Pressing one of these buttons also turns on the unit. 2 Number buttons (13, 15 – 16, 19, 21) 3 4 PREV (reverse search) button (13, 15 – 17, 19 – 20, 22, 23) 4 7 (stop) button (15 – 23) 5 RETURN button (19) 6 STILL button (20) 7 V.
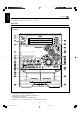
English Continued Become familiar with the buttons and controls on your unit. Front Panel Front Panel Notes: 1. CA-MXG750V: ACTIVE BASS EXTENSION CA-MXG950V/850V/880V: EXTENDED SUPER BASS 2. CA-MXG750V: BASS LEVEL CA-MXG950V/850V/880V: SUBWOOFER LEVEL 3. All illustrations in this manual will be based on CA-MXG950V/880V/850V –4– EN01-13.
English Display Window See pages in the parentheses for details. Front Panel 1 Disc trays 2 STANDBY/ON button and STANDBY lamp (10, 30, 31) 3 Remote sensor 4 PRESET +/– NEXT/PREV control 4 / ¢ (reverse search/forward search) (10, 12 – 13, 15 – 17, 22, 26, 29 – 31) 5 Display window 6 TAPE 2 3 button and lamp (10, 23 – 25) Pressing this button also turns on the unit. 7 CD 3¥8 SELECT (play/pause) button and lamp (10, 15 – 20, 22, 26, 28) Pressing this button also turns on the unit.
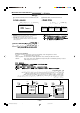
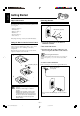
English Getting Started Supplied Accessories Connecting Antennas Make sure that you have all the following items. The number in the parentheses indicates the quantity of the pieces supplied. FM antenna • • • • • • A ENN ANT AM loop antenna (1) FM antenna (1) Remote control (1) Batteries (2) AC plug adaptor (1) Video cord (1) FM antenna (supplied) EXT AM LOOP 5 FM 7 IAL X COA If anything is missing, consult your dealer immediately.
Connecting Speakers AM antenna For Models CA-MXG950V/880V/850V 1 3 Vinyl-covered wire (not supplied) 2 1 Red Speaker cords (red/black) Speaker cords (red/black) Black Black 2 Blue AM loop antenna (supplied) Speaker cords (blue/black) 1 Connect the AM loop antenna to the AM LOOP terminals as illustrated. • If the AM loop antenna wire is covered with vinyl, remove the vinyl by twisting it as shown in the diagram. 2 Turn the AM loop antenna until you have the MAIN best reception.
English Connecting Speakers Surround Speakers For Model CA-MXG750V To connect surround speakers. 1 3 2 Red Speaker cords (red/black) • Connect the right rear speaker to the RIGHT jack. • Connect the left rear speaker to the LEFT jack. Black Red Speaker cords (red/black) Left speaker Right speaker 1 Open the speaker terminals on the rear of the unit. 2 Insert the end of the speaker cord into the terminal.
English Connecting Other Equipment Adjusting the Voltage Selector You can connect both analog and digital equipment. Before plugging in the unit, set the correct voltage for your area with the voltage selector on the rear of the unit. • DO NOT connect any equipment while the power is on. • DO NOT plug in any equipment until all connections are complete.
English Common Operations Turning On or Off the Power To check the clock time Press and hold SET/DISPLAY while playing any source. • Each time you press and hold the button, the source indication and the clock time alternate on the display. To turn on the unit, press STANDBY/ON so that the STANDBY lamp goes off. To adjust the clock again If you have adjusted the clock before, you need to press CLOCK/TIMER repeatedly until the clock setting mode is selected.
Adjusting the Volume Reinforcing the Bass Sound (For G750V) You can adjust the volume level only while the unit is turned on. The volume level can be adjusted in 32 steps (VOL MIN, VOL 01 — VOL 30 and VOL MAX). You can select one of the 4 bass levels. This function only affects the playback sound, but does not affect your recording. The bass levels can be adjusted in 4 steps — BASS OFF, BASS 1, BASS 2 and BASS 3.
English STADIUM: Adds clarity and spreads the sound, like in an outdoor stadium. 3 Adjust the SEA pattern. 1) Turn 4/¢ to select the frequency range to adjust (LOW, MID, HIGH). SEA (Sound Effect Amplifier) modes: ROCK: Boosts low and high frequency. Good for acoustic music. POP: Good for vocal music. CLASSIC: Good for classical music. 2) Press 1 or ¡ to adjust the level (–3 to +3) of the selected frequency range. Manual modes: MANUAL 1/2/3: Your individual mode stored in memory.
Tuning in a Station On the unit ONLY: 1 Press FM/AM. 1 Tune in the station you want to preset. • See “Tuning in a Station.” The unit automatically turns on and tunes in the previously tuned station (either FM or AM). • Each time you press the button, the band alternates between FM and AM. 2 Press SET/DISPLAY. 2 Start searching for stations. On the unit: Press and hold TUNING + or TUNING – for more than 1 second. On the remote control: Press and hold ¢ NEXT or 4 PREV for more than 1 second.
English Playing Back CDs (CD/CD-R/CD-RW) This unit has been designed to playback the following CDs: • CD (Audio CD) • CD-R (CD-Recordable) • CD-RW (CD-ReWritable) Loading CDs On the unit ONLY: 1 Press 0 for the disc tray Continued use of irregular shape CDs (heart-shape, octagonal, etc.) can damage the System. (CD1, CD2 and CD3) you want to load a CD onto. General Notes The unit automatically turns on and the disc tray comes out.
Playing Back the Entire Discs — Continuous Play Basic CD Operations 1 Load CDs. 2 Press one of the disc number To exchange CDs during playback of another While playing a CD, you can do the following operations. Press 0 corresponding to a CD, not playing or selected currently, to eject and exchange the CD. If you exchange CDs during play, the current play will not stop until all CDs you have exchanged are played. buttons (CD1, CD2 and CD3) for the disc you want to play.
English Continued Programming the Playing Order of the Tracks — Program Play 5 Program other tracks you want. You can arrange the order in which tracks play before you start playing. You can program up to 50 tracks. • To use Repeat play (see page 17) for Program play, press REPEAT after starting Program play. • There is a time limit in performing the following steps. If the setting is cancelled before you finish, start from step 2 again. 6 Press CD 3¥8 SELECT.
English Playing at Random — Random Play Repeating Tracks or CDs — Repeat Play The tracks of all loaded CDs will play at random. • To use Repeat play for Random play, press REPEAT after starting Random play. You can have all the CDs, the program or the individual track currently playing repeat as many times as you like. 1 Load CDs. • If the current playing source is not the CD player, press CD 3¥8 SELECT, then 7 before going to the next step. 2 Press RANDOM so that “RANDOM” appears on the display.
English Playing Back Video CDs 4 Repeat steps 1 to 3 to place other CDs. Selecting Video Output (PAL, MULTI, NTSC) You can set this setting in Standby mode. Before playing a VCD, use the buttons on the unit to select a video output mode to match your TV system. Video output is preset for PAL. When you place a CD onto the currently selected tray, whose disc number shown on the CD indicator, reading of the CD starts.
Playing Video CDs with PBC Function — Menu Play This System provides Playback Control (PBC) which utilizes a procedure (menu selection) programmed in a video CD. The playback operation procedure may differ depending on the disc you use. 1 Turn on the TV and select the video input so that you can view the pictures from the CD Player. Refer to the manual supplied for your TV. 2 Prepare a CD. Refer to “Loading Discs” on page 18. 3 Press PBC on the unit.
English Continued 2 Press CD 3¥8 SELECT button to continue Screen-saver • When a menu screen of a karaoke disc is displayed for a few minutes without any selection being made, it automatically starts from the first song. Reminder! Do not paused Video CD for more then 10 minutes to prevent screen burns. Playing Video CDs without PBC — Continuous Play playback from the last scene that you stopped at. NOTE: 1 Resume play will not work when the CD tray has been opened.
English The TV screen will show the following: Viewing highlights • If a highlight scene is not selected while 9 scenes are shown on the TV, highlight scenes of the next track will appear on the display.
English MP3 Disc Playback About MP3 discs An MP3 disc can have several folders (albums). Tracks are contained within the albums. The player will only recognize up to 64 albums. Total number of tracks recognizable is 255. Recording your own MP3 discs • • • • 7 If you press and hold 4 or ¢ (press 4 PREV or ¢ NEXT on the remote control), you can fast search (reverse/forward) within a track. The track elapsed time on the unit’s display will change. 8 Press 7 to stop playing.
English Playing Back Tapes To play both sides repeatedly — Reverse Mode You can playback type I, type II and type IV tapes without changing any settings. Reverse Mode works for both decks at the same time. When it is in use, the tape automatically reverses at the end of a side and the unit starts playing the other side of the tape, and repeats the same process. Playing Back a Tape To use Reverse Mode, press REVERSE MODE so that the Reverse Mode indicator on the display lights up — .
English Recording Recording a Tape on Deck B IMPORTANT: • It may be unlawful to record or play back copyrighted material without the consent of the copyright owner. • The recording level is automatically set correctly, so it is not affected by the VOLUME, the SUBWOOFER LEVEL, and the SOUND MODE controls. Thus, during recording you can adjust the sound you are actually listening to without affecting the recording level.
CD Direct Recording To record on both sides — Reverse Mode Press REVERSE MODE so that the Reverse Mode indicator lights up — . • When using Reverse Mode for recording, start recording in the forward (3) direction first. Otherwise, recording will stop when recording is done only on one side (reverse) of the tape. To cancel Reverse Mode, press the button again so that the Reverse Mode indicator lights up — . Everything on the CD goes onto the tape in the orderlayed out on the CD.
English Auto Edit Recording 3 Press SET/DISPLAY. • Each time you press the button, the tracks to be recorded on the front side (“SIDE-A”) and on the reverse side (“SIDE-B”) alternate. By using Auto Edit Recording, you can record the CD tracks to fit the tape. Auto Edit Recording makes a program by selecting the CD tracks in numerical order. However, to prevent the end of the last track on the front side from being cut off, the last track is selected so as to fit on the remaining tape length.
English Using the Microphones You can enjoy singing along (Karaoke) and microphone mixing using two microphones. • MIC LEVEL adjustment is valid for both microphones connected MIC 1 and MIC 2 jacks. IMPORTANT: • Always set MIC LEVEL to MIN when connecting or disconnecting the microphone. • When not use the microphones, keep them disconnecting. If howling or squealing (feedback) occurs while using the microphone(s) Take the following actions to prevent these noises. • Adjust MIC LEVEL and VOLUME.
English Microphone mixing When you sing along with multiplex tapes or CDs, follow the procedure below: When finished singing Restore the stereo effect by pressing MPX until “NORMAL” appears on the display. 1 Connect the microphone(s). 2 Start playing the source — CD, tape or other Recording Your Singing connected component. You can adjust the music key using the remote control. 3 Turn MIC LEVEL and VOLUME 1 Follow the steps in “Singing Along with as you sing into the microphone(s).
English Using the Timers On the unit ONLY: There are three timers available — Daily Timer, Recording Timer and Sleep Timer. Before using the timers, you need to set the clock built in the unit. (See page 10.) 1 Press CLOCK/TIMER repeatedly until “DAILY” appears on the display. indicator lights up and DAILY (Daily Timer) indicator also starts flashing on the display. Using Daily Timer With Daily Timer, you can wake to your favorite music or radio program.
English Continued 9 Press STANDBY/ON 5 Turn 4 / ¢ to select the source to play, to turn off the unit (on standby) if you have set the Daily Timer with the unit turned on. then press SET/DISPLAY. • The source changes as follows: TUNER FM AUX TUNER AM TAPE – CD –– TUNER FM: tunes into a specified preset FM station. = Go to step 6. TUNER AM: tunes into a specified preset AM station. = Go to step 6. – CD – –: plays a disc from a specified track of a specified disc. = Go to step 6.
4 Set the on-time you want the Using Recording Timer unit to turn on at. With Recording Timer, you can make a tape of a radio broadcast automatically. You can set the timer whether the system is on or off. 1) Turn 4/¢ to set the hour, then press SET/DISPLAY. 2) Turn 4/¢ to set the minute, then press SET/ DISPLAY. “OFF TIME” appears for 2 seconds, then the unit enters offtime setting mode.
English To turn on or off Recording Timer after its setting is done Timer Priority 1 Press CLOCK/TIMER repeatedly until “REC” appears on the display. Since each timer can be set separately, you may wonder what happens if the settings for these timers overlap. Here are examples. 2 To turn off the Recording Timer, press CANCEL/DEMO. The REC (Recording Timer) indicator goes off from the display. The Recording Timer is cancelled, but the setting for the Recording Timer remains in memory.
English Maintenance To get the best performance of the unit, keep your discs, tapes, and mechanism clean. Handling discs Handling cassette tapes • Remove the disc from its case by holding it at the edge while pressing the center hole lightly. • Do not touch the shiny surface of the disc, or bend the disc. • Put the disc back in its case after use to prevent warping. • If the tape is loose in its cassette, take up the slack by inserting a pencil in one of the reels and rotating.
English Troubleshooting If you have a problem with your unit, check this list for a possible solution before calling for service. If you cannot solve the problem from the hints given here, or the unit has been physically damaged, call a qualified person, such as your dealer, for service. Symptom Cause Action Unable to cancel the display demonstration. Other buttons will pressed to cancel the display demonstration. Press CANCEL/DEMO on the unit. (See page 9.) No sound is heard.
Specifications CA-MXG950V (Silver Colour) Amplifier section CA-MXG850V (Silver Colour) CA-MXG880V (Gold Colour) Amplifier section Output Power SUBWOOFERS: Output Power 88 W per channel, min. RMS, both channels SUBWOOFERS: 68 W per channel, min. RMS, both channels driven into 6 Ω at 63 Hz with no more than driven into 6 Ω at 63 Hz with no more than 0.9% total harmonic distortion. 0.9% total harmonic distortion. MAIN SPEAKERS: 28 W per channel, min. RMS, both channels MAIN SPEAKERS: 22 W per channel, min.
Mains (AC) Line Instruction (not applicable for Europe, U.S.A., Canada, Australia, and U.K.) ANTENNA AM EXT AM LOOP FM 75 COAXIAL CD OPTICAL DIGITAL OUTPUT IMPORTANT for mains (AC) line BEFORE PLUGGING IN, do check that your mains (AC) line voltage corresponds with the position of the voltage selector switch provided on the outside of this equipment and, if different, reset the voltage selector switch, to prevent from damage or risk of fire/electric shock.
INSTRUCTIONS SPEAKER SYSTEM SP-MXG950V Consists of SP-XG950V, SP-WG950V and SP-XSG950V MANUAL DE INSTRUCCIONES: SISTEMA DE ALTAVOCES 说明书∶扬声器系统 U UL « ÂUE ∫ ULOKF « qO œ INSTRUÇÕES: SISTEMA DE ALTIFALANTES This system consists of the following systems: 这一系统由下列系统组成∶ Este sistema se compone de los cuatro siguientes: ∫WO U² « WLE½_« s ÂUEM « «c¼ ÊuJ²¹ Este equipamento compõe-se dos seguintes sistemas: MAIN SPEAKER SYSTEM : SP-XG950V SUBWOOFER : SP-WG950V SURROUND SPEAKER SYSTEM : SP-XSG950V 主扬声器系
Thank you for purchasing JVC speakers. Before you begin using them, please read the instructions carefully to be sure you get the best possible performance. If you have any questions, consult your JVC dealer. 感谢您惠购 JVC 扬声器。 在开始使用之前,请您仔细阅读本使用说明书,以确保您获得扬声 器的最佳性能。如有疑问,请与 JVC 代理销售商联系。 Le estamos muy agradecidos por haber adquirido estos altavoces de JVC. Antes de utilizarlos, sirvase leer las instrucciones detenidamente a fin de obtener el mejor rendimiento posible.
MAIN SPEAKER SYSTEM : SP-XG950V SUBWOOFER : SP-WG950V MAIN SPEAKER SYSTEM : SP-XG950V SUBWOOFER : SP-WG950V 主扬声器系统:SP-XG950V 重低音扬声器:SP-WG950V SISTEMA DE ALTAVOZ PRINCIPAL : SP-XG950V SUBWOOFER : SP-WG950V SP-XG950V WO U _« SP-WG950V ∫ wŽdH « WCOH)« UŽUL « ÂUE½ «œœd² « —UN− SISTEMA DE ALTO-FALANTE PRINCIPAL : SP-XG950V SUBWOOFER : SP-WG950V SPEAKER FOR A/V COMBINATION A/V 组合扬声器 SP-XG950V and SP-WG950V have a magnetically-shielded design for placement adjacent to TV’s and monitors without causing co
Connection Conexión Ligaçao 连接 qO u « CONNECTION Subwoofer (Right Side) Subwoofer (Lado derecho) Subwoofer (Lado direito) 重低音扬声器 (右侧) Main Speaker (Right Side) Altavoz principal (Lado derecho) Alto-falante principal (Lado direito) 主扬声器 (右侧) Main Speaker (Left Side) Altavoz principal (Lado izquierdo) Alto-falante principal (Lado esquerdo) 主扬声器 (左侧) Subwoofer (Left Side) Subwoofer (Lado izquierdo) Subwoofer (Lado esquerdo) 重低音扬声器 (左侧) wŽdH « WCOH)« «œœd² « —UN− ©s1_« V½U'«® WO Ozd « WŽUL « ©s1_« V½U
CONEXIÓN LIGAÇÃO • NO utilice ningún otro amplificador para operar este sistema de altavoces excepto CA-MXG950V. • Desactive la alimentación de todo el sistema antes de conectar los altavoces al amplificador. • La capacidad máxima de potencia del altavoz principal SP-XG950V es de 50 W, y del Subwoofer es de 130 W.
接线 qO u « • 请勿使用其他放大器操作 CA-MXG950V 以外的扬声器系统。 q¹œuLK ¡UM¦²ÝUÐ «c¼ UŽUL « ÂUE½ qOGA² dš¬ u rdC qLF² ð ô • ÆCA-MXG950V ÆrdC*UÐ UŽUL « qO uð q³; ÂUEM « qJ W;UD « qB(« • ¨ «Ë µ∞ u¼ SP-XG950V q¹œuLK WŽUL K W;UDK ÈuBI « qLײ « WFÝ • Ò v « ÍœROÝ bz«e « qšb « Æ «Ë ±≥∞ u¼ w U ô« WCOH)« «œœd² « —UN− ÆnKð ÀËbŠ WO½UJ «Ë –Uý g¹uAð u v²Š ¨ UŽUL « vKŽ ÁU½œ√ W(u u*« «—Uýô« UNO( o³DMð w² « ôU(« w( ‚dŠË «bz« Î “ ÎöLŠ V³ ð b; UN½U( ¨tÐ ÕuL qšœ vB;√ ÊËœ «—Uýô« X½U4 ÆÎU bI rdC*« u …—UNł iOHdð s b4Qð «cN Æ
SURROUND SPEAKER SYSTEM SURROUND SPEAKER SYSTEM : SP-XSG950V 环绕扬声器系统∶SP-XSG950V SP-XSG950V WÞUŠù« u UŽULÝ ÂUE½ SISTEMA DE ALTAVOCES PERIMÉTRICOS : SP-XSG950V SISTEMA DE COLUNAS SURROUND : SP-XSG950V HOW TO INSTALL SURROUND SPEAKERS 如何安装环绕立体声扬声器 • This equipment is not magnet-proof. If it is placed near a TV set, color on a TV screen may become uneven. If the case of installation, therefore, locate it at sufficient distance from the TV set.
Amplifier Connection Conexión del amplificador Ligação do amplificador 放大器连接 r&C*U( U UL « qO u « Surround speakers Altavoces peromètricos Colunas surround 环绕扬声器 CONNECTION A pin plug is attached to the tip of the speaker cord. If the speaker connection terminal on the amplifier to which the speaker is to be connected is a pin jack, connect the left-hand speaker’s lead to the left terminal, and the right-hand speaker’s lead to the right terminal.
CONEXIÓN LIGAÇÃO Una clavija monopolar está fijada al extremo del cordón del altavoz. Si el terminal de conexión para altavoz en el amplificador al cual se conectará el altavoz es un jack monopolar, conecte el cable del altavoz izquierdo al terminal izquierdo, y el cable de altavoz derecho al terminal derecho. • Desactivar la alimentación de todo el equipo antes de conectar el altoparlante al amplificador. • La impedancia nominal des SP-XSG950V es de 16 ohmios.
连接 qO u « 扬声器软线尖头装有插脚式插头。如果放大器上的用以连接扬声器 的扬声器连接端子为插脚式插孔,将左侧扬声器导线连接到左端 子,将右侧扬声器导线连接到右端子。 • 在将扬声器连接到放大器上之前,要关断所有设备的电源。 • SP-XSG950V 的额定阻抗为 16Ω(欧姆)。请将它们连接到带 有 16Ω(欧姆)扬声器的负荷阻抗的放大器。 • 最大储备功率如规格中所示。 过大的功率输入扬声器将会造成异常噪声,甚至可能导致扬声器 损坏。 下述情况可能会引起扬声器超载。此时,务请预先调低放大器的 音量。 1) 在作 FM 调谐中,发生噪声。 2) 磁带录音机的快进绕模式中产生的含有高频部分的高电平信 号。 3) 开关其他组成机电源时产生的喀嗒噪声。 4) 接通着电源的组成机间的接线或拆卸接线时产生的喀嗒噪声。 5) 接通着电源更换卡声时产生的喀嗒噪声。 6) 操作放大器开关时产生的喀嗒噪声。 7) 连续的高频振荡音或高音电子乐器产生的声音。 8) 使用麦克风时出现啸叫声或反馈声 ·dÞ ÊU4 «–≈ ÆdO³J² « WŽULÝ pKÝ ·dÞ w( wÝuÐœ fÐU; XO³¦ð “«dÞ
11
VICTOR COMPANY OF JAPAN, LIMITED EN. SP. PR. CH. AR.
INSTRUCTIONS SPEAKER SYSTEM SP-MXG850V/SP-MXG880V Consists of SP-XG850V/SP-XG880V and SP-WG850V/SP-WG880V MANUAL DE INSTRUCCIONES: SISTEMA DE ALTAVOCES INSTRUÇÒES: SISTEMA DE ALTIFALANTES 说明书∶扬声器系统 U UL « ÂUEM ∫ ULOKF « qO œ Thank you for purchasing JVC speakers. Before you begin using them, please read the instructions carefully to be sure you get the best possible performance. If you have any questions, consult your JVC dealer. Gratos pela aquisição dos altifalantes JVC.
SPEAKER FOR A/V COMBINATION A/V 组合扬声器 SP-XG850V/SP-XG880V and SP-WG850V/SP-WG880V have a magnetically-shielded design for placement adjacent to TV’s and monitors without causing color aberrations. However, color may be affected as a result of how the speaker system is installed. Therefore, be careful of the following: 1. When placing these speakers near a TV set, turn off the TV’s main power switch or unplug it before installing the speakers.
Connection Conexión Ligaçao 接线 CONNECTION • DON’T use other amplifier to operate this speaker system except for CA-MXG850V/CA-MXG880V. • Turn off power to the whole system before connecting the speakers to the amplifier. • The maximum power handling capacity of the SP-MXG850V/SPMXG880V main speaker is 40 W/Subwoofer is 120 W. Excessive input will result in abnormal noise and possible damage.
CONEXIÓN LIGAÇÃO • NO utilice ningún otro amplificador para operar este sistema de altavoces excepto CA-MXG850V/CA-MXG880V. • Desactive la alimentación de todo el sistema antes de conectar los altavoces al amplificador. • La capacidad máxima de potencia del altavoz principal del SPMXG850V/SP-MXG880V es de 40 W y la del altavoz de subgraves es de 120 W.
接线 qO u « q¹œuLK ¡UM¦²ÝUÐ «c¼ UŽUL> « ÂUE½ qOGA² dš¬ uY rbC& qLF²>ð ô • ÆCA-MXG850V/CA-MXG880V ÆrbC*UÐ UŽUL> « qOYuð q³! ÂUEM « qJ W!UD « qB « • UŽUL> « ÂUEM WO>Ozd « WŽUL> « qOGA² …—bIK WFÝ vB!√ • «œœd²K wŽdH « —UN−LK Ë ◊«Ë ¥∞ w¼ SP-MXG850V/SP-MXG880V WO½UJ&«Ë –Uý g¹uAð v « ÍœROÝ bz«e « qšb « Æ◊«Ë ±≤∞ w¼ WCHbM*« ÆnKð ÀËbŠ u v²Š ¨ UŽUL> « vKŽ ÁU½œ√ W uYu*« «—Uýô« UNO o³DMð w² « ôU(« w ‚dŠË «bz« Î “ ÎöLŠ V³>ð b! UN½U ¨tÐ ÕuL>& qšœ vB!√ ÊËœ «—Uýô« X½U' ÆÎU&bI& rbC*« uY …—UNł iOHbð s& b'Qð «cN Æ UŽU
VICTOR COMPANY OF JAPAN, LIMITED EN. SP. PR. CH. AR.
INSTRUCTIONS SPEAKER SYSTEM SP-MXG750V MANUAL DE INSTRUCCIONES: SISTEMA DE ALTAVOCES INSTRUÇÒES: SISTEMA DE ALTIFALANTES 说明书∶扬声器系统 U UL « ÂUEM ∫ ULOKF « qO œ Thank you for purchasing JVC speakers. Before you begin using them, please read the instructions carefully to be sure you get the best possible performance. If you have any questions, consult your JVC dealer. Gratos pela aquisição dos altifalantes JVC.
SPEAKER FOR A/V COMBINATION A/V 组合扬声器 SP-MXG750V has a magnetically-shielded design for placement adjacent to TV’s and monitors without causing color aberrations. However, color may be affected as a result of how the speaker system is installed. Therefore, be careful of the following: 1. When placing these speakers near a TV set, turn off the TV’s main power switch or unplug it before installing the speakers. Wait at least 30 minutes after the system is installed before turning on the TV’s power. 2.
Connection Conexión Ligaçao 接线 CONNECTION • DON’T use other amplifier to operate this speaker system except for CA-MXG750V. • Turn off power to the whole system before connecting the speakers to the amplifier. • The maximum power handling capacity of the SP-MXG750V is100W. Excessive input will result in abnormal noise and possible damage.
CONEXIÓN LIGAÇÃO • NO utilice ningún otro amplificador para operar este sistema de altavoces excepto CA-MXG750V. • Desactive la alimentación de todo el sistema antes de conectar los altavoces al amplificador. • La potencia máxima admisible del SP-MGX750V es de 100W. En casos donde las señales descritas más abajo se apliquen a los altavoces, aunque las mismas resulten menores que la entrada máxima permisible, pueden causar una sobrecarga y quemar el cableado de los altavoces.
接线 qO u « q¹œuLK ¡UM¦²ÝUÐ «c¼ UŽUL= « ÂUE½ qOGA² dš¬ uY rbC& qLF²=ð ô • ÆCA-MXG750V ÆrbC*UÐ UŽUL= « qOYuð q³! ÂUEM « qJ W!UD « qB « • qšb « Æ «Ë ±∞∞ w¼ SP-MXG750V q¹œuLK ÈuBI « …—bI « qL% Ò WFÝ • ÆnKð ÀËbŠ WO½UJ&«Ë –Uý g¹uAð v « ÍœROÝ bz«e « u v²Š ¨ UŽUL= « vKŽ ÁU½œ√ W uYu*« «—Uýô« UNO o³DMð w² « ôU(« w ‚dŠË «bz« Î “ ÎöLŠ V³=ð b! UN½U ¨tÐ ÕuL=& qšœ vB!√ ÊËœ «—Uýô« X½U' ÆÎU&bI& rbC*« uY …—UNł iOHbð s& b'Qð «cN Æ UŽUL= « „öÝ« ÆFM Y³ « WH «u& ¡UMŁ√ g¹uAð ©± XOÝU' “UNł sŽ W&U½ ‰UŽ œœdð U³'d& Íu% lHðd& È
VICTOR COMPANY OF JAPAN, LIMITED EN. SP. PR. CH. AR.