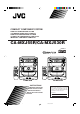
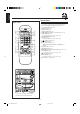
COMPACT COMPONENT SYSTEM KOMPAKT-KOMPONENTEN-SYSTEM SYSTEME DE COMPOSANTS COMPACT KOMPACTO KOMPONENTEN-SYSTEEM SISTEMAS DE COMPONENTES COMPACTOS IMPIANTO A COMPONENTI COMPATTO CA-MXJ55R/CA-MXJ530R COMPACT DIGITAL AUDIO CD3 STANDBY CD 2 COMPACT CD 2 CD1 COMPACT VOLUME VOLUME + SOUND MODE + PHONES – PANEL OPEN / CLOSE – PANEL OPEN / CLOSE TAPE CD AUX FM / AM COMPU PLAY S. A.
Warnings, Cautions and Others / Warnung, Achtung und sonstige Hinweise /Mises en garde, précautions et indications diverses /Waarschuwingen, voorzorgen en andere mededelingen/Avisos, precauciones y otras notas / Avvertenze e precauzioni da osservare IMPORTANT for the U.K. DO NOT cut off the mains plug from this equipment.
English ATTENZIONE Per ridurre il rischio di shock elettrici, incendi, ecc... 1. Non togliete viti, coperchi o la scatola. 2. Non esponete l'apparecchio alla piogggia e all'umidità. Caution –– switch! Disconnect the mains plug to shut the power off completely. The switch in any position does not disconnect the mains line. The power can be remote controlled. Achtung –– -Schalter! Den Netzstecker aus der Steckdose ziehen, um die Stromversorgung vollkommen zu unterbrechen.
Caution: Proper Ventilation Voorzichtig: Goede ventilatie vereist To avoid risk of electric shock and fire, and to prevent damage, locate the apparatus as follows: 1 Front: No obstructions and open spacing. 2 Sides/ Top/ Back: No obstructions should be placed in the areas shown by the dimensions below. 3 Bottom: Place on the level surface. Maintain an adequate air path for ventilation by placing on a stand with a height of 10 cm or more.
IMPORTANT FOR LASER PRODUCTS/ WICHTIGER HINWEIS FÜR LASER-PRODUKTE / IMPORTANT POUR LES PRODUITS LASER / BELANGRIJKE INFORMATIE VOOR LASERPRODUKTEN / IMPORTANTE PARA LOS PRODUCTOS LÁSER / IMPORTANTE PER I PRODOTTI LASER REPRODUCTION OF LABELS/ANBRINGUNGSORTE FÜR LASER-PRODUKTE/REPRODUCTION DES ETIQUETTES/VERKLARING VAN DE LABELS/REPRODUCCIÓN DE ETIQUETAS/RIPRODUZIONE DELLE ETICHETTE 1 CLASSIFICATION LABEL, PLACED ON REAR ENCLOSURE 2 WARNING LABEL, PLACED INSIDE THE UNIT 1 KLASSIFIKATIONSETIKETTE AN DER RÜ
English Introduction We would like to thank you for purchasing one of our JVC products. Before operating this unit, read this manual carefully and thoroughly to obtain the best possible performance from your unit, and retain this manual for future reference. About This Manual Power sources This manual is organized as follows: • When unplugging from the wall outlet, always pull the plug, not the AC power cord. • The manual mainly explains operations using the buttons and controls on the unit.
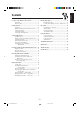
English Contents Location of the Buttons and Controls ....................... 3 Playing Back Tapes ................................................... 18 Front Panel ................................................................. 4 Remote Control .......................................................... 5 Playing Back a Tape ................................................. 18 Locating the Beginning of a Song — Music Scan ... 18 Getting Started .......................................................
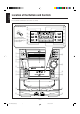
English Location of the Buttons and Controls Become familiar with the buttons and controls on your unit. Powered Rolling Panel h j k i o PANEL OPEN / CLOSE PRESET REC START/STOP TUNING PROGRAM / RANDOM ; l DUBBING REVERSE MODE TIMER /CLOCK a Press PANEL OPEN/ CLOSE to open the panel. To close the panel, press the button again. SEA CONTROL CD REC START SET DEMO DISPLAY SOUND MODE CANCEL / DECK A/B DISPLAY MODE s d f g S. A.
Display Window 1 2 3 4 5 SOUND MODE 1 2 REPEAT ALL 1CD PROGRAM RANDOM 1 5 9 13 3 SLEEP DAILY REC STEREO MONO A B REC p EON TA NEWS INFO 9 kHz MHz 8 7 2 6 10 14 3 7 11 15 4 8 12 16 6 See pages in the parentheses for details. Front Panel 1 2 3 4 5 6 7 8 9 p q w e r t y u Disc trays (standby/on) button and STANDBY lamp (9) Display window Remote sensor PANEL OPEN/CLOSE button (9) Pressing this button also turns on the unit.
English Remote Control Remote Control 1 2 3 q SOUND MODE S. A. BASS SLEEP DISPLAY MODE PTY/EON w e – SELECT + TAPE A 4 TAPE B 5 r REC PAUSE 6 FM MODE t 7 y 8 + u – i o FADE MUTING 9 p ; RM–SMXJ55R REMOTE CONTROL 1 Disc number buttons (CD 1, CD 2, and CD 3) (15) Pressing one of these buttons also turns on the unit. 2 S. A.
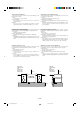
Continued Unpacking Connecting Antennas After unpacking, check to be sure that you have all the following items. The number in the parentheses indicates the quantity of the pieces supplied. FM antenna • • • • A ENN ANT FM antenna (supplied) GND OP LO EXT AM AM loop antenna (1) FM antenna (1) Remote control (1) Batteries (2) 5 FM 7 IAL X COA If any is missing, consult your dealer immediately.
English Connecting Speakers AM (MW/LW) antenna You can connect a pair of front speakers, and one subwoofer. 1 2 3 To connect front speakers 2, 3 1 ANTENNA Vinyl-covered wire (not supplied) GND AM LOOP AM EXT Red FM 75 COAXIAL SPEAKERS Speaker cord RIGHT Speaker cord LEFT Black AM loop antenna (supplied) 1 Connect the AM loop antenna to the AM LOOP terminals as illustrated. 2 Turn the AM loop antenna until you have the Right speaker best reception.
English To connect a subwoofer To connect audio equipment with an optical digital input terminal By connecting a subwoofer, you can enhance the bass. You can record CD sound onto the connected digital equipment.
English Common Operations Setting the Clock Turning On the Power and Selecting the Sources Before operating the unit any further, first set the clock built in this unit. 1 Press PANEL OPEN/CLOSE. When you press the play button for a particular source (FM/ AM, CD 6, AUX, and TAPE 2 3), the unit turns on, and the Powered Rolling Panel opens automatically (and the unit starts playing the source if it is ready — COMPU PLAY CONTROL).
English Continued Adjusting the Volume Reinforcing the Bass Sound You can adjust the volume level only while the unit is turned on. The Signal Adaptive Bass function provided for this unit can enhance the bass sound while listening to any source at low volume. You can use this function only for playback. Turn VOLUME clockwise to increase the volume or counterclockwise to decrease it. VOLUME + To turn on the function, press S. A. BASS repeatedly until “SA-BASS1” or “SA-BASS2” appears on the display.
English Surround modes *: D.CLUB: Increases resonance and bass. HALL: Adds depth and brilliance to the sound. STADIUM: Adds clarity and spreads the sound, like in an outdoor stadium. SEA modes: ROCK: POP: CLASSIC: 1) Press 4 or ¢ to select the frequency range to adjust (LOW, MID, HIGH). PRESET TUNING 2) Press 1 or ¡ to adjust the level (–3 to +3) of the selected frequency range. Boosts low and high frequency. Good for acoustic music. Good for vocal music. Good for classical music.
English Listening to FM and AM (MW/LW) Broadcasts AM FM Tuning in a Station 2 Press SET. SEA CONTROL SET On the unit ONLY: 1 Press FM/AM. FM / AM The unit automatically turns on and tunes in the previously tuned station (either FM or AM – MW/LW). The Powered Rolling Panel automatically opens. • Each time you press the button, the band alternates between FM and AM (MW/LW). 2 Press and hold TUNING – / + for 3 Press PRESET – / + to select a PRESET preset number. TUNING 4 Press SET again.
English Receiving FM Stations with RDS RDS allows FM stations to send an additional signal along with their regular program signals. For example, the stations send their station names, as well as information about what type of program they broadcast, such as sports or music, etc. When tuned to an FM station which provides the RDS service, the RDS indicator lights up on the display.
Switching to a Program Type of Your Choice Temporarily How the EON function actually works: By receiving EON data sent by FM RDS stations, the EON function allows the unit to switch temporarily to a broadcast program of your choice (TA, NEWS, and INFO) from a different station. The EON function only works when you are listening to a preset FM RDS stations providing EON data. • The EON indicator lights while receiving a station with EON data.
English Playing Back CDs Loading CDs Playing Back the Entire Discs — Continuous Play 1 Press 0 for the disc tray (CD 1 to You can play CDs continuously. 3) you want to load a CD onto. 1 Load CDs. 2 Press one of the disc number The unit automatically turns on and the disc tray comes out. The Powered Rolling Panel also opens automatically. CD3 CD2 buttons (CD 1, CD 2, and CD 3) for the disc you want to play. 2 Place a disc correctly on the circle of the disc tray, with its label side up.
TUNING To locate a particular point in a track • Each time you press the button, CD play mode changes as follows: During play, press and hold 1 or ¡. • 1: Fast reverses the disc. • ¡: Fast forwards the disc. When using the remote control, press and hold 1 / 4 or ¢ / ¡. Program Play Random Play Continuous Play 3 Press one of the disc number To go to another track CD3 buttons (CD 1, CD 2, and CD 3) to select the disc number you want to play.
English To check the program contents Before playing, you can check the program contents by pressing 1 / 4 or ¢ / ¡ on the remote control. • ¢ / ¡: Shows the programed tracks in the programed order. • 1 / 4: Shows them in the reverse order. To modify the program DEMO Before play, you can erase the programed tracks CANCEL shown on the display by pressing CANCEL. • Each time you press the button, the programed track shown on the display is erased from the program.
English Playing Back Tapes You can play back type I, type II, and type IV tapes without changing any settings. Playing Back a Tape To play both sides repeatedly — Reverse Mode Reverse Mode works for both decks at the same time. When it is in use, the tape automatically reverses at the end of a side and the unit starts playing the other side of the tape, and repeats the same process.
English Recording Recording Tapes on Deck B IMPORTANT: • It may be unlawful to record or play back copyrighted material without the consent of the copyright owner. • The recording level is automatically set correctly, so it is not affected by the VOLUME control. Thus, during recording you can adjust the sound you are actually listening to without affecting the recording level. • While recording, you can hear sound modes and/or the Signal Adaptive Bass effect through the speakers or headphones.
To stop recording temporarily (except when the playback source is deck A), press REC PAUSE on the remote control. To resume recording, press TAPE 2 3. CD Direct Recording REC PAUSE Everything on the CD goes onto the tape in the order it is on the CD, or according to the order you have made for Program play. To remove the cassette, press EJECT 0 for deck B. To record on both sides — Reverse Mode 1 Put a recordable cassette into deck B.
English Auto Edit Recording 5 Put a recordable cassette of appropriate By using Auto Edit Recording, you can record the CD tracks to fit the tape. Auto Edit Recording makes a program by selecting the CD tracks in numerical order. However, to prevent the end of the last track on the front side from being cut off, the last track is selected so as to fit on the remaining tape length. length into deck B. 6 Press REVERSE MODE so that the Reverse Mode indicator lights up as .
Using the Timers 3 Set the on-time you want the unit There are three timers available — Recording Timer, Daily Timer, and Sleep Timer. English Continued PRESET to turn on. 1) Press 4 or ¢ to set the hour, then press SET. 2) Press 4 or ¢ to set the minute, then press SEA CONTROL SET. SET “OFF TIME” appears for 2 seconds, then the unit enters off-time setting mode. Before using the timers, you need to set the clock built in the unit. (See page 9.
English 6 When selecting “– CD – – –” 1) Press 4 or ¢ to select the disc number, then press SET. 2) Press 4 or ¢ to set the track number, then press SET. The unit enters volume setting mode. When selecting “TUNER FM” or “TUNER AM” Using Recording Timer PRESET With Recording Timer, you can make a tape of a radio broadcast automatically. SEA CONTROL SET Press 4 or ¢ to select the preset station number, then press SET. The unit enters volume setting mode.
English ZZ Z. .. 4 Set the on-time you want the unit Using Sleep Timer PRESET to turn on. 1) Press 4 or ¢ to set the hour, then press SET. 2) Press 4 or ¢ to set the minute, then press SET. “OFF TIME” appears for 2 seconds, then the unit enters off-time setting mode. 5 Set the off-time you want the unit With Sleep Timer, you can fall asleep to music. You can set Sleep Timer when the unit is turned on.
English Additional Information Description of the PTY codes: FINANCE: Stock Market reports, commerce, trading etc. CHILDREN: Programs targeted at a young audience. NEWS: News. SOCIAL A: AFFAIRS: Topical program expanding or enlarging upon the news — debate, or analysis. RELIGION: Religious programs. INFO: Program the purpose of which is to impart advice in the widest sense. PHONE IN: Involving members of the public expressing their views either by phone or at a public forum.
? Troubleshooting ? ? If you are having a problem with your unit, check this list for a possible solution before calling for service. If you cannot solve the problem from the hints given here, or the unit has been physically damaged, call a qualified person, such as your dealer, for service. Symptom Cause Action No sound is heard. Connections are incorrect or loose. Check all connections and make corrections. (See pages 6 to 8.) Hard to listen to broadcasts because of noise.
VICTOR COMPANY OF JAPAN, LIMITED V EN, GE, FR, NL, SP, IT Cover-MXJ55R/J530R[E]/2 6 J 99.2.